
Imagine a sensor node sitting in a paddy field 3 km from the nearest building, measuring soil moisture, temperature, and humidity every 15 minutes — for years — without ever needing a battery change. That’s what a solar-powered LoRa wireless sensor node delivers. LoRa (Long Range) radio achieves 3–15 km range in open terrain using less power than a Bluetooth handshake, and a 6V/2W solar panel paired with a small LiPo is enough to run the system perpetually even through cloudy Indian monsoon seasons.
This project guide covers everything: hardware selection, power budget calculation, firmware for deep sleep duty cycling, LoRa packet design, and weatherproof enclosure strategies. Whether you’re building an agricultural monitor, a forest fire early-warning node, or a water-level station for flood-prone rivers, this blueprint applies directly.
System Architecture Overview
A LoRa field monitoring network has three layers:
- End Nodes (this project): Battery + solar powered. Sleep 99% of the time. Wake, read sensors, transmit 10–30 bytes over LoRa, sleep again.
- Gateway: Mains or solar powered. Receives LoRa packets from all nodes, forwards to cloud or local server over WiFi/Ethernet/4G.
- Application Server: TTN (The Things Network), ChirpStack self-hosted, or a simple MQTT broker on a Raspberry Pi.
For a farm monitoring application, a single gateway on the farmhouse rooftop covers an entire 100-acre farm with 20–30 sensor nodes. The LoRaWAN protocol handles multi-node time division automatically.
The Indian regulatory environment: LoRa operates on the 865–867 MHz band in India (AS923 or IN865 regional parameters). Duty cycle: max 1% (36 seconds per hour). This perfectly matches our 15-minute transmission interval with a 2-second air time for a 20-byte packet.
Hardware Components and Wiring
Core components for one node:
- Microcontroller: ESP32 (with deep sleep to 10–20 µA) or ATmega328P + RFM95W module
- LoRa module: RYLR998 (UART) or SX1276/RFM95W (SPI) — both work at 868 MHz
- Solar panel: 6V 2W (166mA peak) — adequate for India’s irradiance levels
- Solar charger IC: TP4056 with protection, or CN3791 (for MPPT)
- LiPo battery: 3.7V 3000mAh (11.1 Wh) — 2–3 weeks of autonomy without sun
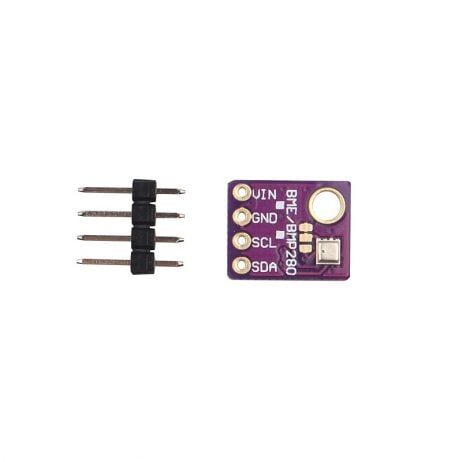
- Sensors: BME280 (temperature + humidity + pressure) + capacitive soil moisture
- Voltage divider: 100k + 100k for battery voltage monitoring via ADC
Wiring for ESP32 + RFM95W:
RFM95W → ESP32
  NSS  → GPIO5  (CS)
  SCK  → GPIO18
  MOSI → GPIO23
  MISO → GPIO19
  DIO0 → GPIO26  (TX done / RX done interrupt)
  RST  → GPIO14
  3.3V → 3.3V
  GND  → GND

BME280 (I2C) → ESP32
  SDA  → GPIO21
  SCL  → GPIO22
  VCC  → 3.3V (only powered during read)

Soil Moisture → ESP32
  AO   → GPIO34 (ADC)
  VCC  → GPIO25 (switched via GPIO to avoid idle current)
  GND  → GND
Power the sensors through a GPIO pin (set HIGH before reading, LOW after) to eliminate standby current draw during sleep. The BME280 draws 3.6 µA in sleep mode — negligible if always powered, but every µA matters for a solar node targeting months of cloudy-season autonomy.

GY-BME280-3.3 Precision Altimeter & Atmospheric Pressure Sensor
Measures temperature, humidity, and barometric pressure in one I2C module. Ultra-low power (3.6µA sleep) makes it ideal for battery-powered field nodes.

Capacitive Soil Moisture Sensor
Corrosion-resistant capacitive design — unlike resistive probes, this lasts years in outdoor soil. Essential for any agricultural IoT field node.
Solar Power Budget Calculation
This is the most critical design step. Get it wrong and your node dies after a week of cloudy weather.
Average daily energy consumption (one node, 15-min transmit interval, 96 wakes per day):
| Phase | Current | Duration | Energy/day |
|---|---|---|---|
| Deep Sleep | 20 µA | ~1440 min | 0.46 mAh |
| Wake + Read Sensors | 80 mA | 96 × 2s = 3.2 min | 4.27 mAh |
| LoRa TX (SF9, 20 bytes) | 120 mA | 96 × 0.5s = 0.8 min | 1.6 mAh |
| Total Daily | ~6.3 mAh/day |
Solar harvest (6V/2W panel, India, monsoon worst case):
- Peak power: 166 mA at 6V (but charger converts to 3.7V LiPo → ~270 mA charge current at 3.7V, minus ~15% charger losses = ~230 mA effective)
- Effective sun hours in monsoon (Maharashtra/Gujarat): 2.5 hours/day
- Daily harvest: 230 mA × 2.5h = 575 mAh
- Surplus: 575 − 6.3 = 568.7 mAh stored daily (battery charges fully by mid-morning)
With a 3000 mAh battery, you have 3000 / 6.3 = 476 days of autonomy without any sun. In practice, even 3 consecutive completely overcast days (common in Kerala and Northeast India in monsoon) is fully covered.
Firmware: Deep Sleep + LoRa Transmission
The ESP32 Arduino firmware follows a simple state machine: wake from deep sleep → read sensors → transmit LoRa → return to deep sleep. No RTOS needed.
#include <Arduino.h>
#include <esp_sleep.h>
#include <Wire.h>
#include <Adafruit_BME280.h>
#include <LoRa.h>

#define SLEEP_SECONDS  900   // 15 minutes
#define LORA_SS        5
#define LORA_RST       14
#define LORA_DIO0      26
#define SENSOR_PWR_PIN 25
#define SOIL_ADC_PIN   34

Adafruit_BME280 bme;

// LoRa packet: 20 bytes, little-endian
struct __attribute__((packed)) SensorPacket {
  uint16_t nodeId;     // 0–65535
  int16_t  tempX10;    // temp * 10 (e.g. 27.3°C → 273)
  uint16_t humX10;     // humidity * 10
  uint16_t pressX10;   // pressure hPa * 10
  uint16_t soilRaw;    // ADC value 0–4095
  uint16_t battMv;     // battery mV
  uint32_t uptime;     // seconds since first boot (from RTC)
  uint16_t counter;    // packet sequence number
};

RTC_DATA_ATTR uint32_t bootCount = 0;
RTC_DATA_ATTR uint16_t packetCounter = 0;

void setup() {
  bootCount++;

  // Power on sensors
  pinMode(SENSOR_PWR_PIN, OUTPUT);
  digitalWrite(SENSOR_PWR_PIN, HIGH);
  delay(50); // Sensor startup time

  // Read BME280
  Wire.begin();
  bme.begin(0x76);
  bme.setSampling(Adafruit_BME280::MODE_FORCED,
    Adafruit_BME280::SAMPLING_X1, // temperature
    Adafruit_BME280::SAMPLING_X1, // pressure
    Adafruit_BME280::SAMPLING_X1, // humidity
    Adafruit_BME280::FILTER_OFF);
  bme.takeForcedMeasurement();

  float temp = bme.readTemperature();
  float hum  = bme.readHumidity();
  float pres = bme.readPressure() / 100.0f; // hPa

  // Read soil moisture
  int soil = analogRead(SOIL_ADC_PIN);

  // Read battery voltage (voltage divider: 100k + 100k)
  int battRaw = analogRead(35);
  uint16_t battMv = (uint16_t)(battRaw * 2 * 3300 / 4095);

  // Power off sensors
  digitalWrite(SENSOR_PWR_PIN, LOW);

  // Build packet
  SensorPacket pkt;
  pkt.nodeId   = 1;
  pkt.tempX10  = (int16_t)(temp * 10);
  pkt.humX10   = (uint16_t)(hum * 10);
  pkt.pressX10 = (uint16_t)(pres * 10);
  pkt.soilRaw  = soil;
  pkt.battMv   = battMv;
  pkt.uptime   = bootCount * SLEEP_SECONDS;
  pkt.counter  = packetCounter++;

  // Transmit via LoRa
  LoRa.setPins(LORA_SS, LORA_RST, LORA_DIO0);
  LoRa.begin(866500000); // 866.5 MHz (India IN865)
  LoRa.setSpreadingFactor(9);
  LoRa.setSignalBandwidth(125000);
  LoRa.setCodingRate4(5);
  LoRa.setTxPower(17); // 17 dBm = 50mW

  LoRa.beginPacket();
  LoRa.write((uint8_t*)&pkt, sizeof(pkt));
  LoRa.endPacket(true); // async=true, non-blocking TX

  delay(100); // Wait for TX to complete
  LoRa.sleep(); // Put SX1276 into sleep (0.2µA)

  // Deep sleep
  esp_sleep_enable_timer_wakeup((uint64_t)SLEEP_SECONDS * 1000000ULL);
  esp_deep_sleep_start();
}

void loop() {} // Never reached
Key firmware optimizations for minimum power:
- Use
esp_deep_sleep_start()rather thandelay()loops — deep sleep draws 10–20 µA vs 80+ mA awake. - RTC_DATA_ATTR variables survive deep sleep — use them for counters and last readings.
- Call
LoRa.sleep()before the MCU sleeps — the SX1276 draws 1.8 mA in standby but only 0.2 µA in sleep. - Disable WiFi and Bluetooth at boot:
esp_wifi_stop(); esp_bt_controller_disable();— saves 2–5 mA baseline.
LoRa Packet Design and Range
Spreading Factor (SF) selection: Higher SF = longer range but slower data rate and higher air time.
| SF | Range (open) | Air Time (20B) | Use Case |
|---|---|---|---|
| SF7 | 2–3 km | ~70ms | Dense urban, many nodes |
| SF9 | 5–8 km | ~370ms | Farmland, balanced |
| SF12 | 15+ km | ~2600ms | Remote mountain stations |
For a 15-minute interval and farms up to 5 km from the gateway, SF9 is the sweet spot. For forest or hilly terrain (common in Maharashtra, Himachal Pradesh), use SF10 or SF11 to punch through foliage and terrain.
Packet size: Keep payloads under 51 bytes for SF9 (LoRaWAN Fair Access Policy). Our 20-byte packet fits easily and transmits in ~370ms at SF9.
RSSI and SNR monitoring: At the gateway, log RSSI (signal strength) and SNR (signal-to-noise ratio) for each node. RSSI below −120 dBm or SNR below −15 dB indicates you need to raise the antenna or increase SF.
Gateway Setup (Single-Channel and Full)
Option A — Single-Channel Gateway (cheap, for testing):
An ESP32 + RFM95W configured as a single-channel gateway receives packets on one SF/frequency combination. Works great for a private network where all nodes use the same SF. Total cost: under ₹800.
Option B — RAK2287 / SX1302 Full Gateway (production):
The RAK2287 is a 8-channel LoRaWAN concentrator module. Paired with a Raspberry Pi Zero 2W and ChirpStack on local server, it supports 200+ nodes, adaptive data rate, and OTAA/ABP authentication. Cost: ~₹8,000–12,000.
Option C — The Things Network (TTN) with community gateway:
If a TTN gateway exists within range of your field (check TTN Map), you can use it for free. Several cities in India (Pune, Bangalore, Mumbai, Hyderabad) have community gateways.
Weatherproof Enclosure for Indian Climate
The Indian monsoon is brutal on electronics: 80–95% humidity for 4 months, combined with dust storms in the dry season. Your enclosure must handle IP65 or better. Practical recommendations:
- Junction box: Use a standard IP65 ABS junction box (available at electrical shops for ₹100–200). Drill cable glands for the sensor wires and antenna feed-through.
- Antenna: Mount a 1/4-wave wire antenna or a small fiberglass omni outside the box. Never place the LoRa antenna inside a metal enclosure — it kills range by 10–20 dB.
- Silica gel: Place 2–4g of indicating silica gel inside. Replace when it turns pink (usually after monsoon season).
- Solar panel: Mount at 15–25° tilt facing south. Avoid shade from trees or buildings between 10am–3pm. Clean monthly (bird droppings and dust reduce output significantly).
- PCB coating: Apply two coats of conformal coating (or clear nail varnish) to all PCB surfaces. Leave connectors uncoated.
- Cable management: Run sensor cables in conduit to ground level. Use waterproof connectors (JST-SM or IP67 M12 connectors) where cables enter the soil.

DHT20 SIP Packaged Temperature & Humidity Sensor
The DHT20 in SIP package is the upgraded successor to DHT11 — I2C interface, higher accuracy, and better outdoor performance in humid Indian conditions.
Recommended Sensors for Field Nodes
GY-BME280-5V Temperature and Humidity Sensor
5V-compatible BME280 module with onboard regulator — useful for 5V Arduino-based nodes. Measures temperature, humidity, and pressure in one compact package.
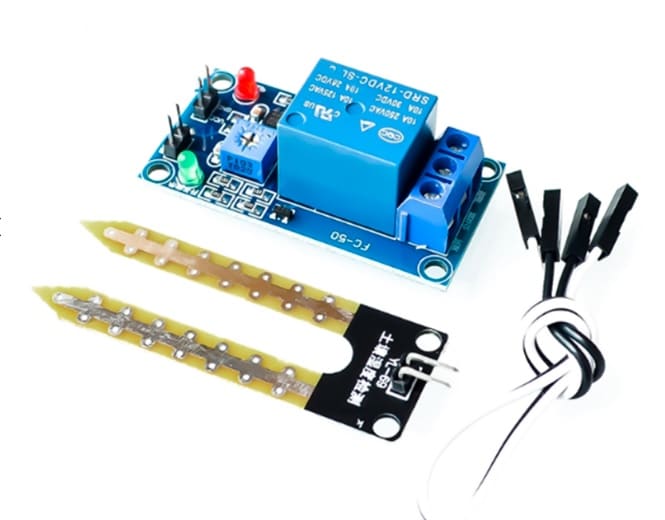
5V/12V Soil Moisture Sensor Relay Module
Integrated relay makes this module perfect for nodes that also trigger irrigation pumps locally while transmitting data to the gateway over LoRa.
FAQ
What is the range of LoRa in a farm environment in India?
In open, flat farmland (common in Punjab, Haryana, Gujarat), LoRa with SF9 at 17 dBm achieves 5–8 km reliably. In hilly or forested terrain (Maharashtra, Northeast India), expect 1–3 km. Use SF11 or SF12 for difficult terrain, placing gateways at high elevations when possible.
How long does the 3000mAh battery last without sunlight?
With the firmware above (15-minute interval, 20µA deep sleep, ESP32), the battery lasts approximately 476 days mathematically. In practice, expect 2–3 weeks of full cloudy-season autonomy before the battery drops to the cutoff voltage (3.0V).
Is LoRa legal in India?
Yes. LoRa operates in the 865–867 MHz unlicensed band in India, governed by WPC (Wireless Planning & Coordination Wing) regulations. You do not need a license for low-power LoRa end nodes. Gateways with more than 1W EIRP may need WPC approval — most hobbyist gateways at 25–50mW are well within limits.
Can I use this for flood or water-level monitoring?
Yes. Replace the soil moisture sensor with a waterproof ultrasonic rangefinder (JSN-SR04T) to measure water level in a river or reservoir. The LoRa node transmits alerts when the level exceeds a threshold — all without cellular connectivity in remote areas.
What is the difference between LoRa and LoRaWAN?
LoRa is the physical radio modulation (chirp spread spectrum). LoRaWAN is the MAC layer protocol on top: it adds device addressing, encryption (AES-128), join procedures (OTAA/ABP), and the multi-gateway network protocol. For a private single-gateway farm network, you can use raw LoRa packets without LoRaWAN complexity.
How do I debug a node in the field without serial connection?
Encode a status byte in every LoRa packet (bit 0 = sensor read OK, bit 1 = BME280 found, bit 2 = low battery). Monitor these flags at the gateway. For physical debugging, add an LED that blinks error codes before sleep — remove it in production to save power.
All the sensors mentioned in this guide are available at Zbotic’s Sensors & Modules category. From BME280 atmospheric sensors to capacitive soil moisture probes, get everything you need for a professional-grade field monitoring network shipped fast across India.


Add comment