
OLED Display Custom Bitmap: Show Images on SSD1306 Arduino
Displaying a custom bitmap image on an SSD1306 OLED display with Arduino transforms a bare microcontroller project into a polished, professional-looking gadget. Whether you want to show your logo, a custom icon, an animation frame, or a sensor dashboard graphic, bitmap images on OLED are the key. In this complete tutorial, we cover the entire workflow — from picking the right OLED module, converting your image to a bitmap array, writing the Arduino code, and building real projects. All components used here are available in India from Zbotic.
Understanding SSD1306 OLED Displays
The SSD1306 is a single-chip CMOS OLED/PLED driver controller by Solomon Systech. It drives a 128×64 or 128×32 pixel OLED panel. At the hardware level, it organizes pixels into 8 horizontal bands (pages), each 8 pixels tall. This architecture is exactly why bitmaps must be stored as column-first or page-aligned byte arrays — each byte represents a vertical column of 8 pixels in a page.
The SSD1306 supports both I2C and SPI communication:
- I2C version (4-pin: VCC, GND, SDA, SCL): Easier wiring, slower (400 kHz max), allows multiple I2C devices on same bus.
- SPI version (7-pin): Faster data transfer, better for animations, uses more GPIO pins.
For most Indian Arduino hobbyist projects, the I2C 4-pin version (Blue or White OLED, 0.96-inch, 128×64) is the most popular choice due to its simplicity and low price.
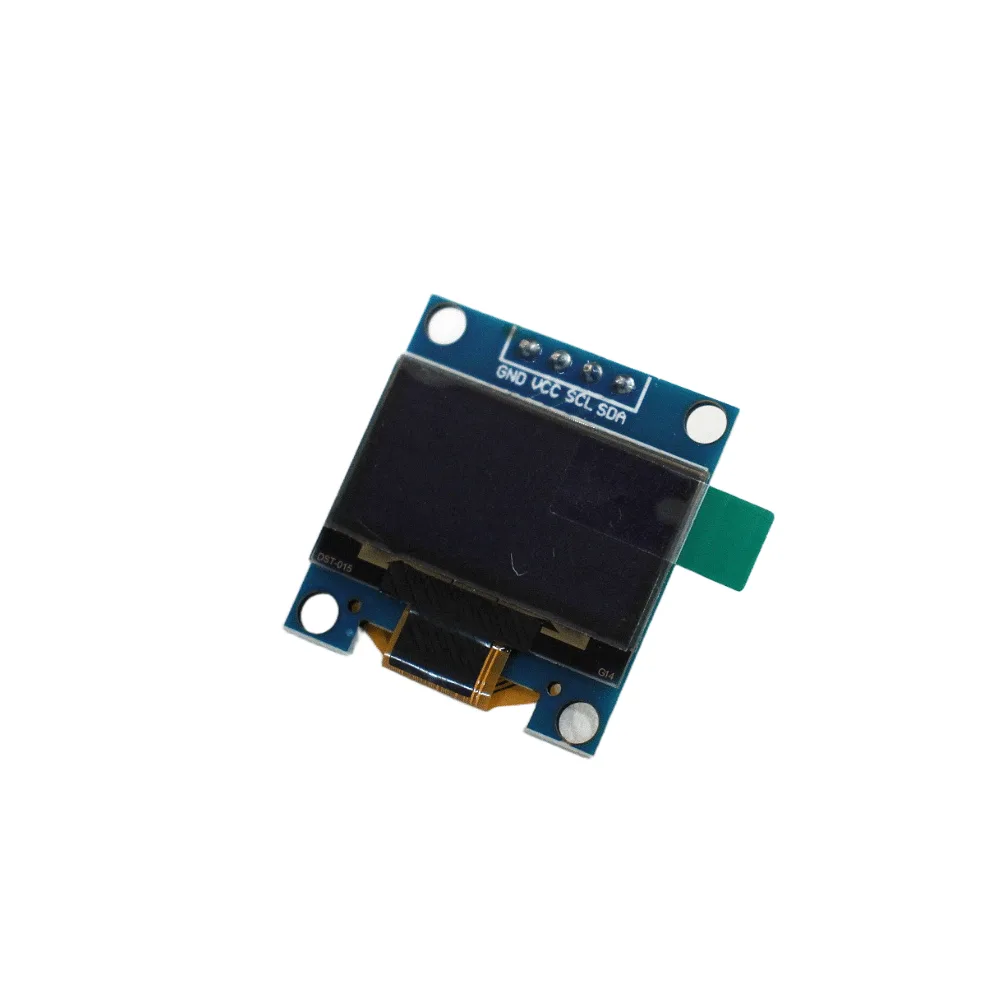
0.96-Inch I2C/IIC 4-Pin OLED Display Module (Blue)
The classic 128×64 blue SSD1306 OLED module. Just 4 pins — VCC, GND, SDA, SCL. Perfect for custom bitmap and icon display projects with Arduino.

0.96-Inch I2C/IIC 4-Pin OLED Display Module (White)
Same SSD1306 chip but with crisp white pixels — great for UI elements and custom bitmap icons where white-on-black contrast is preferred.
Choosing the Right OLED Module
Here is a quick comparison of popular SSD1306 OLED options available in India:
- 0.96″ 128×64 (Blue or White) — I2C: Most popular. Best for custom bitmaps, icons, and small text. Default I2C address is 0x3C.
- 0.96″ 128×64 — SPI (7-pin): Faster refresh — use this for animations or fast-updating data. Requires CS, DC, RST, MOSI, SCK pins.
- 1.3″ 128×64 — I2C (SH1106 chip): Slightly larger, same resolution. Uses SH1106 driver (use the
U8g2orAdafruit_SH110Xlibrary — NOT the SSD1306 library!). - 0.91″ 128×32 — I2C: Narrower, good for status displays in tall enclosures.
Pro tip: If ordering from Zbotic, note that the 1.3″ OLED uses the SH1106 chip, not SSD1306. The libraries are different. The product pages mention the chip — always check before coding.
Converting Images to Bitmap Arrays
Converting your image to a C byte array is the most important (and often confusing) step. Here is the complete workflow:
- Prepare your image: Resize to 128×64 pixels (or smaller for icons). Convert to black and white (1-bit). High contrast images work best. Tools: MS Paint, GIMP, Photoshop, or any image editor.
- Use an online bitmap converter: The best free tools for Indian makers are:
- image2cpp (javl.github.io/image2cpp): Upload your PNG/BMP, set canvas size to 128×64, set the output format to “Arduino code” and byte orientation to “Horizontal” for Adafruit GFX. Click “Generate code”.
- LCD Image Converter: A desktop app (free, Windows/Linux) with more control over byte packing and orientation.
- Understand the output: You will get a
const uint8_t PROGMEM myBitmap[] = {...};array. The size is (width/8) × height bytes for a 1-bit image. For 128×64: 128/8 × 64 = 1024 bytes. - PROGMEM keyword: Always include PROGMEM when storing large bitmaps in Arduino. This places the array in Flash memory (32KB on Uno) instead of SRAM (2KB), preventing out-of-memory crashes.
Wiring SSD1306 OLED to Arduino Uno
For the I2C OLED (4-pin version):
| OLED Pin | Arduino Uno Pin |
|---|---|
| VCC | 3.3V or 5V |
| GND | GND |
| SDA | A4 (SDA) |
| SCL | A5 (SCL) |
For ESP32: SDA → GPIO 21, SCL → GPIO 22. For Arduino Mega: SDA → Pin 20, SCL → Pin 21.
Libraries: Adafruit SSD1306 + GFX
Install these two libraries via Arduino IDE Library Manager:
- Adafruit SSD1306 — the display driver
- Adafruit GFX Library — the graphics rendering library that provides
drawBitmap()
For Arduino Uno users with tight SRAM, the U8g2 library by olikraus is a great alternative — it uses a tiled rendering approach that significantly reduces RAM usage at the cost of slightly slower rendering.
Arduino Code for Custom Bitmap Display
#include <Wire.h>
#include <Adafruit_GFX.h>
#include <Adafruit_SSD1306.h>

#define SCREEN_WIDTH 128
#define SCREEN_HEIGHT 64
#define OLED_RESET -1       // No reset pin
#define SCREEN_ADDRESS 0x3C // Default I2C address

Adafruit_SSD1306 display(SCREEN_WIDTH, SCREEN_HEIGHT,
                         &Wire, OLED_RESET);

// --- Your custom bitmap here ---
// Replace with the output from image2cpp
// This example is a 32x32 smiley face
const uint8_t PROGMEM smileIcon[] = {
  0x00,0x00,0x00,0x00,
  0x00,0x7E,0x00,0x00,
  0x01,0xFF,0x80,0x00,
  0x03,0xC3,0xC0,0x00,
  0x07,0x00,0xE0,0x00,
  0x0E,0x00,0x70,0x00,
  0x0E,0x66,0x70,0x00,
  0x1C,0x66,0x38,0x00,
  0x1C,0x00,0x38,0x00,
  0x1C,0x00,0x38,0x00,
  0x1C,0x81,0x38,0x00,
  0x1C,0x3C,0x38,0x00,
  0x0E,0x3C,0x70,0x00,
  0x07,0x00,0xE0,0x00,
  0x03,0xC3,0xC0,0x00,
  0x01,0xFF,0x80,0x00,
  0x00,0x7E,0x00,0x00
};
// 32x32 bitmap from image2cpp would be 128 bytes.
// Above is illustrative — use image2cpp for real images.

void setup() {
  Serial.begin(9600);
  if (!display.begin(SSD1306_SWITCHCAPVCC, SCREEN_ADDRESS)) {
    Serial.println("SSD1306 allocation failed");
    for (;;);
  }
  display.clearDisplay();

  // Draw full-screen bitmap (128x64)
  // display.drawBitmap(0, 0, myFullBitmap, 128, 64, WHITE);

  // Draw a centered 32x32 icon
  display.drawBitmap(
    (SCREEN_WIDTH  - 32) / 2,  // x = center
    (SCREEN_HEIGHT - 32) / 2,  // y = center
    smileIcon, 32, 32, SSD1306_WHITE
  );

  // Add text below the icon
  display.setTextSize(1);
  display.setTextColor(SSD1306_WHITE);
  display.setCursor(32, 55);
  display.println("Hello Zbotic!");

  display.display(); // Push buffer to screen
}

void loop() {
  // Static display — nothing needed in loop
}
The key function is display.drawBitmap(x, y, bitmapArray, width, height, color). The x,y are the top-left corner of the bitmap on the display. The color parameter sets the pixel color: SSD1306_WHITE (1) for white pixels on black background, or SSD1306_BLACK for inverted.

1.3-Inch I2C/IIC 128×64 White OLED Display Module (4-Pin)
Larger 1.3-inch OLED display with SH1106 chip and I2C interface. Excellent for bitmap-heavy projects where screen real estate matters.
Creating Bitmap Animations
OLED displays can animate at 10–30 FPS depending on display size and I2C speed. Here is the concept for a simple frame animation:
- Create multiple bitmap frames using image2cpp (e.g., 8 frames of a walking character)
- Store each frame as a separate PROGMEM array, or use a 2D array:
const uint8_t PROGMEM frames[][128] = {frame0, frame1, ...}; - In your loop(), cycle through frames with a delay:
display.drawBitmap(0, 0, frames[i], 128, 64, WHITE); display.display(); delay(100);
For smoother animations, use display.clearDisplay() only when needed and use partial screen updates with fillRect() to clear just the animated area.
Speed tip: Increase I2C clock speed to 800 kHz: Wire.setClock(800000); before display.begin(). This dramatically speeds up frame rates on OLED animations with Arduino Uno.

Arduino UNO R3 Development Board ATMEGA16U2
The original Arduino Uno R3 with genuine ATMEGA16U2 USB chip. The go-to board for OLED bitmap display projects across India.
Real Project Ideas Using OLED Bitmaps
- Custom Logo Display: Show your project or company logo on startup — every gadget you build can have a branded boot screen.
- Animated Loading Screen: A spinning progress indicator or animated robot face while your device initializes sensors.
- Weather Icon Display: Fetch weather data from an API and display a pre-stored sun, rain, or cloud icon bitmap matching the weather condition.
- Health Monitor UI: Combine sensor readings (heart rate, SpO2) with an ECG waveform bitmap drawn in real time using
drawPixel(). - Retro Game: Build a simple game (Pong, Snake, Tetris) using bitmap sprites on a 128×64 OLED. The SSD1306 update rate is sufficient for basic games.
- Digital Oscilloscope: Plot real-time ADC readings as a waveform using drawLine() — no custom bitmap needed, but bitmap icons can enhance the UI.
Frequently Asked Questions
What is the maximum bitmap size I can store on Arduino Uno for SSD1306 OLED?
Arduino Uno has 32KB of Flash (program memory). With PROGMEM, you can store bitmaps totaling up to ~28KB (leaving room for the program code). A full 128×64 bitmap is 1KB, so you can store up to ~25 full-screen bitmaps. Arduino Mega with 256KB Flash can store ~200 full-screen frames.
Why is my bitmap mirrored or upside down on the OLED?
This is a byte orientation mismatch from the image converter. In image2cpp, try changing the “Byte orientation” option between “Horizontal” and “Vertical”, and try inverting the image. Also check if your OLED display is rotated — use display.setRotation(2) to flip 180 degrees.
Can I display grey-scale images on SSD1306?
The SSD1306 is a 1-bit display — only black or white. True greyscale is not supported. However, you can simulate grey levels using dithering (converting grey pixels to black/white dot patterns). Image2cpp has a dithering option for this.
Does the SSD1306 OLED work with ESP32 or NodeMCU?
Yes, the SSD1306 OLED works perfectly with ESP32 and NodeMCU. The wiring changes: SDA → GPIO 21, SCL → GPIO 22 on ESP32. The Adafruit SSD1306 library supports all common Arduino-compatible boards.
What is the difference between SSD1306 and SH1106 OLED?
SSD1306 supports page-addressing and horizontal/vertical addressing modes for efficient full-screen updates. SH1106 uses a slightly different column start address (column 2 offset) and requires a different library or configuration. The 0.96″ OLED typically uses SSD1306; the 1.3″ OLED typically uses SH1106.
Get Your OLED Display Module Today
Choose from India’s widest selection of 0.91″, 0.96″, and 1.3″ OLED modules in blue, white, and yellow-blue variants — all available at Zbotic with fast shipping.


Add comment