
One of the most powerful features of the ESP32 is its built-in support for ESP32 OTA firmware update — the ability to push new code to your deployed devices over WiFi without physically touching them. Imagine having 50 IoT sensors installed across a factory floor or warehouse in Pune or Chennai — OTA updates let you fix bugs, add features, and push security patches to all of them remotely. This tutorial covers everything from basic ArduinoOTA to production-grade HTTP OTA with rollback support.
Understanding ESP32 OTA: How It Works
The ESP32’s flash memory is divided into partitions defined by a partition table. For OTA to work, you need an OTA-capable partition scheme with at least two application (OTA) partitions: OTA_0 and OTA_1. The device runs from one partition while receiving the new firmware into the other. When the update completes and verification passes, the device boots from the new partition on the next restart.
This dual-partition design is critical for reliability. If the update fails halfway through — say due to a power cut during load shedding — the device simply reboots into the old firmware. No brick, no manual recovery needed.
The ESP32 supports three main OTA mechanisms:
- ArduinoOTA: Uses mDNS + UDP for local network discovery, upload via Arduino IDE or PlatformIO. Best for development.
- HTTP(S) OTA: Device polls or is triggered to download new firmware from a web server. Best for production deployments.
- MQTT-triggered OTA: Device subscribes to an update topic; server publishes firmware URL. Suitable for large fleets.
ArduinoOTA: Quick and Easy Local Updates
ArduinoOTA is the quickest way to get started with ESP32 OTA. It is included in the ESP32 Arduino core — no extra libraries needed. Here is a complete sketch that connects to WiFi and enables OTA updates:
#include <WiFi.h>
#include <ArduinoOTA.h>

const char* ssid = "YourWiFiSSID";
const char* password = "YourWiFiPassword";

void setup() {
  Serial.begin(115200);
  WiFi.mode(WIFI_STA);
  WiFi.begin(ssid, password);

  while (WiFi.status() != WL_CONNECTED) {
    delay(500);
    Serial.print(".");
  }
  Serial.println("nConnected: " + WiFi.localIP().toString());

  // Set OTA hostname (shows up in Arduino IDE port list)
  ArduinoOTA.setHostname("esp32-sensor-node-01");

  // Optional: Set OTA password
  ArduinoOTA.setPassword("zbotic2026");

  ArduinoOTA.onStart([]() {
    Serial.println("OTA Update Starting...");
  });

  ArduinoOTA.onEnd([]() {
    Serial.println("nOTA Update Complete!");
  });

  ArduinoOTA.onProgress([](unsigned int progress, unsigned int total) {
    Serial.printf("Progress: %u%%r", (progress / (total / 100)));
  });

  ArduinoOTA.onError([](ota_error_t error) {
    Serial.printf("OTA Error[%u]n", error);
  });

  ArduinoOTA.begin();
  Serial.println("OTA Ready");
}

void loop() {
  ArduinoOTA.handle(); // Must be called in every loop iteration!
  // Your actual application code here
  delay(10);
}
To upload new firmware, open Arduino IDE, go to Tools → Port and you’ll see your ESP32 listed as a network port (e.g., esp32-sensor-node-01 at 192.168.1.105). Select it and upload as normal. The IDE sends the binary wirelessly to the ESP32.
The most important thing to remember: always call ArduinoOTA.handle() in your loop(). If your loop blocks for more than a few seconds — for example, waiting on a slow HTTP request — the OTA handler won’t run and uploads will time out.
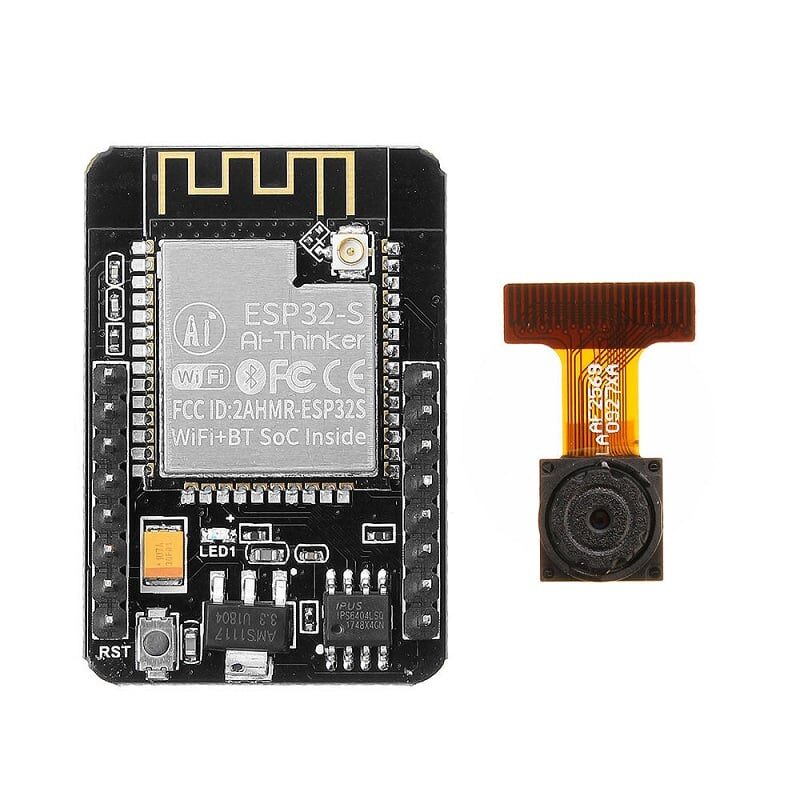
Ai Thinker ESP32 CAM Development Board WiFi+Bluetooth with Camera Module
The ESP32-CAM is perfect for OTA practice — once installed in a camera housing, you can update its firmware remotely without disassembly. Supports ArduinoOTA and HTTP OTA.
HTTP OTA: Pull Updates from a Server
For production deployments where devices are spread across multiple locations, ArduinoOTA is not practical — it requires being on the same LAN. HTTP OTA allows your ESP32 to pull firmware from any web server on the internet. The ESP32 Arduino core includes the HTTPUpdate library for this purpose:
#include <WiFi.h>
#include <HTTPClient.h>
#include <HTTPUpdate.h>

const char* FIRMWARE_VERSION = "1.0.2";
const char* VERSION_CHECK_URL = "http://ota.yourdomain.in/version.txt";
const char* FIRMWARE_URL = "http://ota.yourdomain.in/firmware-latest.bin";

void checkAndUpdate() {
  HTTPClient http;
  http.begin(VERSION_CHECK_URL);

  int code = http.GET();
  if (code == 200) {
    String latestVersion = http.getString();
    latestVersion.trim();

    if (latestVersion != FIRMWARE_VERSION) {
      Serial.printf("Update available: %s (current: %s)n",
        latestVersion.c_str(), FIRMWARE_VERSION);

      t_httpUpdate_return ret = httpUpdate.update(FIRMWARE_URL);

      switch (ret) {
        case HTTP_UPDATE_FAILED:
          Serial.printf("Update failed: %sn",
            httpUpdate.getLastErrorString().c_str());
          break;
        case HTTP_UPDATE_NO_UPDATES:
          Serial.println("No updates available");
          break;
        case HTTP_UPDATE_OK:
          Serial.println("Update OK! Rebooting...");
          // Device reboots automatically
          break;
      }
    } else {
      Serial.println("Firmware is up to date");
    }
  }
  http.end();
}

void setup() {
  // Connect WiFi...
  checkAndUpdate(); // Check on boot
}

void loop() {
  // Check for updates every 6 hours
  static unsigned long lastCheck = 0;
  if (millis() - lastCheck > 6UL * 3600UL * 1000UL) {
    checkAndUpdate();
    lastCheck = millis();
  }
}
For the server side, you just need a simple HTTP server (even a basic Apache or Nginx on a VPS) hosting two files: version.txt containing the latest version string, and the compiled .bin firmware file. Generate the firmware binary in Arduino IDE via Sketch → Export Compiled Binary or PlatformIO’s build pipeline.

Waveshare ESP32-S3 1.47inch 172×320 LCD Display Development Board
The ESP32-S3 has 8MB flash and more RAM, making it ideal for OTA-capable devices with UI. Display update progress on the LCD during firmware download for a professional user experience.
Secure HTTPS OTA with Certificate Validation
Plain HTTP OTA is vulnerable to man-in-the-middle attacks — a malicious actor on the network could serve a tampered firmware binary. For production devices, always use HTTPS with certificate validation:
#include <WiFiClientSecure.h>
#include <HTTPUpdate.h>

// Embed your server's root CA certificate
const char* rootCACert = R"(
-----BEGIN CERTIFICATE-----
... your certificate here ...
-----END CERTIFICATE-----
)";

void secureOTAUpdate(const char* firmwareUrl) {
  WiFiClientSecure client;
  client.setCACert(rootCACert);

  // Configure httpUpdate to use our secure client
  httpUpdate.setFollowRedirects(HTTPC_STRICT_FOLLOW_REDIRECTS);

  t_httpUpdate_return ret = httpUpdate.update(client, firmwareUrl);

  if (ret == HTTP_UPDATE_FAILED) {
    Serial.printf("Secure OTA failed: %sn",
      httpUpdate.getLastErrorString().c_str());
  }
}
To extract your server’s root CA certificate, use OpenSSL: openssl s_client -connect ota.yourdomain.in:443 -showcerts and copy the last certificate in the chain (the root CA). Embed it as a string in your firmware.
OTA Rollback and Version Management
The ESP32’s OTA subsystem supports automatic rollback if the new firmware does not explicitly mark itself as valid. This is critical for production reliability — if your new firmware has a bug that causes an immediate crash, the device automatically falls back to the previous working firmware.
To use rollback, enable it in your partition scheme (select a rollback-capable scheme in Arduino IDE: Tools → Partition Scheme → Minimal SPIFFS with OTA and Factory) and mark the firmware as valid once it starts successfully:
#include <esp_ota_ops.h>

void setup() {
  // ... WiFi connect, sensor init ...

  // If we reach here, firmware is working
  // Mark this firmware as valid (prevents rollback)
  esp_ota_mark_app_valid_cancel_rollback();

  Serial.println("Firmware validated, rollback cancelled");
}
If the device reboots before reaching esp_ota_mark_app_valid_cancel_rollback() — due to a crash, watchdog timeout, or power cycle — the bootloader automatically switches back to the previously known-good firmware partition. This self-healing behaviour is invaluable for unattended deployments.
Production OTA Best Practices for Indian Deployments
When deploying OTA-enabled ESP32 devices at scale across India, consider these practical recommendations:
- Always validate firmware before marking as valid: Test network connectivity, sensor readings, and critical operations before calling
esp_ota_mark_app_valid_cancel_rollback() - Handle power outages: India’s power supply can be unreliable. Add a capacitor or supercapacitor to maintain power during the flash write phase, or use a UPS for critical nodes
- Stagger updates: Do not push OTA to all devices simultaneously. Update in batches of 10-20% to catch regressions before they affect your entire fleet
- Version tracking in EEPROM/NVS: Store device metadata (location, device ID, firmware version) in NVS (Non-Volatile Storage) so each device can report its current version to your management backend
- OTA during low-traffic hours: Schedule OTA checks during off-peak hours (2-5 AM IST) to avoid disrupting operations and reduce server load
- Binary signing: Use the ESP32’s secure boot feature with RSA key signing to ensure only firmware signed with your private key can be installed
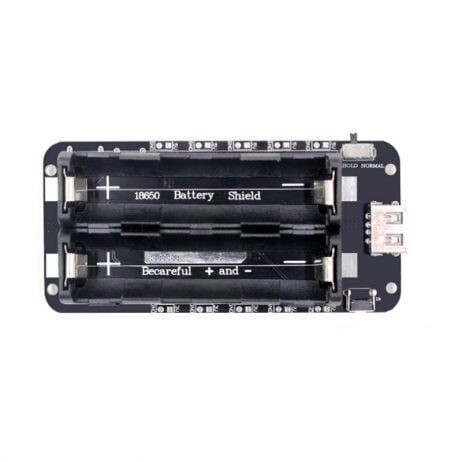
2 x 18650 Lithium Battery Shield V8 for Arduino ESP32 ESP8266
Power your OTA-enabled ESP32 nodes with this dual 18650 battery shield. Provides uninterrupted power during OTA flash writes — critical for avoiding mid-update power failures.
Frequently Asked Questions
What partition scheme do I need to enable OTA on ESP32?
In Arduino IDE, go to Tools → Partition Scheme and select any scheme with “OTA” in the name. Options include “Minimal SPIFFS (1.9MB APP with OTA/190KB SPIFFS)” or “Default 4MB with spiffs”. Avoid “No OTA” schemes. In PlatformIO, set board_build.partitions = default.csv or a custom partition CSV with two OTA app partitions.
How much flash does OTA require on ESP32?
OTA requires at least two equally-sized application partitions plus a small OTA data partition. On a 4MB flash ESP32, each OTA partition is typically 1.8-1.9 MB, leaving your application about 1.8 MB maximum size. For larger applications, use ESP32 modules with 8MB or 16MB flash. The ESP32-S3 variants from Waveshare offer more storage headroom.
Can ESP32 OTA update the SPIFFS or LittleFS filesystem partition?
Yes. The ESP32 supports separate filesystem OTA using the Update class with U_SPIFFS type instead of U_FLASH. This allows you to update your web server files, configuration files, or certificates independently from the firmware binary. The httpUpdate library handles filesystem updates with the updateSpiffs() method.
What happens if power is lost during an ESP32 OTA update?
The ESP32’s dual-partition OTA design is inherently resilient. New firmware is written to the inactive partition. The running firmware in the active partition is never touched until the update completes and the device reboots. If power is lost mid-write, the device reboots into the old (still-intact) firmware. The incomplete write in the inactive partition is simply ignored.
Is ArduinoOTA secure?
ArduinoOTA can be password-protected with ArduinoOTA.setPassword(), but the transfer is not encrypted — it uses plain UDP/TCP. This is acceptable for home lab use on a trusted LAN. For production or Internet-exposed devices, use HTTPS OTA with signed binaries instead.
Build OTA-Ready IoT Devices with Zbotic
Zbotic.in offers ESP32 development boards, sensors, and power modules suitable for production IoT deployments with OTA update capability. Fast delivery across India with GST invoices for businesses.


Add comment