
If you want to build a powerful, cloud-free smart home system on a budget, Tasmota firmware for ESP8266 smart home control is your best option. Tasmota is a free, open-source firmware for ESP8266 and ESP32-based devices that transforms cheap WiFi modules into fully-featured smart home nodes — compatible with Home Assistant, OpenHAB, MQTT brokers, and more. This guide covers everything from flashing Tasmota onto a bare ESP8266 module to integrating it with your smart home setup, written specifically for the Indian maker community.
What is Tasmota and Why Use It
Tasmota was originally written by Theo Arends to replace the Sonoff firmware (Sonoff devices are based on ESP8266) with a locally-controllable alternative that does not depend on a cloud server. Since then, it has grown into one of the most popular open-source smart home firmware projects in the world, with support for hundreds of devices and sensors.
Key advantages of Tasmota over stock ESP8266 firmware or proprietary cloud-based solutions:
- Local control: Your smart home works even when the internet is down
- No cloud dependency: All processing happens on your local network
- MQTT support: Integrates with any MQTT broker (Mosquitto, HiveMQ, etc.)
- Over-the-Air updates: Update firmware wirelessly through the web interface
- Home Assistant auto-discovery: Devices appear automatically in Home Assistant
- Rules engine: Local automation without needing a hub
- Free and open source: No licensing costs, full transparency
- Regular updates: Active development with new features and bug fixes
For Indian hobbyists and makers, Tasmota is especially attractive because ESP8266 modules (D1 Mini, NodeMCU, Wemos) are available locally at very low prices. You can build smart switches, power monitors, temperature sensors, and relay controllers for a fraction of the cost of branded smart home products.

D1 Mini V2 NodeMCU 4M Bytes Lua Wi-Fi ESP8266 Development Board
The D1 Mini is one of the most popular Tasmota targets. Its compact size, 4MB flash, and USB programming make it perfect for smart home nodes. Flash Tasmota and build relay switches, sensors, or RGB controllers.
Hardware You Need to Get Started
Tasmota runs on any ESP8266 or ESP32 device. For a standalone project (not modifying a commercial product), here is what you need:
Minimum Requirements
- ESP8266 module: NodeMCU v2/v3, D1 Mini, ESP-12E/F, or Wemos modules
- USB cable: Micro USB (for NodeMCU/D1 Mini) or USB-to-Serial adapter (for bare ESP-12F modules)
- Computer: Windows, Mac, or Linux — any will work
- WiFi router: 2.4GHz network (ESP8266 does not support 5GHz)
For Advanced Projects
- Relay module: For smart switch/appliance control
- DHT11/DHT22/BME280: Temperature and humidity sensing
- Power supply: 5V regulated (HI-LINK modules for mains power projects)
- Project enclosure: For clean installation
Safety Warning for Indian Readers: If you plan to build mains-powered (220V) smart switches, use proper isolation, rated enclosures, and follow electrical safety standards. Never work on live circuits. If you are not confident about high-voltage work, stick to low-voltage (5V/3.3V) projects or use commercial Sonoff/Shelly devices.

ESP8266/ESP-12F Module Serial WiFi Witty Cloud Development Board + Mini NodeMCU
This combo pack gives you both the ESP-12F module and a Mini NodeMCU programmer board. The Witty Cloud has a built-in RGB LED, LDR, and button — great for Tasmota light and sensor projects.
Flashing Methods: Web Installer vs Manual
There are several ways to flash Tasmota onto your ESP8266. We will cover the two most practical methods.
Method 1: Tasmota Web Installer (Easiest — Chrome Browser Required)
The Tasmota project now provides a browser-based installer at tasmota.github.io/install/ that uses the Web Serial API. This is the simplest method:
- Open the Tasmota Web Installer in Google Chrome (Chrome is required for Web Serial API)
- Connect your ESP8266 board via USB
- Click “Connect” and select your COM port from the popup
- Choose “Tasmota” (standard build) or a specific build like “Tasmota Sensors” or “Tasmota Display”
- Click “Install” — the installer will erase the flash and write Tasmota automatically
- Once done, click “Next” to configure WiFi credentials directly in the browser
The web installer automatically handles baud rate, erase, and flash operations. It takes about 2-3 minutes total.
Method 2: Manual Flash with esptool.py
For more control or if the web installer does not work, use esptool.py — Espressif’s official flashing tool:
# Install esptool
pip install esptool

# Download Tasmota binary from
# https://github.com/arendst/Tasmota/releases
# Get: tasmota.bin (standard) or tasmota-sensors.bin

# Erase flash first (important!)
esptool.py --port COM3 erase_flash

# Flash Tasmota (adjust COM port for your system)
esptool.py --port COM3 --baud 115200 write_flash
  --flash_size detect -fm dout 0x0 tasmota.bin
On Linux/Mac, replace COM3 with /dev/ttyUSB0 or /dev/ttyACM0. After flashing, the ESP8266 will reboot into Tasmota’s WiFi AP mode.
Entering Flash Mode on ESP8266
For NodeMCU and D1 Mini boards, the USB-to-Serial converter handles flash mode automatically — just plug in and flash. For bare ESP-12F modules, you must hold GPIO0 LOW during boot to enter flash mode: connect GPIO0 to GND, power on (or press RST), then release GPIO0.
Initial Setup: WiFi and MQTT Configuration
After flashing, Tasmota broadcasts a WiFi AP called tasmota-XXXXXX-XXXX. Connect to it from your phone or computer (password: tasmota). A captive portal will open — enter your home WiFi SSID and password.
Once Tasmota connects to your WiFi, open your router’s DHCP table or use a network scanner to find the ESP8266’s IP address. Access the Tasmota web interface at http://[IP_ADDRESS].
MQTT Configuration
MQTT is the backbone of smart home integration. To configure MQTT in Tasmota:
- Go to Configuration → Configure MQTT
- Enter your MQTT broker address (e.g.,
192.168.1.100for local Mosquitto) - Set port to 1883 (or 8883 for TLS)
- Set a unique topic (e.g.,
bedroom/relay1) - Enter MQTT username and password if your broker requires it
- Click Save — Tasmota reboots and connects to MQTT
Tasmota uses a structured MQTT topic format. For a device with topic bedroom/relay1:
- Command to turn on:
cmnd/bedroom/relay1/POWERwith payloadON - Status response:
stat/bedroom/relay1/POWERwith payloadON - Telemetry:
tele/bedroom/relay1/SENSORwith JSON sensor data
Integrating with Home Assistant
Tasmota has excellent Home Assistant integration through MQTT auto-discovery. When auto-discovery is enabled (it is by default in recent Tasmota versions), your devices appear automatically in Home Assistant without any YAML configuration.
In Home Assistant, go to Settings → Integrations → Add Integration → MQTT. Enter your broker details. Once the MQTT integration is configured, any Tasmota device on the same MQTT broker will appear automatically. You will see them under Settings → Devices.
For sensors, Tasmota sends telemetry in JSON format every 300 seconds by default. You can change this interval with the command TelePeriod 60 (every 60 seconds). Home Assistant reads this and creates sensor entities automatically.
To manually add a Tasmota device if auto-discovery fails, add this to your configuration.yaml:
switch:
  - platform: mqtt
    name: "Bedroom Light"
    state_topic: "stat/bedroom/relay1/POWER"
    command_topic: "cmnd/bedroom/relay1/POWER"
    payload_on: "ON"
    payload_off: "OFF"
DHT11 Digital Relative Humidity and Temperature Sensor Module
Tasmota natively supports DHT11 — just define the GPIO in Tasmota’s module configuration and it will automatically send temperature and humidity data over MQTT to Home Assistant.
Tasmota Rules and Scripting
One of Tasmota’s most powerful features is its local Rules engine, which allows you to create automations that run directly on the device without needing an external hub or internet connection.
Rules syntax: Rule<x> ON <trigger> DO <command> ENDON
Example: Turn off a relay automatically if temperature exceeds 30°C:
Rule1 ON DHT11#Temperature>30 DO Power1 OFF ENDON
Rule1 1  ; Enable Rule1
Example: Toggle a relay every time a button is pressed:
Rule1 ON Button1#State=10 DO Power1 Toggle ENDON
Rule1 1
Example: Publish a custom MQTT message when sensor value changes:
Rule1 ON BMP280#Pressure<1000 DO Publish stat/weather/alert LOW_PRESSURE ENDON
Rule1 1
You can have three independent rule sets (Rule1, Rule2, Rule3), each containing multiple rules chained with AND. This gives you significant local automation capability without any external hub.
Popular Tasmota Use Cases in India
Here are some practical projects that Indian makers build with Tasmota:
- Smart fan/light controller: Add WiFi control to existing switches using a relay module behind the switchboard
- Geyser timer: Automatically turn off the water heater after 30 minutes using a rule
- Air quality monitor: Connect BME280 or MQ135 sensor for local AQI monitoring during Delhi’s winter pollution season
- Irrigation controller: Schedule garden watering with time-based rules
- Power monitoring: Use Tasmota on PZEM-004T or HLW8012-equipped devices to monitor home electricity consumption
- Garage door opener: Add WiFi control to your garage shutter motor
- Smart water tank sensor: Ultrasonic level sensor + Tasmota for overhead water tank level monitoring and automatic pump control
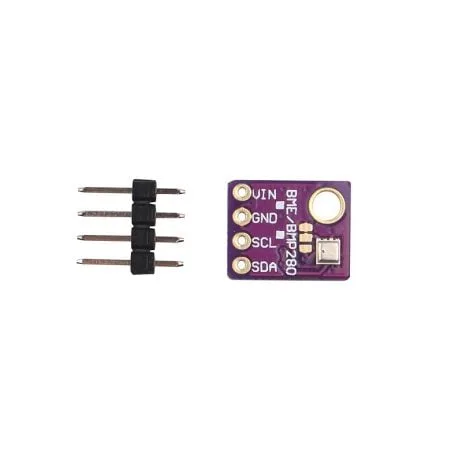
GY-BME280-5V Temperature and Humidity Sensor
The BME280 is natively supported by Tasmota and provides temperature, humidity, AND barometric pressure in one sensor. Perfect for a comprehensive home weather station that publishes to Home Assistant via MQTT.
Frequently Asked Questions
Will flashing Tasmota void my warranty on commercial devices?
Yes, flashing any unofficial firmware voids the warranty on commercial devices. However, for DIY projects using bare ESP8266 modules from Zbotic, there is no warranty concern — these are development boards meant to be programmed. Many Indian hobbyists flash Tasmota onto Sonoff Basic switches for home automation, which is a common practice in the maker community.
Can Tasmota run without an internet connection?
Absolutely — this is one of Tasmota’s biggest advantages over cloud-based smart home products. Once configured with your local MQTT broker (like Mosquitto running on a Raspberry Pi), Tasmota devices work entirely on your local network. Your smart home keeps working even during internet outages.
Does Tasmota support ESP32 in addition to ESP8266?
Yes! Tasmota has supported ESP32 since version 9.0. The ESP32 version of Tasmota (tasmota32.bin) supports more features including Bluetooth, more GPIOs, and faster processing. The same configuration interface and MQTT structure applies to both ESP8266 and ESP32 devices.
How do I update Tasmota firmware after initial installation?
Open the Tasmota web interface and go to Firmware Upgrade. You can upgrade via URL (enter the Tasmota GitHub release URL directly) or by uploading a .bin file. Tasmota supports OTA updates natively — no need to connect a USB cable for firmware updates after the initial flash.
What MQTT broker do you recommend for beginners in India?
For beginners, the easiest option is to install Mosquitto on a Raspberry Pi or even on your Windows PC. Alternatively, use a free cloud MQTT broker like HiveMQ or broker.hivemq.com for testing (not recommended for production due to cloud dependency). For a serious home automation setup, run Mosquitto locally on a Raspberry Pi or a spare Android phone running Termux.
Build Your Tasmota Smart Home Today
Get ESP8266 modules, sensors, and all the components you need for your Tasmota smart home build from Zbotic. We stock genuine modules with fast shipping across India.


Add comment