
If you’ve been searching for a rewarding weekend project, building a CNC laser engraver with stepper motors is one of the most satisfying DIY electronics builds you can attempt. The phrase cnc laser engraver stepper motor diy captures exactly what this guide covers — using affordable NEMA17 or 28BYJ-48 stepper motors, an Arduino running GRBL firmware, and a laser module to create precise engravings on wood, acrylic, leather, and more. Whether you’re a hobbyist, engineering student, or maker, this step-by-step guide will take you from zero to first engrave in a single weekend.
How a CNC Laser Engraver Works
A CNC (Computer Numerical Control) laser engraver moves a laser head across two axes — X and Y — with millimetre-level precision. Two stepper motors drive toothed belts or lead screws along each axis. The laser module sits on a carriage that rides the X-axis rod, while the whole X-axis assembly slides along the Y-axis rails.
GRBL, an open-source CNC firmware that runs on an Arduino Uno or Nano, interprets G-code commands and sends timed pulses to stepper motor drivers (like the A4988 or DRV8825). Each pulse advances the motor shaft by one micro-step, translating into precise linear movement. The laser is switched on/off (or dimmed via PWM) in sync with this movement to burn or engrave a design.
The beauty of this system is that it’s entirely modular. You can start with a small 20×20 cm working area and later expand the rails for A4-sized engravings. The total build cost in India typically ranges from ₹2,500 to ₹6,000 depending on laser power and frame quality.
Components You Need
Here is a complete bill of materials for a basic desktop CNC laser engraver:
- 2× NEMA17 stepper motors (one per axis) — 5.6 kg·cm torque recommended
- 2× A4988 stepper motor driver boards
- Arduino Uno or CNC Shield
- 500mW to 5.5W laser module with PWM input (TTL)
- 20×20 mm aluminium V-slot extrusion rails (or 8mm smooth rods + LM8UU bearings)
- GT2 timing belt + pulleys
- 12V 5A power supply
- Limit switches (2×) for homing
- Laser safety goggles

42HS48-1204A NEMA17 5.6 kg-cm Stepper Motor
High-torque NEMA17 stepper motor with detachable cable and D-type shaft — perfect for CNC X/Y axes. Delivers smooth micro-stepping for precise engraving.

A4988 Stepper Motor Driver Controller Board
Red A4988 driver board supports up to 1/16 micro-stepping and current adjustment via a trimmer. Works directly with Arduino + CNC shield for GRBL builds.
Building the Frame & Axes
The frame is the backbone of your engraver’s accuracy. The most common desktop design uses two parallel Y-axis rails with the X-axis spanning them — commonly called an H-bot or CoreXY layout for faster machines, or a simpler Cartesian layout for beginners.
Step 1 — Cut and assemble the rails
For a 20×20 cm working area, cut two Y-axis rails at 35 cm and one X-axis rail at 30 cm. Use 3D-printed or aluminium corner brackets to square the frame. Check squareness with a diagonal measurement — both diagonals must be equal to within 0.5 mm.
Step 2 — Mount linear bearings and carriage
Thread LM8UU bearings onto 8 mm smooth rods, or clip V-slot wheels into the aluminium extrusions. The X-axis carriage holds the laser module and must slide with zero play but without stiffness. Adjust eccentric nuts on V-slot builds until resistance is uniform throughout travel.
Step 3 — Install GT2 belts and pulleys
Fit GT2 20-tooth pulleys onto each motor shaft. Route the belt through the carriage tensioner, keeping it taut enough that it doesn’t skip under rapid acceleration. A good rule of thumb: the belt should produce a clear tone like a guitar string when plucked.
Wiring Stepper Motors & Drivers
Correct wiring is critical — a mis-wired stepper will vibrate in place instead of rotating. Here is the standard wiring sequence for an A4988 driver on an Arduino CNC Shield:
- Set the A4988 Vref to match your motor’s current rating: Vref = I_motor × 8 × R_sense. For a 1.2 A NEMA17 with 0.1 Ω sense resistors, Vref = 0.96 V.
- Connect motor coils to the 2B/2A and 1A/1B pins. Use a multimeter in continuity mode to identify coil pairs (connected coil ends beep).
- Connect STEP and DIR pins to the corresponding Arduino digital outputs (defined in GRBL’s config.h).
- Add a 100 µF capacitor across the 12V supply rail to absorb back-EMF spikes from the motors.
- Enable micro-stepping: bridge MS1+MS2+MS3 to 1/16 step mode for smooth motion.
Important: Never disconnect stepper motors while power is on — this can destroy the A4988 driver instantly due to voltage spikes.
Flashing GRBL Firmware
GRBL is the de-facto standard CNC firmware for Arduino. Version 1.1h is the most widely used stable release and supports laser mode (M3/M4/M5 commands with PWM spindle).
- Download the GRBL 1.1h source from GitHub and open it in the Arduino IDE.
- In
config.h, enable#define LASER_MODEto activate dynamic laser power via PWM. - Set steps/mm in
defaults.h: for GT2 belt with 20-tooth pulley, steps/mm = (steps_per_rev × micro_steps) ÷ (pitch × teeth) = (200 × 16) ÷ (2 × 20) = 80 steps/mm. - Flash to Arduino Uno via USB. Use a GRBL sender like LaserGRBL or LightBurn to connect and send
$$to verify settings. - Home the machine: type
$Hto trigger the limit switch homing cycle.
Installing the Laser Module
Choose your laser power based on intended materials. A 500 mW module handles paper and thin balsa wood. A 2.5 W or 5.5 W module cuts 3 mm plywood and engraves anodised aluminium. Mount the laser module on the X carriage with the lens focused at the working surface — typically 50–60 mm from the material.
Connect the laser’s PWM signal wire to the Z-axis spindle PWM output on the CNC shield. In GRBL laser mode, M3 S1000 fires the laser at full power; M5 turns it off. Always test at low power (S100) first.
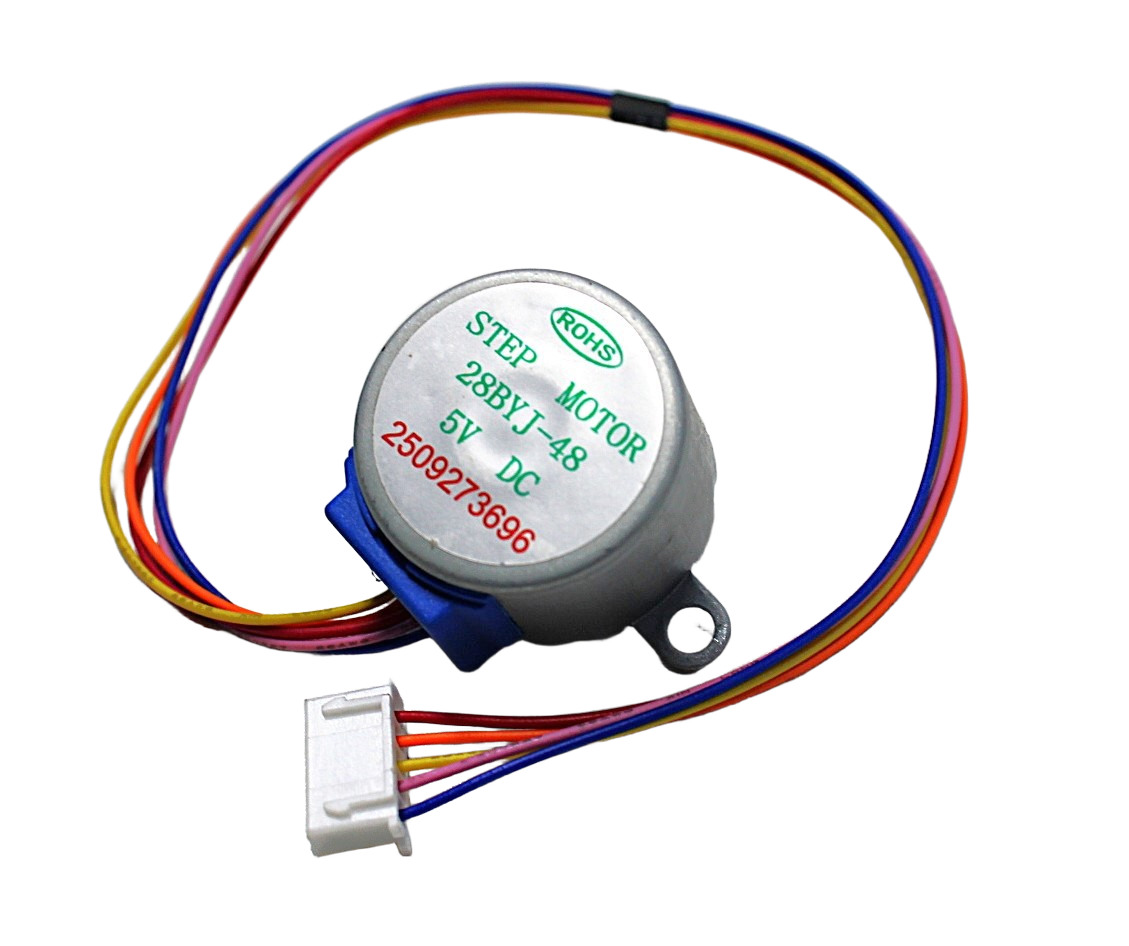
28BYJ-48 5V Stepper Motor
Budget-friendly 5V stepper motor ideal for lightweight low-force CNC axes or pen plotters. Great for prototyping your first GRBL machine before upgrading to NEMA17.
Your First Engrave: Software & Settings
LaserGRBL (free, Windows) and LightBurn (paid, cross-platform) are the two most popular senders for GRBL laser engravers. For beginners, LaserGRBL is excellent. Here is a quick workflow:
- Open LaserGRBL → connect to the correct COM port at 115200 baud.
- Import your image (PNG, JPG, or SVG). For photos, choose “Dithering” mode. For vectors/logos, choose “Line to Line” or “Vectorize”.
- Set the laser line preview — adjust engraving speed (mm/min), laser power (0–1000), and line interval (0.1–0.2 mm for fine detail).
- Recommended starting settings for 3 mm plywood with a 5.5 W laser: Speed 800 mm/min, Power 800/1000, Line interval 0.15 mm.
- Click the play button. Watch the first pass and adjust power down if the wood catches fire rather than burns cleanly.
For importing designs, tools like Inkscape (free) generate clean SVG G-code. Use the Inkscape GRBL extension to export paths directly as G-code files.
A4988 Stepper Motor Driver – Red Board
Essential driver for GRBL CNC builds. Handles micro-stepping up to 1/16 step for smooth, accurate laser head positioning on both axes.
Safety Tips for Laser Engraving
A laser engraver is a powerful tool that demands respect. Follow these safety rules without exception:
- Wear laser safety goggles rated for your laser wavelength (typically 445 nm for blue diode lasers). Never look directly at the beam, even reflected light is dangerous.
- Ventilate the workspace: burning wood and acrylic produces toxic fumes. Use an exhaust fan or fume extractor directed outside.
- Never engrave PVC or vinyl — they release chlorine gas when burned.
- Keep a fire extinguisher nearby. Set up a camera to monitor the machine if you step away.
- Add a physical emergency stop switch wired to the Arduino reset pin or power supply relay.
- Always do a dry-run (laser off, M3 S0) before the first real engrave to verify path and dimensions.
NEMA17 Stepper Motor – D-Type Shaft
The most popular choice for desktop CNC engravers in India. D-type shaft prevents pulley slippage under load; detachable cable simplifies assembly and maintenance.
Frequently Asked Questions
What stepper motor is best for a DIY CNC laser engraver?
NEMA17 motors with 40–48 mm body length and 40–60 N·cm (4–6 kg·cm) torque are the standard choice. They are widely available, work with A4988/DRV8825 drivers, and provide enough force for lightweight laser carriage assemblies at speeds up to 8,000 mm/min.
Can I use a 28BYJ-48 stepper instead of NEMA17?
Yes, for very small and lightweight builds (pen plotters, small laser engravers under 10×10 cm). The 28BYJ-48 has much lower torque and speed than a NEMA17, so it will limit working area and engraving speed. For anything larger, upgrade to NEMA17.
Which laser power should I start with in India?
A 2.5 W laser module is the sweet spot for beginners — safe to handle, capable of engraving wood, leather, and dark acrylic, and available at a reasonable price. Step up to 5.5 W if you want to cut thin materials.
What GRBL sender software works best on Linux/Mac?
LightBurn has the best cross-platform support and is worth the one-time cost for serious projects. For free alternatives, use bCNC (Python-based, works on Linux/Mac/Windows) or LaserGRBL via Wine on Linux.
How do I fix diagonal lines in my engravings?
Diagonal artifacts are usually caused by belt tension imbalance or loose pulleys. Check that both Y-axis belts have identical tension. Also verify your steps/mm calibration with $100 and $101 GRBL parameters using a known-dimension test square.
Do I need limit switches / end stops?
Limit switches are optional but strongly recommended. They enable automatic homing ($H), which gives your machine a repeatable zero point. Without homing, each power-cycle requires manual repositioning of the laser head.
Ready to build your CNC laser engraver? Zbotic.in stocks NEMA17 stepper motors, A4988 driver boards, servo mounts, and all the electronics you need — shipped fast across India. Explore the Robotics & DIY category →


Add comment