
Table of Contents
- Why Build Your Own Power Bank?
- Calculating the Capacity You Need
- Choosing the Right 18650 Cells
- Full Bill of Materials
- Step-by-Step Assembly Guide
- Critical Safety Practices
- Enclosure and Finishing
- Frequently Asked Questions
Commercial power banks have a dirty secret: their rated capacity is almost never the actual capacity delivered to your phone. A “20000mAh” power bank from a popular brand typically delivers only 11,000–13,000mAh to your device after accounting for cell quality, conversion efficiency, and capacity inflation. Building a DIY power bank with 20000mAh of genuine 18650 cells gives you real capacity, complete transparency about what is inside, and the satisfaction of a project that will outlast any commercial product. This guide covers everything — cell selection, BMS wiring, USB module integration, and safety practices — so you can build a power bank that actually delivers on its promise.
Why Build Your Own Power Bank?
The Indian power bank market is flooded with products making inflated capacity claims. Capacity inflation — rating a power bank based on cell capacity at 3.7V rather than at the USB output voltage of 5V — is so widespread it has become an industry norm. An honest 20000mAh rating at 5V output would require cells totalling about 27,000mAh at 3.7V when you account for the boost converter’s ~75-80% efficiency. Almost no consumer product does this math honestly.
By building your own, you:
- Know exactly how many real mAh of genuine cells are inside
- Choose cell brand and quality — Samsung, Panasonic, Sony vs. anonymous “recycled” cells
- Repair and replace individual cells rather than discarding the whole unit
- Customise the form factor for your specific needs (flat, cylindrical, modular)
- Learn fundamental lithium battery, BMS, and power conversion skills applicable to dozens of projects
For Indian engineering students, a DIY power bank build is also an excellent project for practical viva demonstrations, showcasing knowledge of battery management, DC-DC conversion, and USB power delivery.
Calculating the Capacity You Need
Let’s design for a genuine 20000mAh at 3.7V nominal pack. At 5V USB output with 85% boost converter efficiency:
- Usable output: 20,000mAh × 3.7V × 0.85 ÷ 5V = 12,580mAh at USB output
This is honest — about 12.5 full charges of a 3500mAh phone battery, or 2-3 charges of an iPad. If you want more output capacity, scale up the cell count.
Cell count calculation: Using quality 3000mAh 18650 cells (Samsung 30Q or similar):
- Cells in parallel needed: 20,000mAh ÷ 3,000mAh = 6.67 → 7 cells in parallel for 21,000mAh
- Series configuration: For a single-string pack at 3.7V nominal, use 7P (7 cells in parallel, same voltage)
- Total cell count: 7 cells
Alternatively, for a 2S configuration (7.4V pack, more efficient boost conversion, less current draw from cells): 4 cells in each parallel group × 2 groups in series = 8 cells for 12,000mAh at 7.4V → ~12,240mAh at USB output (similar result, but easier on the cells under heavy load).
For this guide, we will build the simpler 7P 1S (single string, 7 cells in parallel) configuration — it is easier to wire and the BMS is simpler.
Choosing the Right 18650 Cells
This is the single most important decision in the entire build. The 18650 cell market in India is contaminated with rewrapped, recycled, and fraudulent cells. Cells claiming to be “Samsung 6000mAh 18650” are physically impossible — no 18650 cell exceeds 3600mAh at the current state of technology (2024). Any cell claiming more than 3500mAh is fraudulent.
Recommended genuine cells (in order of preference):
- Samsung 30Q: 3000mAh, 15A continuous discharge, excellent for power banks and UPS. Very widely available in India through legitimate channels.
- Panasonic/Sanyo NCR18650B: 3400mAh, 4.87A continuous, high capacity but lower discharge rate. Best for capacity-focused power banks where discharge rate is not critical.
- Sony/Murata VTC6: 3000mAh, 15A continuous, similar performance to Samsung 30Q.
- LG HG2: 3000mAh, 20A continuous, excellent balance of capacity and discharge performance.
When buying, purchase from a reputable electronics store (avoid random online sellers with prices too good to be true). Weigh the cells — genuine 18650 cells weigh 44–50 grams each. Rewrapped cells often weigh less due to smaller internal cells.
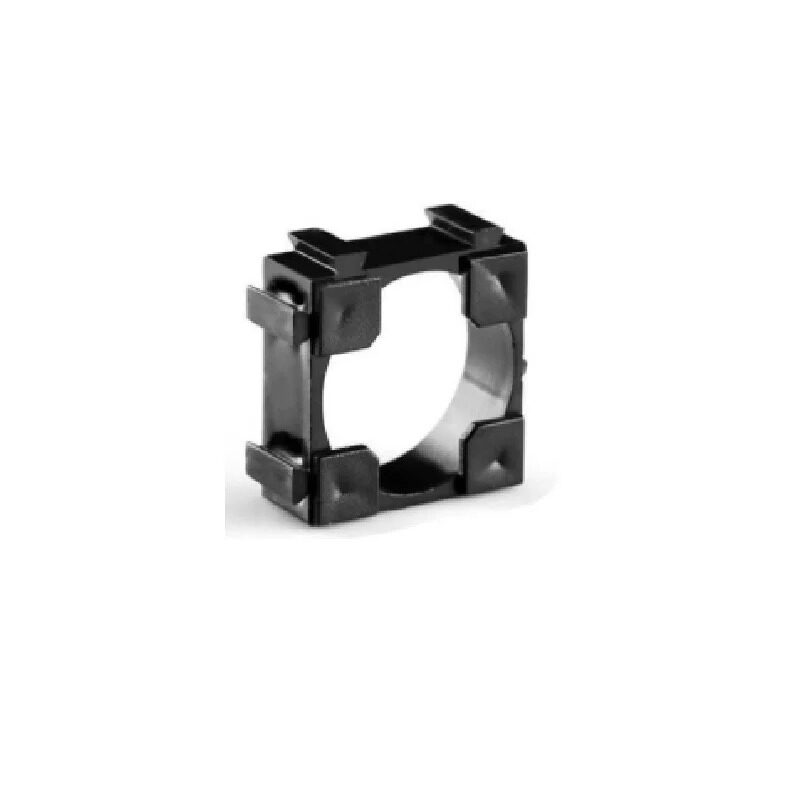
1 x 18650 Battery Holder with 18.4MM Bore Diameter – Pack of 4
Solid 18650 cell holders that make parallel wiring clean and safe. Use these to hold your 7 cells in the power bank enclosure without spot welding.
Full Bill of Materials
Here is everything you need for a 7-cell 21,000mAh DIY power bank:
- 7x 18650 cells (Samsung 30Q or equivalent genuine cells)
- 7x single 18650 battery holders with spring contacts (or a custom 7P holder)
- 1S BMS with 7A+ continuous rating — to handle up to 7 cells charging simultaneously at 1A each. A 1S 10A BMS with balance is ideal. (1S because all 7 cells are in parallel = same voltage as one cell)
- Power bank module with USB output — the IP5306 based module is ideal: handles charging input via micro USB or Type-C, boosts to 5V output, LED battery level indicator, automatic load detection. Available at Zbotic as an 18650 charging module.
- Micro USB / Type-C connector cable for charging input
- USB-A female connector for phone charging output (usually integrated on the power bank module)
- Project enclosure — 3D printed or a PVC pipe section with end caps works well for cylindrical cells
- Nickel strip or 18AWG wire for connecting cells in parallel
- Insulating tape and cell wraps to prevent accidental shorts
Estimated cost breakdown (India, 2024):
- 7x Samsung 30Q cells: ₹2,100 (₹300/cell from reputable seller)
- BMS + power bank module: ₹200–₹400
- Battery holders: ₹80
- Enclosure + misc: ₹100–₹200
- Total: ~₹2,500–₹2,900
Compare this to a commercial 20000mAh power bank (with inflated capacity) costing ₹1,500–₹2,000 — your DIY version costs more upfront but delivers genuine capacity with cells you trust and can replace.
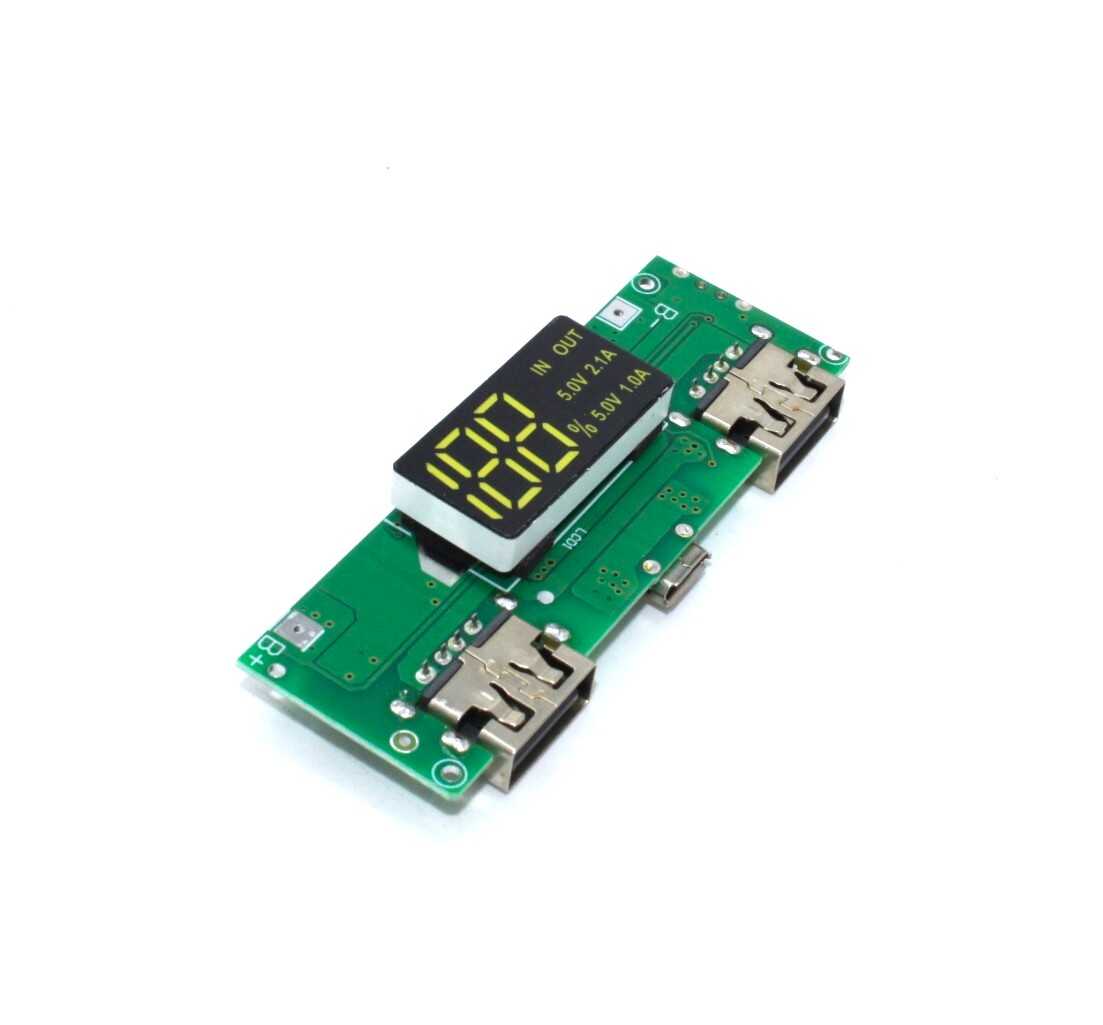
18650 5V 1A/2A Lithium Battery Digital Display & Charging Module, Dual USB Output
The core power bank module integrating 18650 charging, 5V boost, dual USB output, and digital display. Drop it into your DIY build and you have a complete power bank in minutes.
Step-by-Step Assembly Guide
Take your time with each step. Lithium cell assembly requires care and attention to avoid shorts.
Step 1: Test all cells before assembly. Measure each cell’s resting voltage with a multimeter. All cells in a parallel pack must be within 0.1V of each other before connecting. Cells at different voltages will surge current between each other when connected in parallel. Charge all cells to the same voltage (preferably 3.7V for balanced parallel assembly).
Step 2: Arrange the cells in holders. Place all 7 cells in their holders in the same orientation (all positive terminals facing the same direction). Wrap individual cells with kapton tape or reinstalled PVC shrink wrap to prevent any possibility of the cell body creating an accidental circuit.
Step 3: Wire cells in parallel. Connect all positive terminals together using nickel strip (spot-welded for best results, or soldered quickly with a hot iron — avoid prolonged heat on cells) or with short sections of 18AWG silicon wire. Do the same for all negative terminals. You now have a 7P cell block presenting a single pair of terminals at approximately 3.7V.
Step 4: Connect the BMS. Wire the cell block B+ and B- to the BMS battery input. This gives the BMS control over the pack for protection.
Step 5: Connect the power bank module. Wire the BMS protected output (P+ and P-) to the battery input of your IP5306 or equivalent power bank module. This module handles everything else: charging input, boost to 5V, USB output, LED indicators.
Step 6: Test before enclosing. Connect your input charger. Verify the LEDs respond to charge state. Connect a phone and verify it charges. Use a USB tester (USB meter) to verify the 5V output voltage and charging current. Confirm the full pack draws expected charge current.
Step 7: Insulate and enclose. Wrap all exposed connections with kapton tape. Ensure no metal contacts are exposed inside the enclosure. Secure the PCB module and cell block firmly to prevent movement. Close the enclosure.
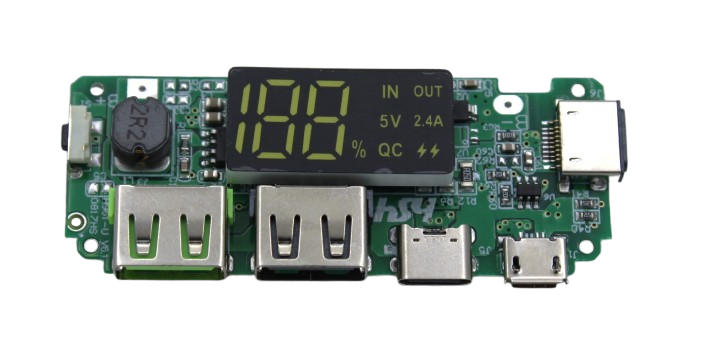
18650 5V 2.4A Lithium Battery Digital Display Charging Module Dual USB Output Booster
Higher-current 2.4A USB output version for faster phone charging from your DIY power bank. The dual USB output lets you charge two devices simultaneously.
Critical Safety Practices
Lithium batteries store enormous energy density. A 7-cell 21Ah pack at 3.7V contains ~78Wh of energy — equivalent to a small bomb if shorted. Take these precautions seriously:
Never short circuit the cell block or BMS output. A short on a 7P pack can instantly draw hundreds of amps, causing a fire or explosion. Work with one connection at a time. Cover the cell pack positive terminal with tape until you are ready to make the final connection.
Always use a BMS. Never connect cells directly to a load or charger without a BMS. The BMS prevents overcharge, over-discharge, and overcurrent — all of which can cause fires or permanent cell damage.
Avoid parallel cells with different histories. Never mix old and new cells, or cells from different manufacturers, in the same parallel group. Mismatched internal resistance causes unequal current distribution that accelerates degradation.
Use appropriate wire gauges. With 7 parallel cells capable of delivering 7+ amps, use 18AWG or thicker wire for the main pack connections. Thin wire creates resistance heating, which is a fire risk.
Store safely. Keep the finished power bank away from flammable materials. If storing for long periods, charge to 50% (around 3.8V resting). Never store fully charged lithium cells for months — it accelerates capacity loss.
Enclosure and Finishing
The enclosure turns a circuit board and cells into a usable product. Several approaches work well:
3D printed enclosure: Design a custom box in Fusion 360 or FreeCAD sized exactly for your cell layout. Print in PETG (not PLA, which can deform in a hot car). Add threaded inserts for screw closure. This gives the most professional result.
PVC pipe enclosure: For a cylindrical pack (cells laid end-to-end or side-by-side in a tube), a 50mm or 63mm PVC pipe with end caps works surprisingly well. Drill holes for the USB ports and charging LED window. Sand and paint for a clean look.
Commercial project box: A rectangular ABS project box (Hammond or equivalent) with drilled holes for USB ports works for a quick build. Available at most electronics component shops in India.
For finishing touches, add a USB meter/display window to show output current in real time, label the charging port and output port clearly, and add rubber feet for table stability. A quality DIY power bank can look as professional as a commercial product with attention to these details.
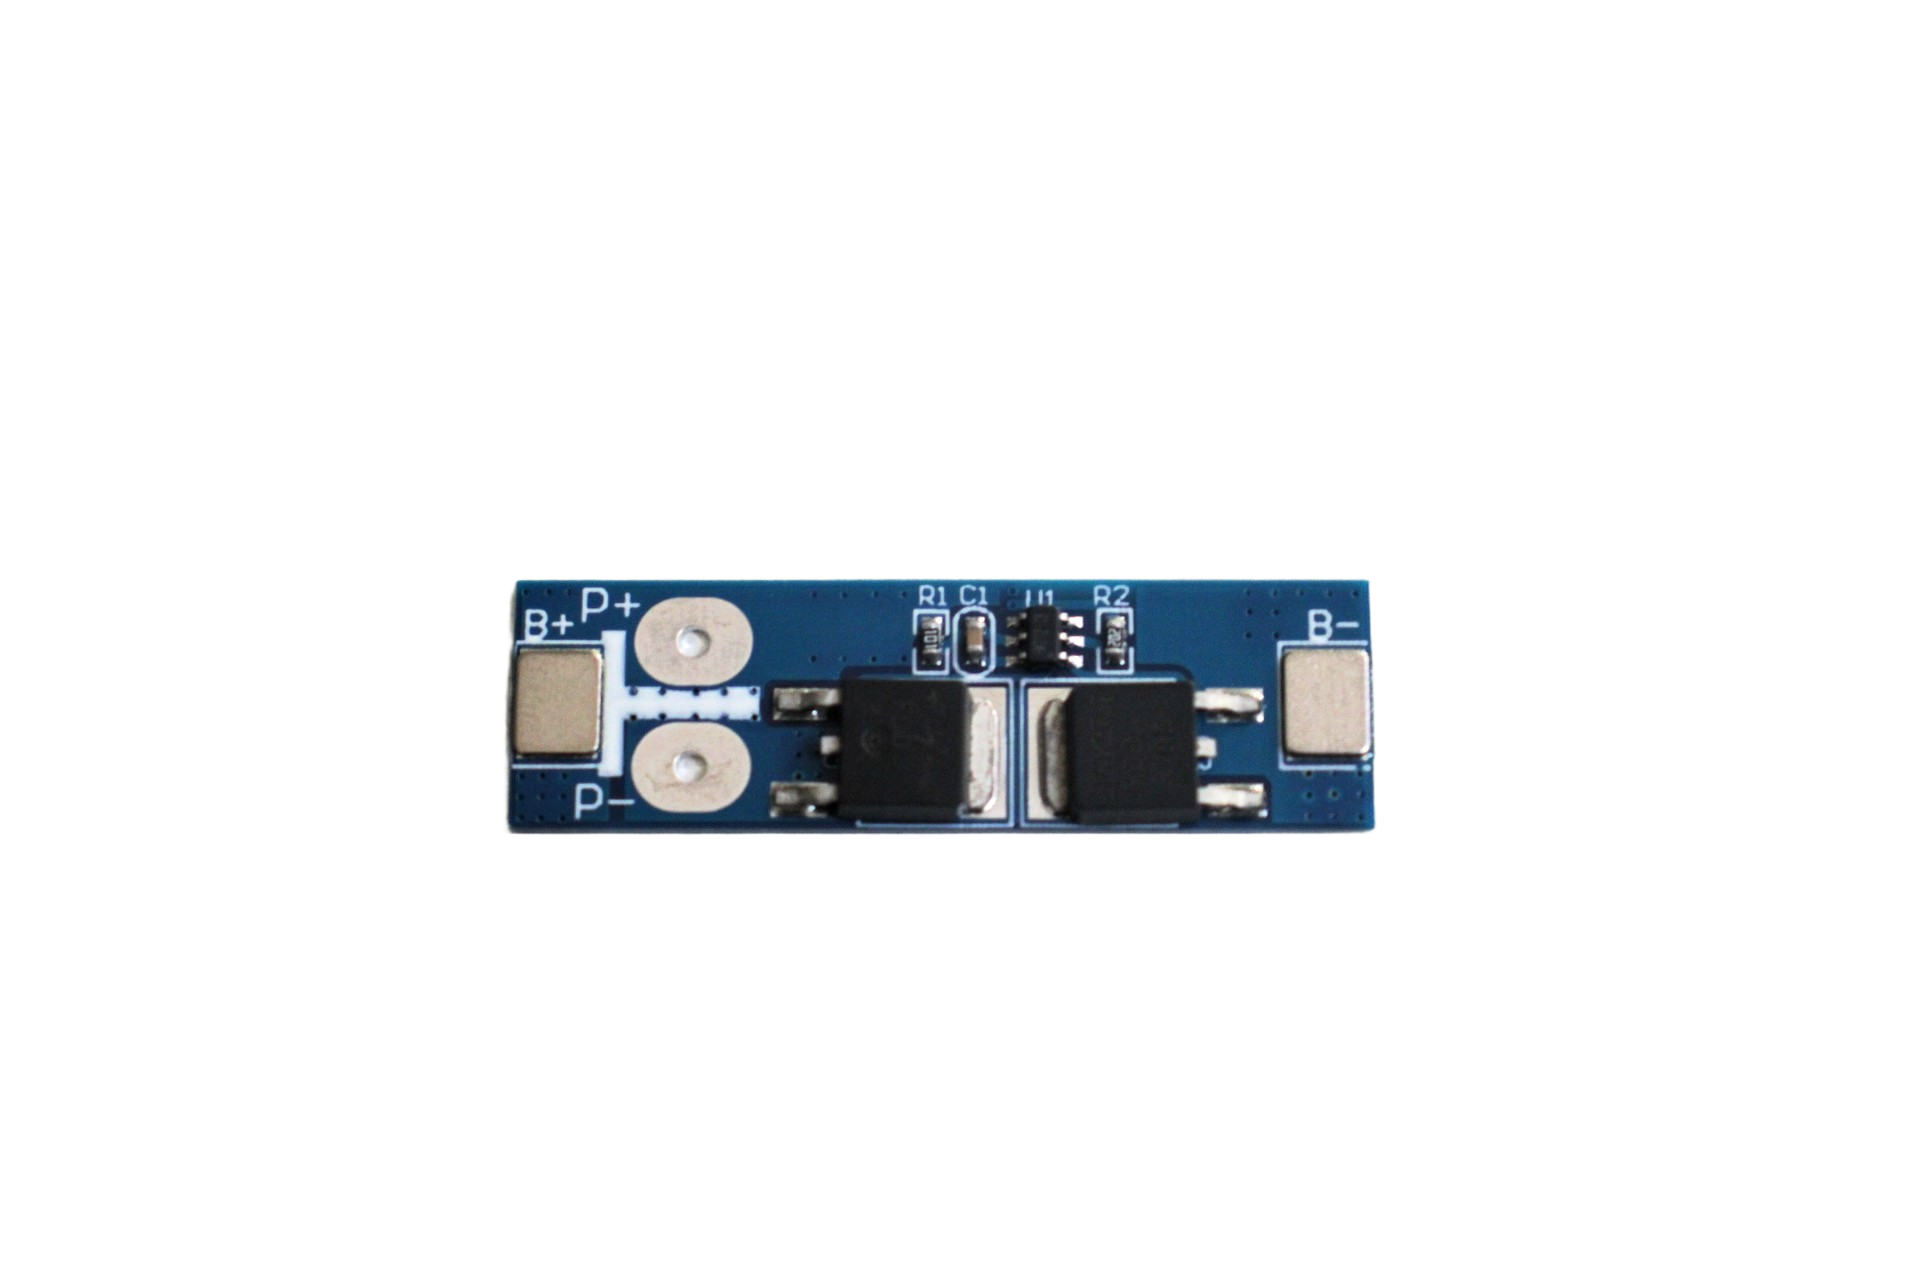
1S 12A 3.6V BMS Battery Protection Board for Li-ion Cell
High-current 12A rated BMS perfect for a 7P 18650 pack — provides overcharge, over-discharge, and short circuit protection for your DIY power bank build.
Frequently Asked Questions
How many times will this 20000mAh power bank charge my phone?
For a phone with a 4000mAh battery: 21,000mAh × 3.7V × 0.85 efficiency ÷ 5V ÷ 4000mAh = approximately 3.3 full charges. For a 3000mAh battery, about 4.4 full charges. Remember that phones themselves have charge losses (typically 85–90% charging efficiency), so real-world results are slightly lower — roughly 3 and 4 charges respectively.
Can I use recycled laptop battery cells for this build?
You can, but it is not recommended for a primary power bank build. Laptop cells are already partially degraded, have unknown cycle history, and often have mismatched capacities when pulled from different packs. If you test and match cells carefully (same resting voltage, tested capacity within 10% of each other), recycled cells can work for a learning project. Never use them for a power bank you plan to carry on flights — airline regulations require stated battery capacity, and degraded cells may fail in ways that flagging rules are designed to prevent.
Is it legal to carry this DIY power bank on flights in India?
DGCA regulations allow lithium batteries up to 100Wh in carry-on baggage (no check-in). Our 21Ah at 3.7V = 77.7Wh, which is under the limit. However, DIY packs without a commercial label may attract inspection. Carry the technical specifications written clearly, showing the capacity in Wh. Some airlines may be more conservative, so check before your flight.
How do I know when to replace cells in the power bank?
Capacity fade is gradual. Replace cells when you notice the power bank charges your phone noticeably fewer times than when new — a rough sign of 20–30% capacity loss. You can also test individual cell capacity with a hobby charger that has a discharge test function. Replace cells that test below 70% of rated capacity or that show significantly higher internal resistance than fresh cells.
Can I add wireless charging to this DIY power bank?
Yes — Qi wireless charging transmitter modules are available that accept 5V input and output 5V wireless charging up to 10W. Simply wire the module to the USB output of your power bank module. You need to accommodate the Qi coil in your enclosure design, which may require a flat enclosure rather than a cylindrical one. The coil must be near the top surface with minimal obstruction for efficient coupling.
Build Your 20000mAh Power Bank Today
A DIY 20000mAh power bank with genuine 18650 cells is one of the most rewarding and practical electronics projects you can complete in a weekend. You end up with a power bank you genuinely trust, built with your own hands, using cells of known quality. All the 18650 holders, BMS protection boards, charging modules, and accessories you need are available at Zbotic.in. Start your power bank build today — your phone will thank you.


Add comment