
The Nokia 5110 LCD Arduino tutorial is a rite of passage for Indian electronics hobbyists. This tiny 84×48 pixel monochrome display — salvaged from old Nokia mobile phones — is one of the cheapest graphical displays you can buy, costing just ₹50–₹100. Despite its age, the Nokia 5110 LCD powered by the PCD8544 controller remains enormously popular because it is easy to wire, draws very little power (only 6–7 mA), and works with virtually every Arduino variant. In this guide, you will learn everything from basic wiring to drawing custom graphics and displaying sensor data.
About the Nokia 5110 LCD and PCD8544 Controller
The Nokia 5110 display module uses the Philips PCD8544 driver IC, which communicates over a 4-wire SPI interface. The display resolution is 84 columns × 48 rows, giving you 4,032 pixels that can each be set on or off. While it cannot display colour or photographic images, it is perfectly capable of showing text in various font sizes, icons, graphs, and even simple animations.
Key specifications:
- Resolution: 84 × 48 pixels
- Interface: SPI (4-wire, up to 4 Mbps)
- Operating voltage: 3.3 V (most modules include a 3.3 V regulator and level shifter)
- Current draw: ~6 mA at full contrast, ~1 mA with backlight off
- Backlight: Blue or white LED backlight (most breakout modules)
- Temperature range: -25°C to +70°C — works fine in all Indian conditions
The display module sold in India typically comes on a blue or red PCB with a 3.3 V regulator and voltage dividers, making it safe to connect directly to 5 V Arduino boards without extra level shifting — though the logic signals should ideally be 3.3 V. We will cover this in the wiring section.
Wiring the Nokia 5110 to Arduino
The Nokia 5110 module has 8 pins. Here is the standard connection to an Arduino Uno or Nano:
| Nokia 5110 Pin | Label | Arduino Pin | Notes |
|---|---|---|---|
| 1 | RST | D8 | Reset |
| 2 | CE (CS) | D7 | Chip select |
| 3 | DC | D6 | Data/Command |
| 4 | DIN (MOSI) | D11 | SPI data |
| 5 | CLK (SCK) | D13 | SPI clock |
| 6 | VCC | 3.3 V | Use Arduino 3.3V pin |
| 7 | LIGHT (BL) | GND or PWM | GND = backlight on |
| 8 | GND | GND | Common ground |
Voltage note: Most Indian Nokia 5110 modules include on-board 10 kΩ resistors on data lines to drop 5 V signals down to approximately 3.3 V. If your module has this protection, connecting to a 5 V Arduino is safe. Otherwise, add a 10 kΩ resistor in series on RST, CE, DC, DIN, and CLK lines.
For backlight brightness control, connect the LIGHT pin to a PWM pin (D9) and use analogWrite(9, value) where 0 = full brightness (active low) and 255 = off.

LM35 Temperature Sensors
Classic analog temperature sensor — pair it with Nokia 5110 to build a compact standalone thermometer without any extra ADC hardware.
Installing the Adafruit PCD8544 Library
The easiest way to use the Nokia 5110 with Arduino IDE is through the Adafruit PCD8544 Nokia 5110 LCD library. It depends on the Adafruit GFX library for graphics primitives.
Install both libraries through Arduino IDE’s Library Manager:
- Open Arduino IDE → Sketch → Include Library → Manage Libraries
- Search for “Adafruit PCD8544” and click Install
- When prompted, also install the Adafruit GFX dependency
- Restart Arduino IDE
Alternatively, install via CLI:
arduino-cli lib install "Adafruit PCD8544 Nokia 5110 LCD library"
arduino-cli lib install "Adafruit GFX Library"
Another excellent option is the U8g2 library by olikraus, which supports dozens of display controllers including PCD8544, offers more fonts, and has lower RAM usage — important for Uno’s 2 KB SRAM.
First Sketch: Hello World and Basic Text
Let’s write your first Nokia 5110 sketch. This code initialises the display and prints text at different sizes:
#include <SPI.h>
#include <Adafruit_GFX.h>
#include <Adafruit_PCD8544.h>

// Pin definitions
#define LCD_CLK   13
#define LCD_DIN   11
#define LCD_DC     6
#define LCD_CE     7
#define LCD_RST    8

Adafruit_PCD8544 display = Adafruit_PCD8544(LCD_DC, LCD_CE, LCD_RST);

void setup() {
  display.begin();
  display.setContrast(57);  // Adjust if text appears too dark/faint
  display.clearDisplay();

  // Normal 1:1 pixel scale
  display.setTextSize(1);
  display.setTextColor(BLACK);
  display.setCursor(0, 0);
  display.println("Namaste!");
  display.println("Nokia 5110");
  display.println("Arduino Demo");
  display.println();
  display.setTextSize(2);
  display.println("Zbotic");
  display.display();  // Push buffer to display
}

void loop() {
  // Nothing in loop for static display
}
Tip: The setContrast() value is critical. Indian-market Nokia 5110 modules often need a value between 50 and 65 for readable text. Values too high make the screen appear all black; too low gives invisible text. Start at 57 and adjust.
Drawing Graphics and Custom Bitmaps
The Adafruit GFX library gives you a full set of drawing primitives:
// Draw a rectangle (x, y, width, height, color)
display.drawRect(0, 0, 84, 48, BLACK);

// Draw a filled circle (x, y, radius, color)
display.fillCircle(42, 24, 10, BLACK);

// Draw a line from (x0,y0) to (x1,y1)
display.drawLine(0, 0, 83, 47, BLACK);

// Draw a triangle
display.drawTriangle(42, 0, 0, 47, 83, 47, BLACK);

// Display custom bitmap (store in PROGMEM to save RAM)
const unsigned char myBitmap[] PROGMEM = {
  0xFF, 0x81, 0xBD, 0xA5, 0xA5, 0xBD, 0x81, 0xFF
};
display.drawBitmap(38, 20, myBitmap, 8, 8, BLACK);
display.display();
To create custom bitmaps (like your project logo), use the free tool at image2cpp — upload a black and white image, scale it to fit within 84×48, and it generates the PROGMEM byte array for you.
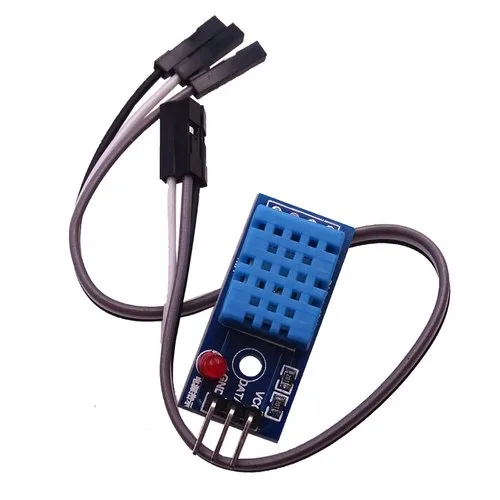
DHT11 Temperature and Humidity Sensor Module with LED
Digital temperature and humidity sensor with onboard LED indicator — perfect for building a standalone weather display with Nokia 5110 and Arduino Nano.
Sensor Data Display Projects
The Nokia 5110’s compact size makes it ideal for battery-powered sensor nodes. Here are three popular project ideas for Indian makers:
Project 1: Digital Thermometer with LM35
#include <SPI.h>
#include <Adafruit_GFX.h>
#include <Adafruit_PCD8544.h>

Adafruit_PCD8544 display = Adafruit_PCD8544(6, 7, 8);

void setup() {
  display.begin();
  display.setContrast(57);
}

void loop() {
  int rawADC = analogRead(A0);
  float voltage = rawADC * (5.0 / 1023.0);
  float tempC = voltage * 100.0;  // LM35: 10mV/°C

  display.clearDisplay();
  display.setTextSize(1);
  display.setCursor(5, 5);
  display.print("Temperature:");
  display.setTextSize(2);
  display.setCursor(15, 20);
  display.print(tempC, 1);
  display.print(" C");
  display.display();
  delay(1000);
}
Project 2: Battery Voltage Monitor
Use a voltage divider (two resistors) to scale your battery voltage to 0–5 V range and display it on the Nokia 5110. Ideal for solar-charged projects and monitoring LiPo battery packs used in drones and RC vehicles.
Project 3: Soil Moisture Display
Connect a capacitive soil moisture sensor to Arduino’s ADC and show moisture percentage on the Nokia 5110. A graph drawn with display.drawPixel() gives a nice visual trend over time.

Capacitive Soil Moisture Sensor
Corrosion-resistant capacitive sensor for accurate soil moisture readings — display live garden or farm soil status on Nokia 5110 LCD with Arduino.
Power Tips and Contrast Adjustment
The Nokia 5110 is famously power-efficient. Here are tips to maximise battery life in portable projects:
- Turn off backlight: Connect the LIGHT pin to a digital output and set it HIGH when not needed. The backlight uses about 3–4 mA — more than the display itself!
- Use
display.sleep(true): The PCD8544 has a built-in sleep mode that drops power to under 1 µA. Perfect for battery-powered data loggers that wake periodically. - Contrast adjustment: The optimal contrast value varies with temperature. Indian summers can push ambient temps to 40°C+ — you may need to lower contrast by 5–10 points vs. winter. Add a potentiometer to Arduino’s ADC and call
display.setContrast(analogRead(A1)/16)for automatic adjustment. - SPI speed: The PCD8544 supports up to 4 Mbps. Adafruit’s library defaults to a safe lower speed. If you see slow screen refreshes, check the SPISettings in the library source.

DHT20 SIP Packaged Temperature and Humidity Sensor
I2C DHT20 sensor in compact SIP package — great for portable Nokia 5110 weather stations since it frees up SPI pins for the display.
Frequently Asked Questions
Q1: My Nokia 5110 screen is all black or shows nothing — what is wrong?
Check the contrast setting first — call display.setContrast(57) and try values from 40 to 70. Also verify that VCC is connected to Arduino’s 3.3 V pin (not 5 V directly — this can damage the display). Confirm your pin assignments in code match your physical wiring.
Q2: Can I use Nokia 5110 with ESP8266 or ESP32?
Yes. Connect to the ESP’s SPI pins (MOSI=D7, SCK=D5 on NodeMCU) and use the same Adafruit PCD8544 library. Since ESP8266/ESP32 is 3.3 V native, no level shifting needed. Remember to use ESP8266 SPI pins rather than Arduino’s pin numbers.
Q3: How do I display numbers with more than 2 decimal places?
Use the print(value, decimals) syntax: display.print(temperature, 3) shows 3 decimal places. For formatted strings, use dtostrf(value, width, decimals, buffer) to convert floats to character arrays.
Q4: The display works but refreshes slowly. How do I speed it up?
Call display.clearDisplay() and display.display() only when needed, not on every loop iteration. Also consider using the U8g2 library in page mode, which refreshes small portions of the display at a time and is significantly faster.
Q5: Is the Nokia 5110 better than an OLED for Arduino projects?
The Nokia 5110 wins on cost (₹60 vs ₹150+ for OLED) and durability (no OLED burn-in risk). OLEDs are sharper, higher contrast, and available in I2C (saving SPI pins). For battery-powered projects, OLEDs draw slightly more at full brightness but have near-zero draw when pixels are off. Choose Nokia 5110 for tight budgets; choose OLED for best visual quality.
Start Your Nokia 5110 Project Today
At under ₹100, the Nokia 5110 LCD is unbeatable value for Arduino display projects. Whether you are building a thermometer, soil moisture monitor, or battery gauge, this guide has everything you need to get started.
Find all the sensors and components you need for your projects at Zbotic.in — with fast delivery across India and competitive pricing for makers and students.


Add comment