
Imagine controlling your home appliances, reading sensor data, or toggling LEDs simply by sending a message on Telegram. With ESP32 Telegram bot control, this is entirely possible — and it’s easier to set up than you might think. Telegram’s Bot API is free, has no message rate limits for normal use, works over HTTPS, and doesn’t require a static IP or port forwarding. In this comprehensive tutorial, we’ll build a full-featured ESP32 Telegram bot that can receive commands, control a relay (or LED), and reply with sensor readings.
Why Use Telegram for ESP32 Control?
There are many ways to control an ESP32 remotely — Blynk, MQTT, a custom web server, Firebase — but Telegram has some unique advantages that make it especially attractive for Indian makers and hobbyists:
- No server needed: Your ESP32 polls the Telegram servers via HTTPS. No server setup, no domain, no port forwarding on your router.
- Free with no message limits: Telegram’s Bot API is completely free for personal use with generous rate limits (30 messages/second to different users, 1 message/second to the same user).
- Works on any internet connection: Whether you’re on Jio 4G, Airtel broadband, or a friend’s Wi-Fi, Telegram is accessible everywhere in India.
- Secure: HTTPS encrypted communication. You can restrict your bot to respond only to your own Telegram user ID, preventing anyone else from controlling your hardware.
- Rich UI: Telegram supports inline keyboards, custom reply keyboards, photo sending, and location sharing — all usable from your ESP32.
- No app to build: Unlike Blynk which requires downloading a separate app, everyone already has Telegram (or can install it in seconds).
Creating a Telegram Bot with BotFather
Setting up a Telegram bot takes less than 2 minutes:
- Open Telegram and search for @BotFather (the official Telegram bot management service, verified with a blue tick).
- Start a chat and send:
/newbot - Enter a display name for your bot, e.g.,
My ESP32 Bot - Enter a username for your bot — must end in “bot”, e.g.,
my_esp32_home_bot - BotFather will reply with your Bot Token — a long string like
1234567890:ABCDefghIJKLmnopQRSTuvwxyz. Save this.
Next, find your personal Telegram User ID — this is a number, NOT your username. Use @userinfobot: search for it, start a chat, and it will reply with your User ID (e.g., 123456789). Save this — you’ll use it to restrict bot access to only your account.
Hardware Setup
For this tutorial, we’ll control an LED and read a DHT11 temperature/humidity sensor via Telegram commands. The wiring is simple:
| Component | ESP32 Pin |
|---|---|
| LED (with 330Ω resistor) | GPIO 2 → GND |
| DHT11 Data pin | GPIO 4 |
| DHT11 VCC | 3.3V |
| DHT11 GND | GND |

DHT11 Temperature and Humidity Sensor Module with LED
Read ambient temperature and humidity on demand via Telegram commands — this module version includes a built-in status LED and 10kΩ pull-up resistor.
Installing Required Libraries
Open Arduino IDE and install these libraries via Sketch → Include Library → Manage Libraries:
- UniversalTelegramBot by Brian Lough — version 1.3.0 or later
- ArduinoJson by Benoit Blanchon — version 6.x (required by UniversalTelegramBot)
- DHT sensor library by Adafruit
- Adafruit Unified Sensor
Also ensure you have the ESP32 board package installed in Arduino IDE (via Boards Manager, search for “esp32” by Espressif).
Complete ESP32 Arduino Code
#include <WiFi.h>
#include <WiFiClientSecure.h>
#include <UniversalTelegramBot.h>
#include <ArduinoJson.h>
#include <DHT.h>

// Wi-Fi
const char* ssid     = "YourWiFiSSID";
const char* password = "YourWiFiPassword";

// Telegram Bot Token (from BotFather)
#define BOT_TOKEN "1234567890:YourBotTokenHere"

// Your Telegram User ID (from @userinfobot)
#define CHAT_ID   "123456789"

// Pins
#define LED_PIN  2
#define DHTPIN   4
#define DHTTYPE  DHT11

DHT dht(DHTPIN, DHTTYPE);

WiFiClientSecure client;
UniversalTelegramBot bot(BOT_TOKEN, client);

unsigned long lastTimeBotRan = 0;
const int botRequestDelay = 1000; // Check Telegram every 1 second

void handleNewMessages(int numNewMessages) {
  for (int i = 0; i  botRequestDelay) {
    int numNewMessages = bot.getUpdates(bot.last_message_received + 1);
    while (numNewMessages) {
      handleNewMessages(numNewMessages);
      numNewMessages = bot.getUpdates(bot.last_message_received + 1);
    }
    lastTimeBotRan = millis();
  }
}
Upload this code. Open the Serial Monitor at 115200 baud. Once the ESP32 connects to Wi-Fi, open Telegram, find your bot by its username, and send /start. You’ll see the welcome menu. Try sending /ledon — the LED on GPIO2 should light up!

Ai Thinker NodeMCU-32S ESP32 Development Board
The ideal board for this Telegram bot project — proven Wi-Fi performance, easy USB programming, and 38 usable GPIO pins for expanding your command set.
Advanced Commands: Sensor Data and Keyboard Menus
Adding a Custom Reply Keyboard
Instead of typing commands, you can create a persistent keyboard in Telegram. Replace the bot.sendMessage(chat_id, welcome, "") call with a keyboard layout:
String keyboardJson = "[["LED ON","LED OFF"],["Temperature","Status"]]";
bot.sendMessageWithReplyKeyboard(chat_id, "Choose a command:",
    "", keyboardJson, true);
This creates a persistent keyboard at the bottom of the Telegram chat — users just tap buttons instead of typing.
Controlling Multiple Relays
Extend the bot to control 4 relays for home automation — light, fan, water pump, and geyser for example. Connect a 4-channel relay module to GPIOs 25, 26, 27, 32. Add commands like /light_on, /fan_off, etc. and the corresponding digitalWrite() calls.
Sending BME280 Readings
Replace the DHT11 with a BME280 to also report atmospheric pressure. Include the pressure reading in your /temp reply. Useful for weather monitoring stations.

BMP280 Barometric Pressure and Altitude Sensor I2C/SPI
Add pressure and altitude readings to your Telegram bot responses — this I2C sensor connects to just 2 pins and gives highly accurate barometric data.
Sending Photos from ESP32-CAM via Telegram
Combine the Telegram bot with an ESP32-CAM to get on-demand photos. Add a /photo command that triggers the ESP32-CAM to capture and send a JPEG image directly to your Telegram chat using bot.sendPhoto(). Perfect for a doorbell camera, pet monitor, or garden surveillance.
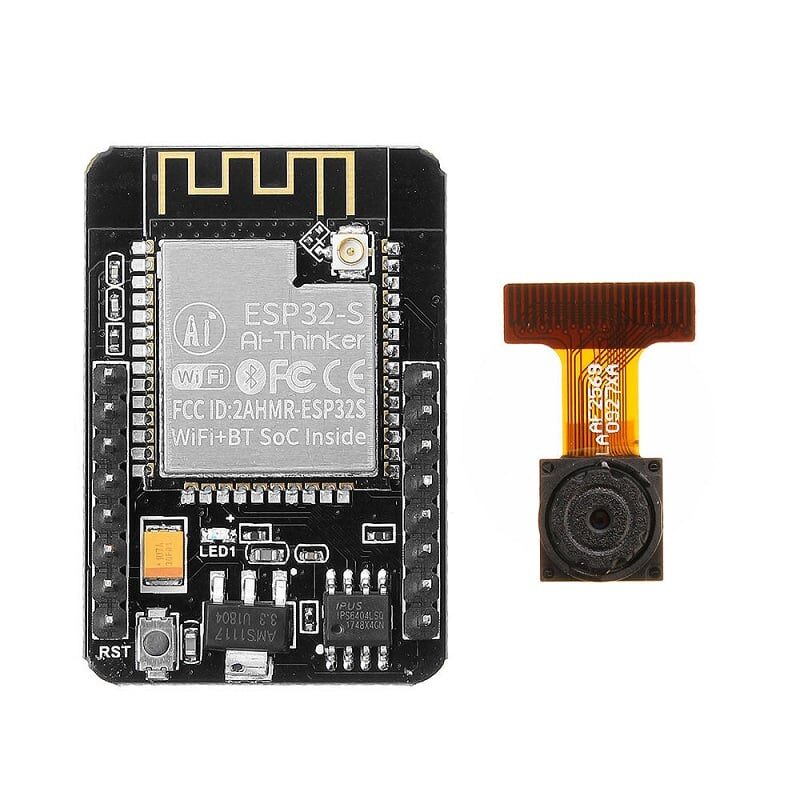
Ai Thinker ESP32-CAM with AF2569 Camera Module
Take your Telegram bot to the next level — request on-demand photos from anywhere using this compact ESP32-CAM module with the OV2640 camera.
Power the Bot 24/7
For a Telegram bot that’s always on, you need reliable power. A battery-backed power supply or a UPS-protected outlet is ideal. For portable or outdoor installations, use an 18650 battery shield.
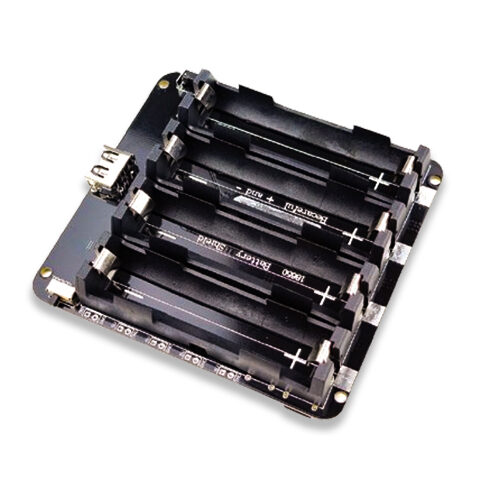
4 x 18650 Lithium Battery Shield for ESP32 with On-Off Button
Run your Telegram bot for days without recharging using this quad-cell 18650 shield — ideal for portable installations and power outage scenarios.
Frequently Asked Questions
Is the Telegram Bot API free to use?
Yes, the Telegram Bot API is completely free with no hidden charges. You can send up to 30 messages per second across all users and 1 message per second to the same chat. For a personal home automation bot with just one or two users, these limits are never an issue.
What is the response latency for ESP32 Telegram bot commands?
Typical response time from sending a command to getting a reply is 1–3 seconds, depending on your internet connection and Telegram server load. The ESP32 polls Telegram’s servers every 1 second (configurable). For time-critical applications, consider increasing polling frequency to 500ms (set botRequestDelay = 500).
How do I prevent strangers from controlling my ESP32 bot?
Always check the chat_id against your own Telegram User ID (as shown in the code). Never share your bot token publicly. Additionally, you can set the bot’s privacy mode in BotFather to prevent it from receiving group messages.
Can multiple people control the same ESP32 bot?
Yes. Instead of comparing against a single CHAT_ID, maintain an array of authorised chat IDs. Check if the incoming chat_id exists in the array before processing commands. This lets you share control with family members or a work team.
Does this project work with ESP8266 as well?
Yes. The UniversalTelegramBot library supports both ESP32 and ESP8266. The code changes are minimal — replace <WiFi.h> with <ESP8266WiFi.h> and <WiFiClientSecure.h> with <WiFiClientSecure.h> (same name, different ESP8266 implementation). Also remove the client.setCACert() call and use client.setInsecure() for ESP8266 due to limited SSL certificate handling.
Start Building Your ESP32 Telegram Bot
Get all the ESP32 boards, sensors, battery shields, and components you need at Zbotic.in — India’s trusted electronics store. Competitive prices, genuine products, and fast delivery across India.


Add comment