
If you are just starting with Arduino and wondering which sensor modules to buy first, you are not alone. Walking into an electronics store — or browsing an online catalogue — reveals hundreds of modules, and it is overwhelming without a roadmap. This guide curates the best sensor modules for Arduino beginners, explains what each one does, shows you how to wire it up, and gives you a working code snippet so you can see results within minutes of unboxing. We also recommend a bundle strategy so you buy smart and avoid redundant purchases.
What to Look for in a Beginner Sensor Bundle
A good beginner sensor kit should satisfy four criteria:
- Easy wiring: 3 or 4 pin connections (VCC, GND, signal). Avoid sensors requiring complex differential pair wiring or high-voltage isolation until you have basics down.
- Rich library support: Every sensor on this list has at least one actively maintained Arduino library in the Arduino IDE Library Manager. No bit-banging protocols from scratch.
- Practical projects: Each sensor should enable a project you can actually show someone — a thermometer, a plant monitor, a gas alarm — rather than being a pure exercise.
- Value for money: India-specific pricing. No point recommending a ₹5,000 sensor to a beginner when a ₹150 one teaches the same concepts.
Temperature Sensors: LM35, DHT11, DS18B20
Temperature sensing is the canonical Arduino first project. Three sensors form the beginner-to-intermediate ladder:
LM35 — The Analog Basics Teacher
The LM35 outputs 10 mV per °C. Connect VCC to 5V, GND to GND, output to A0. That is it — no library needed. Read with analogRead(A0), convert with voltage * 100 (after dividing ADC counts by 1023 and multiplying by 5). The LM35 teaches analog signal conversion, ADC basics, and Ohm’s law concepts. Price: ~₹25–50.
void loop() {
  float voltage = analogRead(A0) * 5.0 / 1023.0;
  float temp_C = voltage * 100.0;
  Serial.println(temp_C);
  delay(1000);
}
DHT11 — Your First Digital Sensor
The DHT11 adds humidity measurement to temperature, communicates over a single digital wire, and costs under ₹80. It introduces beginners to: protocol libraries, timing-critical communication, and multi-variable sensors. Accuracy is ±2 °C and ±5% RH — not lab grade, but perfectly fine for home automation and learning.
#include <DHT.h>
#define DHTPIN 4
DHT dht(DHTPIN, DHT11);
void setup() { Serial.begin(9600); dht.begin(); }
void loop() {
  Serial.print(dht.readTemperature()); Serial.print(" C  ");
  Serial.print(dht.readHumidity()); Serial.println(" %");
  delay(2000);
}
DS18B20 — Precision and Multi-Drop Wiring
The DS18B20 communicates over Dallas 1-Wire protocol. Its party trick: you can wire 10 or more DS18B20 sensors on a single data pin, each with a unique 64-bit address. This teaches addressing, bus topologies, and digital thermometry with ±0.5 °C accuracy. Essential for multi-zone temperature monitoring projects.
Humidity + Temperature: DHT20 and BME280
DHT20 — Step Up from DHT11
The DHT20 uses I2C, has ±0.5 °C temperature accuracy (vs ±2 °C for DHT11) and ±3% RH humidity accuracy. It comes in a SIP (single inline package) — smaller form factor. The upgrade path from DHT11 to DHT20 teaches I2C protocol basics: address pins, SCL/SDA lines, and Wire.h library usage.
BME280 — The Triple Combo
The BME280 measures temperature, humidity AND barometric pressure. It supports both I2C and SPI. With altitude calculation built into the library (bme.readAltitude(1013.25)), it enables weather station projects. The GY-BME280 module comes in 3.3V and 5V variants — always match your Arduino’s logic level. Price: ~₹120–200.
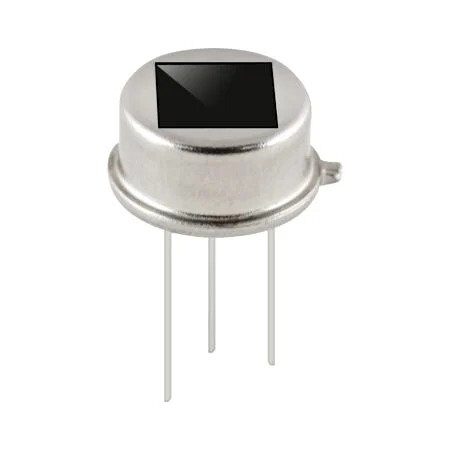
PIR Motion Sensors
Passive Infrared (PIR) sensors detect human body heat movement. They output a simple digital HIGH when motion is detected, making them arguably the easiest sensor for beginners after an LED. The classic application: automatic light switch, burglar alarm, or counting people entering a room.
const int PIR_PIN = 7;
void setup() { Serial.begin(9600); pinMode(PIR_PIN, INPUT); }
void loop() {
  if (digitalRead(PIR_PIN) == HIGH) {
    Serial.println("Motion detected!");
    delay(1000);
  }
}
The B2X2 4-element PIR sensor and the AC 220V PIR switch variants cover both 5V logic-level projects and mains-powered light automation. For beginners, start with a 5V logic PIR module before touching mains voltage projects.
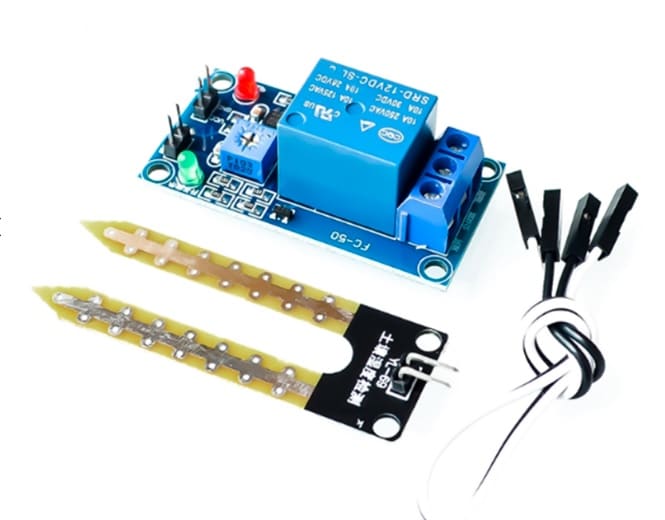
Soil Moisture Sensors
Soil moisture sensors are a beginner favourite because the project outcome — automatic plant watering — is immediately useful and impressive. There are two types:
- Resistive (capacitive probe style): Two conductive probes measure resistance through the soil. Cheap (~₹30), but corrodes over time due to electrolysis. Good for learning, not for permanent installation.
- Capacitive: Measures the dielectric constant of soil, which changes with moisture content. No metal in direct contact with soil — much longer service life. The capacitive soil moisture sensor at Zbotic is the correct choice for any permanent plant monitoring installation.
The Soil Moisture Relay Control Module integrates the sensor with a relay — connect a water pump directly to the relay output and you have an autonomous irrigation system with zero additional components. Perfect for a self-contained beginner project.
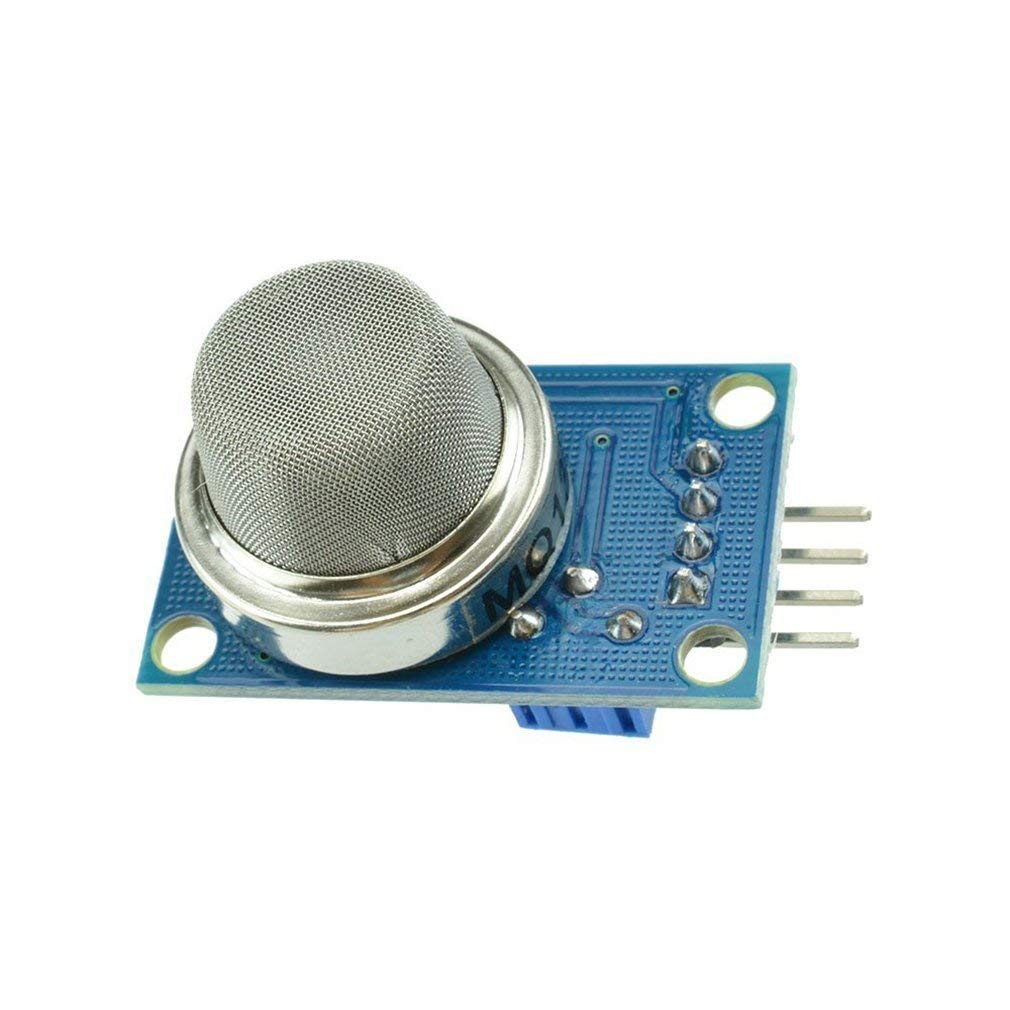
Gas and Air Quality Sensors
MQ-series gas sensors are a beginner staple. Each variant detects a different gas:
| Sensor | Target Gas | Useful Project |
|---|---|---|
| MQ-2 | LPG, smoke | Kitchen gas leak alarm |
| MQ-135 | Air quality (CO2, NH3) | Indoor air quality monitor |
| MQ-131 | Ozone | Ozone generator safety shutoff |
All MQ sensors share the same circuit: a heated sensing element whose resistance changes with gas concentration. They output both a digital alarm (DO pin) and an analog voltage proportional to concentration (AO pin). For a beginner alarm project, use only the DO pin — set the onboard potentiometer threshold and connect DO to a buzzer. For concentration measurement, read the AO pin and apply the datasheet calibration curve.
The 7-pin universal MQ sensor socket available at Zbotic fits MQ-2 through MQ-9 series, making it easy to swap sensor types on a single PCB.
Current Sensors: ACS712
The ACS712 family uses Hall-effect technology to measure AC or DC current up to 5A, 20A, or 30A without breaking the circuit. The conductor passes through the IC package — no shunt resistor losses, no isolation transformer needed. For beginners, the ACS712 is the entry point into energy monitoring projects: measure how much power your appliances draw, build a power meter, or detect motor stall conditions.
Key beginner lesson: the ACS712 outputs VCC/2 at zero current. Read the ADC, subtract the zero-current reading, multiply by sensitivity (mV/A). The INA219 I2C module takes this further — it measures both current and bus voltage over I2C and computes power, delivering a complete energy meter IC in a single module.
Load Cells and Weight Measurement
Building a weighing scale with Arduino is a rite of passage. A load cell (strain gauge bridge) paired with an HX711 24-bit ADC amplifier gives you a postal scale, coffee scale, or industrial inventory counter. The HX711 amplifies the millivolt-level load cell output to ADC-readable levels, communicates over a simple 2-wire interface (CLK + DATA), and has an excellent Arduino library with built-in tare and calibration functions.
Available capacities from Zbotic: 1 kg (letter scale), 10 kg (kitchen/postal scale), 50 kg half-bridge (platform scale, body weight). For beginners, start with the 1 kg load cell and a known calibration mass (a ₹5 coin weighs 4.79 g ± 0.02 g — good enough for basic calibration).
Distance Sensing: Ultrasonic and LiDAR
The HC-SR04 ultrasonic sensor is the most popular beginner distance sensor globally. The entire project — measure distance, display on Serial Monitor — takes 10 lines of code and 4 wires. It introduces the concept of time-of-flight measurement and the pulseIn() function. Use it for obstacle-avoiding robots, parking sensors, and liquid level meters.
For more demanding projects (longer range, higher accuracy, narrow beam), the JSN-SR04T waterproof module extends the HC-SR04 to 600 cm range with a sealed probe — ideal for outdoor water tank level monitoring.
Bundle Strategy: Beginner, Intermediate, Advanced
Beginner Bundle (~₹500–800)
- LM35 temperature sensor — analog fundamentals
- DHT11 module — digital protocol basics
- PIR motion sensor module — digital input projects
- Capacitive soil moisture sensor — analog + relay control
- MQ-135 air quality module — gas sensing alarm project
Intermediate Bundle (~₹1,200–2,000)
Everything in Beginner plus:
- DHT20 or BME280 — I2C protocol and precision weather station
- DS18B20 — 1-Wire protocol, multi-sensor networks
- ACS712 20A — current measurement and energy monitoring
- HC-SR04 / JSN-SR04T — distance and level sensing
- 1 kg load cell + HX711 (purchase separately) — weight measurement
Advanced Bundle (~₹3,000–5,000)
Everything in Intermediate plus:
- BME280 5V — environmental station with pressure/altitude
- 10 kg load cell — postal or kitchen scale project
- INA219 I2C current/power monitor — precision energy meter
- MQ-131 ozone sensor — advanced gas detection system
- Benewake LiDAR — advanced robotics and autonomous navigation
Recommended Products from Zbotic

DHT11 Digital Relative Humidity and Temperature Sensor Module
The ideal first digital sensor for Arduino — measures both temperature and humidity with a single data wire and a beginner-friendly library.

DHT20 SIP Packaged Temperature and Humidity Sensor
Upgraded DHT with I2C interface — ±0.5°C accuracy, compact SIP package, perfect step up for beginners learning I2C protocol.

Capacitive Soil Moisture Sensor
No corrosion, long service life — the right choice for permanent plant monitoring and automatic irrigation projects with Arduino.
MQ-135 Air Quality / Gas Detector Sensor Module
Detects CO2, ammonia, benzene, and smoke — build an indoor air quality alarm as your first gas sensor project.
B2X2 4-Element Infrared Motion Analog PIR Sensor
Dual-element PIR with adjustable sensitivity — wider detection zone than basic PIR modules, suitable for room-scale motion detection projects.
5V / 12V Soil Moisture Sensor Relay Control Module
All-in-one: sensor + relay driver for direct pump control. Build an autonomous irrigation system without a separate relay module.
Frequently Asked Questions
What is the single best first sensor for a complete Arduino beginner?
The DHT11 or DHT11 with LED module. It requires only 3 connections (VCC, GND, DATA), uses a well-documented library that works first time, measures two useful things (temperature and humidity), and the project — displaying readings on Serial Monitor — is immediately satisfying. Once you have DHT11 working, every other sensor follows the same pattern of: connect power/ground/signal, include library, call read function, print result.
Do I need a breadboard for all these sensors?
Yes, for initial learning. A standard 400-point or 830-point breadboard and a set of jumper wires (male-to-male and male-to-female) are essential tools alongside sensors. Once you have validated a circuit on breadboard, you can solder it to a perfboard for a permanent version. Zbotic sells breadboards and jumper wire kits alongside sensor modules.
Can these sensors work with ESP32 and NodeMCU instead of Arduino Uno?
All sensors listed in this guide work with ESP32 and NodeMCU/ESP8266 with minor modifications. The main consideration is 3.3V logic: ESP32 and NodeMCU GPIO pins are 3.3V, not 5V tolerant. DHT11, DHT20, BME280, DS18B20, and most digital sensor modules work at 3.3V. The LM35 reads slightly differently at 3.3V reference (use analogRead * 3300.0 / 4095.0 / 10.0 for ESP32’s 12-bit ADC). Check each sensor’s datasheet for minimum operating voltage before connecting to 3.3V systems.
How do I wire multiple sensors to one Arduino?
Sensors with I2C protocol (BME280, DHT20, INA219) share the same two wires (SDA + SCL) — wire them in parallel on the bus, each with a unique I2C address. Sensors with unique digital/analog pins (DHT11, LM35, PIR) each need their own pin. With a standard Arduino Uno (14 digital, 6 analog pins) you can comfortably connect 8–10 sensors simultaneously. For larger projects, use Arduino Mega (54 digital pins) or add an I2C multiplexer (TCA9548A) to connect multiple identical-address sensors.
My MQ sensor is reading very high values even in clean air. Is it broken?
No — MQ sensors require a 24–48 hour warm-up period when new (called burn-in). The sensing element heats to its operating temperature and stabilizes. During this period readings are erratic and high. Power it continuously for 48 hours before calibrating. Also, the onboard heater draws 130–150 mA — ensure your Arduino’s 5V pin can supply this, or power the sensor from an external 5V supply.
Browse Zbotic’s complete Sensors and Measurement catalogue — every module listed in this guide is in stock and ships from Mumbai. Free shipping above ₹999, with same-day dispatch on orders before 2 PM.


Add comment