
The ESP8266 D1 Mini WeMos IoT board has become one of the most popular microcontroller modules among hobbyists, students, and professional makers in India. Combining the power of the ESP8266 WiFi SoC with a compact footprint smaller than a business card, the D1 Mini punches far above its weight class. Whether you are building a smart switch, a temperature monitor, or a remote sensor node, the D1 Mini is often the ideal choice when you need WiFi connectivity in a tiny package.
What Is the D1 Mini and Why Is It So Popular?
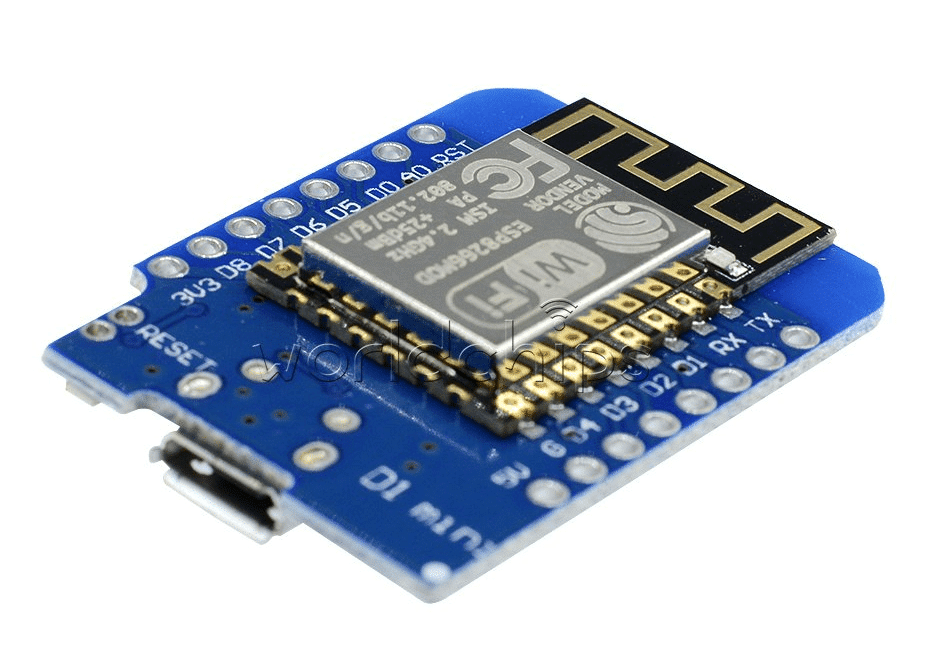
The WeMos D1 Mini is a miniature WiFi development board built around the ESP8266EX chip. The original design was created by WeMos (now LOLIN), but today dozens of compatible variants are sold by various manufacturers. What makes it special is the combination of:
- Tiny size: Just 34.2 mm × 25.6 mm — small enough to embed inside a wall switch or a sensor enclosure.
- Built-in WiFi: The ESP8266 handles 802.11 b/g/n at 2.4 GHz without any external modules.
- Arduino compatibility: Program it exactly like an Arduino using the Arduino IDE, PlatformIO, or MicroPython.
- Low price: In India, a D1 Mini typically costs between ₹200 and ₹350 — far cheaper than adding a WiFi shield to an Arduino Uno.
- Shield ecosystem: WeMos designed a rich library of stackable shields (OLED, relay, DHT sensor, battery, etc.) that plug directly onto the D1 Mini’s headers.
The D1 Mini runs on the Tensilica L106 32-bit RISC processor at 80 MHz (overclockable to 160 MHz), with 4 MB of flash storage. The ESP8266 handles WiFi in a way that is largely transparent to the application developer — you write your sketch, and the WiFi stack runs in the background on a dedicated RTOS.
D1 Mini V2 NodeMCU 4M Bytes Lua Wi-Fi IoT Development Board (ESP8266)
The classic D1 Mini V2 with 4 MB flash — perfect for beginners and experienced makers building compact WiFi IoT nodes with full Arduino IDE support.
Hardware Overview: Pins, Power, and Peripherals
Understanding the D1 Mini’s pinout is essential before starting any project. The board exposes 11 digital I/O pins and 1 analog input.
Digital I/O Pins
Pins D0 through D8 map to GPIO numbers on the ESP8266. All digital pins support the following functions:
- Digital input/output (3.3 V logic)
- PWM output (23 kHz default frequency)
- I2C (D1 = SCL, D2 = SDA by default)
- SPI (D5 = CLK, D6 = MISO, D7 = MOSI, D8 = CS)
- Interrupt on D1–D8
Important: D0 (GPIO16) is special — it can wake the ESP8266 from deep sleep when connected to RST, but it does NOT support interrupts or PWM.
Analog Input
The single analog pin (A0) accepts 0–3.3 V and returns a 10-bit value (0–1023). It cannot be used as a digital output. On some D1 Mini clones, the ADC reference voltage is 1 V internally, with an on-board voltage divider to accept 3.3 V. Always verify this with a multimeter before connecting sensors.
Power Supply Options
| Method | Voltage | Notes |
|---|---|---|
| Micro USB | 5 V | Regulated to 3.3 V on-board via AMS1117 |
| 5V pin | 5 V | Same as USB, goes through AMS1117 |
| 3V3 pin | 3.3 V | Directly to ESP8266 VDD — bypasses regulator |
| 18650 Battery Shield | 5 V (boost) | Best option for portable/outdoor deployments |
The AMS1117 regulator on the D1 Mini can only supply 800 mA, which is tight when WiFi transmitting (peak ~400 mA). Avoid powering heavy loads (relays, servo motors) directly from the D1 Mini’s power pins.
Programming the D1 Mini: Arduino IDE and MicroPython
Arduino IDE Setup
- Open Arduino IDE → File → Preferences → Additional Boards Manager URLs, add:
https://arduino.esp8266.com/stable/package_esp8266com_index.json - Go to Boards Manager, search for “esp8266” and install the community esp8266 package (version 3.1.x or later).
- Select board: LOLIN(WeMos) D1 R2 & mini
- Set Upload Speed to 921600 for faster flashing.
- Connect via micro USB and select the correct COM port.
Your First WiFi Sketch
#include <ESP8266WiFi.h>

const char* ssid     = "YourSSID";
const char* password = "YourPassword";

void setup() {
  Serial.begin(115200);
  WiFi.begin(ssid, password);
  while (WiFi.status() != WL_CONNECTED) {
    delay(500);
    Serial.print(".");
  }
  Serial.println();
  Serial.println("Connected! IP: " + WiFi.localIP().toString());
}

void loop() {
  // your code here
}
MicroPython on the D1 Mini
MicroPython is an excellent alternative for Python developers. Download the ESP8266 MicroPython firmware from micropython.org, flash it with esptool.py, and use Thonny IDE or ampy for file management. The WiFi connection in MicroPython is equally simple:
import network
wlan = network.WLAN(network.STA_IF)
wlan.active(True)
wlan.connect('YourSSID', 'YourPassword')
while not wlan.isconnected():
    pass
print('Connected:', wlan.ifconfig())
ESP8266/ESP-12F Serial WiFi Witty Cloud Development Board + Mini NodeMCU
An all-in-one ESP8266 kit with an LDR, RGB LED, and push button — great for learning IoT concepts quickly without needing extra components.
Practical IoT Project Ideas for the D1 Mini
The D1 Mini’s small footprint makes it perfect for embedded projects where space is limited. Here are some project ideas that work well with this board:
1. Home Weather Station
Connect a DHT11 or DHT20 sensor to the D1 Mini and push temperature/humidity readings to a Blynk dashboard, Home Assistant, or Telegram bot every 5 minutes. The entire circuit, including the sensor, fits inside a small project box. Add deep sleep between readings to run the whole thing for weeks on a 2000 mAh power bank.
2. Smart Doorbell Notifier
Wire a simple push button to D2 and program the D1 Mini to send a Telegram message or trigger a Blynk notification whenever someone presses it. The board is small enough to fit inside a standard electrical backbox alongside the existing doorbell wiring.
3. WiFi-Controlled Relay Switch
Combine the D1 Mini with the WeMos relay shield to create a WiFi-controlled power switch. Host a simple web server on the ESP8266 to toggle the relay from any browser on your network — no cloud service required.
4. Plant Moisture Monitor
Connect a capacitive soil moisture sensor to A0 and publish readings to MQTT or ThingSpeak every 30 minutes. The D1 Mini enters deep sleep between readings, extending battery life to several months with a small LiPo battery.

DHT11 Digital Relative Humidity and Temperature Sensor Module
A classic pairing with the D1 Mini for weather station and environment monitoring projects — simple 1-wire protocol, easy to use with Arduino library.
Compatible Shields and Add-on Modules
One of the greatest strengths of the D1 Mini ecosystem is its stackable shield system. Shields use the exact same pin spacing and footprint as the D1 Mini, so they plug directly on top without any wiring. Popular shields include:
- OLED Shield: A 0.66-inch 64×48 pixel OLED display that stacks directly on the D1 Mini for showing status information.
- Relay Shield: A single 10 A relay for controlling mains-voltage appliances safely.
- Motor Shield: Dual L293D H-bridge for controlling two DC motors — ideal for small robots.
- Battery Shield: Integrates a single 18650 cell holder with USB charging via TP4056.
- DS18B20 Temperature Shield: Pre-wired DS18B20 probe with 4.7 kΩ pull-up resistor for clean 1-Wire readings.
- DHT Pro Shield: Includes a DHT12 sensor and is fully compatible with the DHT11 library.
D1 Mini vs ESP32: Which One Should You Choose?
| Feature | D1 Mini (ESP8266) | ESP32 |
|---|---|---|
| CPU cores | 1 (Tensilica L106) | 2 (Xtensa LX6) |
| CPU speed | 80/160 MHz | 240 MHz |
| RAM | ~80 KB usable | ~320 KB usable |
| Bluetooth | No | BLE 4.2 + Classic |
| Analog inputs | 1 | Up to 18 |
| Touch sensing | No | Yes (10 pins) |
| Price (India) | ₹200–₹350 | ₹350–₹600 |
| Best for | Simple WiFi sensors | Complex, multi-task IoT |
Choose the D1 Mini when you need a simple WiFi sensor node and want to minimise cost and board size. Choose the ESP32 when you need Bluetooth, more GPIO, higher processing power, or plan to run multiple FreeRTOS tasks simultaneously.
Frequently Asked Questions
Can the D1 Mini run on 5 V directly?
The D1 Mini accepts 5 V input via its USB or 5V pin, which is regulated down to 3.3 V on-board. Do NOT apply 5 V directly to the GPIO pins or the 3V3 pin — this will permanently damage the ESP8266 chip.
How many devices can I control over WiFi simultaneously?
The ESP8266 running in SoftAP mode can support up to 5 simultaneous client connections. In STA mode connecting to your home router, you can communicate with as many devices as your network allows. For real-time control of multiple actuators, MQTT is more efficient than HTTP polling.
Is the D1 Mini suitable for outdoor use?
The bare D1 Mini board is not weatherproof. For outdoor use in Indian weather conditions (humidity, monsoon rain), place it inside an IP65-rated project enclosure and use conformal coating on the PCB. Use a DS18B20 waterproof probe instead of a DHT sensor for outdoor temperature measurement.
What is the difference between D1 Mini and D1 Mini Pro?
The D1 Mini Pro has 16 MB of flash, an IPEX connector for an external antenna, and a slightly different pin spacing. For most projects, the standard D1 Mini with 4 MB flash is more than sufficient.
Can I use the D1 Mini with Home Assistant?
Yes. The easiest integration is through ESPHome, which allows you to define D1 Mini behaviour in YAML and automatically discovers the device in Home Assistant. This is widely used in the Indian maker community for DIY smart home projects.
Start Your IoT Journey with Zbotic
Zbotic stocks the D1 Mini and a full range of compatible sensors, shields, and accessories. Order online and get fast delivery anywhere in India.


Add comment