
A personal IoT weather station is one of the most rewarding electronics projects you can build. Unlike commercial weather apps that pull data from a station kilometres away, your own node captures hyperlocal conditions—the temperature in your specific garden, the humidity inside your greenhouse, or the air quality in your workshop. And because it is connected to the internet, you can monitor everything remotely from your phone, set alerts when conditions cross thresholds, and build a historical database of your microclimate.
This guide takes you from empty breadboard to a fully functional multi-sensor weather station transmitting data to an online dashboard. We use an ESP32 (built-in WiFi), a BME280 for temperature/humidity/pressure, a DS18B20 for outdoor soil/water temperature, a BH1750 or LDR for light level, and optionally a rain gauge tipping bucket. We cover the hardware assembly, firmware, MQTT broker setup, and a free Node-RED dashboard—all achievable with components available in India.
1. Components and Bill of Materials
| Component | Purpose | Interface |
|---|---|---|
| ESP32 DevKit v1 | Main controller + WiFi | — |
| BME280 | Temp + humidity + pressure | I2C (0x76 or 0x77) |
| DS18B20 (waterproof) | Outdoor / soil temperature | 1-Wire |
| LM35 or 10kΩ NTC | Backup / calibration reference | Analog ADC |
| MQ-135 (optional) | Air quality / CO2 proxy | Analog ADC |
| LDR or BH1750 | Light intensity (lux) | Analog / I2C |
| Rain sensor module | Rain detection | Digital/Analog |
| 18650 LiPo + TP4056 | Battery backup | — |
| IP65 junction box | Weatherproof enclosure | — |
Total estimated cost: ₹800–₹1,400 depending on sensor choices and whether you source locally or online. The BME280 is the most capable single chip for atmospheric measurements and is available ready-soldered on a breakout board.
2. Hardware Assembly and Wiring
I2C Bus (BME280 + optional BH1750)
Connect both I2C sensors to the same SDA/SCL lines on the ESP32:
- ESP32 GPIO 21 → SDA (both sensors)
- ESP32 GPIO 22 → SCL (both sensors)
- BME280 VCC → 3.3V, GND → GND
- BME280 SDO → GND (sets I2C address to 0x76)
If your BME280 module has a 5V regulator on board (the GY-BME280-5V variant), you can power it from the ESP32’s 5V VBUS pin instead of 3.3V—convenient when powering the whole system from USB.
1-Wire Bus (DS18B20)
- DS18B20 DQ → ESP32 GPIO 4
- 4.7 kΩ pull-up resistor between DQ and 3.3V
- DS18B20 VCC → 3.3V, GND → GND
Run multiple DS18B20 probes on the same GPIO 4 wire if you need several outdoor temperature points (underground vs. surface vs. shade). Each sensor has a unique 64-bit ROM code for individual addressing.
Analog Sensors (LM35, LDR, MQ-135)
The ESP32 ADC has a known non-linearity near 0V and 3.3V. For accurate readings, keep analog sensor outputs in the 0.1–3.1V range and use the esp_adc_cal library for calibration. The LM35 outputs 10 mV/°C—at 40°C that is only 0.4V, safely within the linear ADC range.
Complete Pin Assignment
ESP32 Pin Assignments
  GPIO 21  → SDA (BME280, BH1750)
  GPIO 22  → SCL (BME280, BH1750)
  GPIO  4  → DS18B20 data (1-Wire)
  GPIO 34  → LM35 analog output (ADC1_CH6, input only)
  GPIO 35  → LDR voltage divider (ADC1_CH7, input only)
  GPIO 32  → MQ-135 analog output (ADC1_CH4)
  GPIO  5  → Rain sensor digital output (active low)
  GPIO  2  → Status LED
  3.3V     → BME280, DS18B20, BH1750, LM35 VCC
  5V       → MQ-135 VCC (heater needs 5V)
  GND      → All sensor GNDs
3. ESP32 Firmware
The firmware uses the Arduino framework with the following libraries: Adafruit_BME280, OneWire, DallasTemperature, PubSubClient (MQTT), WiFi, and esp_adc_cal. Install them via Arduino Library Manager or PlatformIO.
#include <WiFi.h>
#include <PubSubClient.h>
#include <Adafruit_BME280.h>
#include <OneWire.h>
#include <DallasTemperature.h>
#include <ArduinoJson.h>

// --- Configuration ---
const char* WIFI_SSID     = "YourSSID";
const char* WIFI_PASSWORD = "YourPassword";
const char* MQTT_SERVER   = "broker.hivemq.com"; // free public broker
const int   MQTT_PORT     = 1883;
const char* MQTT_TOPIC    = "zbotic/weather/station1";
const char* DEVICE_ID     = "station1";
const long  INTERVAL_MS   = 60000; // publish every 60 seconds

// --- Hardware ---
#define ONE_WIRE_BUS 4
#define RAIN_PIN     5
#define LM35_PIN    34

Adafruit_BME280 bme;
OneWire oneWire(ONE_WIRE_BUS);
DallasTemperature ds18(&oneWire);
WiFiClient wifiClient;
PubSubClient mqtt(wifiClient);

unsigned long lastPublish = 0;

void connectWiFi() {
  WiFi.begin(WIFI_SSID, WIFI_PASSWORD);
  Serial.print("Connecting to WiFi");
  while (WiFi.status() != WL_CONNECTED) {
    delay(500); Serial.print(".");
  }
  Serial.println(" connected: " + WiFi.localIP().toString());
}

void connectMQTT() {
  while (!mqtt.connected()) {
    Serial.print("Connecting MQTT...");
    if (mqtt.connect(DEVICE_ID)) {
      Serial.println("connected");
    } else {
      Serial.print("failed rc=");
      Serial.println(mqtt.state());
      delay(5000);
    }
  }
}

void setup() {
  Serial.begin(115200);
  pinMode(RAIN_PIN, INPUT_PULLUP);

  if (!bme.begin(0x76)) {
    Serial.println("BME280 not found!");
  }
  bme.setSampling(Adafruit_BME280::MODE_FORCED,
    Adafruit_BME280::SAMPLING_X1, Adafruit_BME280::SAMPLING_X1,
    Adafruit_BME280::SAMPLING_X1, Adafruit_BME280::FILTER_X2);

  ds18.begin();
  connectWiFi();
  mqtt.setServer(MQTT_SERVER, MQTT_PORT);
}

void loop() {
  if (!mqtt.connected()) connectMQTT();
  mqtt.loop();

  if (millis() - lastPublish >= INTERVAL_MS) {
    lastPublish = millis();

    // Read BME280
    bme.takeForcedMeasurement();
    float bme_temp  = bme.readTemperature();
    float humidity  = bme.readHumidity();
    float pressure  = bme.readPressure() / 100.0F;

    // Read DS18B20
    ds18.requestTemperatures();
    float soil_temp = ds18.getTempCByIndex(0);

    // Read LM35
    int lm35_raw    = analogRead(LM35_PIN);
    float lm35_temp = (lm35_raw * 3.3 / 4095.0) * 100.0; // mV to °C

    // Rain sensor (active low = raining)
    bool raining    = !digitalRead(RAIN_PIN);

    // Build JSON payload
    StaticJsonDocument<256> doc;
    doc["device"]    = DEVICE_ID;
    doc["temp_c"]    = bme_temp;
    doc["humidity"]  = humidity;
    doc["pressure"]  = pressure;
    doc["soil_temp"] = soil_temp;
    doc["lm35_temp"] = lm35_temp;
    doc["rain"]      = raining;
    doc["rssi"]      = WiFi.RSSI();

    char payload[256];
    serializeJson(doc, payload);

    mqtt.publish(MQTT_TOPIC, payload, true); // retained
    Serial.println(payload);
  }
}
The firmware publishes a retained MQTT message every 60 seconds. Retained messages mean any new subscriber immediately receives the latest reading without waiting for the next publish cycle—great for dashboards.
4. MQTT Broker and Topics
For getting started, the public HiveMQ broker (broker.hivemq.com:1883) requires no account. For a production deployment, use a private broker:
- Mosquitto on Raspberry Pi or VPS: Free, runs on any Linux system,
sudo apt install mosquitto mosquitto-clients - HiveMQ Cloud Free Tier: 100 device connections, TLS encryption
- AWS IoT Core: Enterprise-grade, per-message pricing
Design a logical topic hierarchy if you have multiple stations:
home/weather/outdoor/temperature
home/weather/outdoor/humidity
home/weather/outdoor/pressure
home/weather/garden/soil_temp
home/weather/balcony/temperature
# Or publish a single JSON payload:
home/weather/station1  → {"temp_c":28.4,"humidity":72,...}
For security, always use TLS (port 8883) with username/password authentication on any broker that is internet-accessible. Never publish to a public broker in production—anyone can read your data.
5. Node-RED Dashboard Setup
Node-RED is a free, browser-based visual programming tool that runs on a Raspberry Pi, home server, or cloud VM. Install the node-red-dashboard package for gauge and chart UI elements.
Basic Flow
- Add an mqtt-in node, subscribe to
home/weather/station1 - Add a JSON node to parse the payload
- Add a function node to route properties:
msg.payload = msg.payload.temp_c - Add a ui_gauge node — Label: Temperature, Range: 0–50°C, Units: °C
- Repeat for humidity (gauge 0–100%), pressure (chart line graph), soil temperature
Alternatively, use Grafana + InfluxDB for professional time-series visualisation:
- Node-RED writes data to InfluxDB via the
node-red-contrib-influxdbnode - Grafana queries InfluxDB and displays multi-day trend charts with annotations
- Free tier available on Grafana Cloud (14-day retention, 10,000 metrics)
6. Weatherproof Enclosure Design
Outdoor electronics need careful enclosure design. The primary enemies are condensation (not rain), which forms inside the box when warm humid air cools overnight, and direct solar radiation heating the enclosure and causing temperature measurement errors.
Stevenson Screen Principle
Real weather stations house sensors in a louvred white box (Stevenson screen) that shades against direct solar radiation while allowing free airflow. You can approximate this with:
- White-painted ABS IP65 box (avoids solar absorption)
- Louvred ventilation slots on the sides, facing downward to prevent rain entry
- Silica gel desiccant packet inside to absorb residual moisture
- Semi-permeable membrane (Gore-Tex patch) over a small hole for pressure equalisation without moisture ingress
Mount the enclosure 1.25–2.0m above ground on a north-facing wall (in India, away from the south-facing sun) to match the WMO standard measurement height. Ground-level mounting inflates temperature readings by 5–10°C on hot days due to surface radiant heat.
Cable Entry
Use IP-rated cable glands (PG7 for 3–6.5mm cables) for all wire entries. Apply silicone sealant around glands after installation. Drip-loop the cable before entry so rainwater runs off rather than tracking into the gland.
7. Power Supply and Solar Option
USB Power (simplest)
If a power outlet is within 10m, a good quality 5V 2A USB adapter with a weatherproof box is the most reliable solution. Route the cable through a conduit.
Battery + Solar (most flexible)
Combine a 6V/2W solar panel, a TP4056 lithium charger, a 2× 18650 battery pack (7,400 mAh), and a low-dropout 3.3V regulator. In Indian summers (5–6 sun-hours/day), a 2W panel generates 1,000–1,200 mAh daily—more than enough for a once-per-minute transmitting station drawing ~200 mAh/day (see power budget in our sensor power management guide).
Add a battery_voltage field to your MQTT payload: use a voltage divider (100 kΩ + 47 kΩ) to bring the 8.4V max battery voltage into the ESP32 ADC range, and alert when it drops below 7.0V.
8. Sensor Calibration
Temperature Calibration
Place your BME280 alongside a calibrated thermometer (or a certified DS18B20, which has ±0.5°C factory accuracy) in a steady environment. Record 10 readings and calculate the offset. Apply in firmware:
const float TEMP_OFFSET = -1.2; // measured: sensor reads 1.2°C high
float bme_temp = bme.readTemperature() + TEMP_OFFSET;
Humidity Calibration
Use a two-point saturated salt solution: sodium chloride (NaCl) gives 75%RH at 25°C; lithium chloride gives 11%RH. Seal each salt solution with your sensor in a jar for 24 hours and record the offset at each point. Apply a linear correction.
Pressure Calibration
Cross-reference with the nearest meteorological station’s sea-level pressure (available on Windy or Weather Underground). Apply the hypsometric correction for your altitude:
// Convert station pressure to sea-level pressure
const float ALTITUDE_M = 400.0; // your altitude in metres
float slp = pressure / pow(1.0 - (ALTITUDE_M / 44330.0), 5.255);
9. Sensors Available at Zbotic

GY-BME280-3.3 Precision Altimeter Atmospheric Pressure Sensor Module
Temperature, humidity, and barometric pressure in a single I2C module. The essential core sensor for any IoT weather station build.
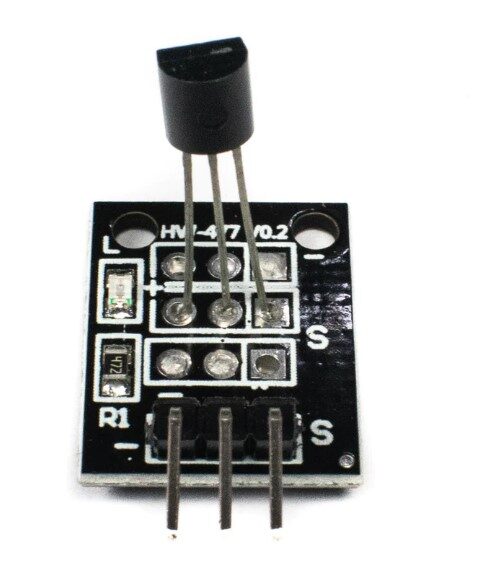
DS18B20 Temperature Sensor Module
Waterproof 1-Wire probe for outdoor or soil temperature. ±0.5°C accuracy, multiple sensors on a single wire, perfect for garden deployments.

DHT11 Digital Relative Humidity and Temperature Sensor Module
Entry-level humidity and temperature module, great for indoor weather nodes or secondary monitoring points alongside a BME280 primary station.
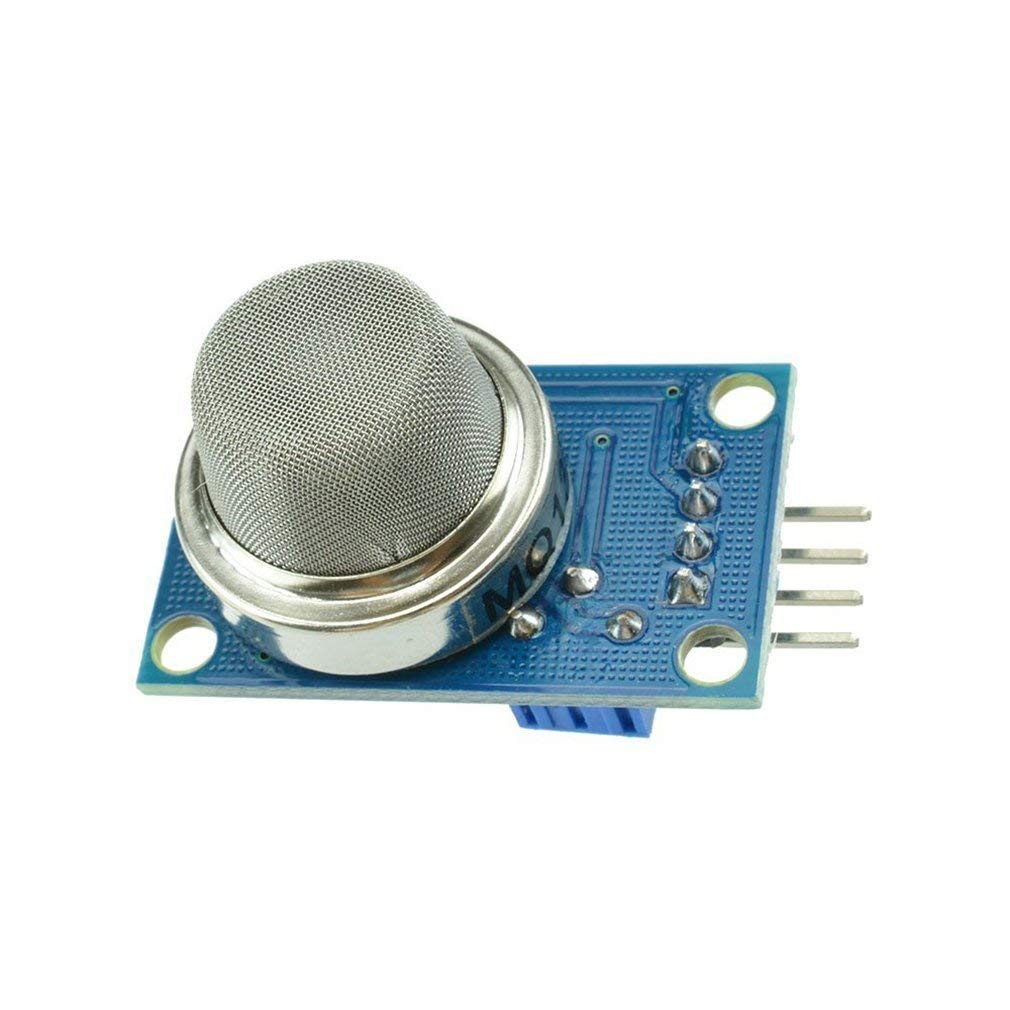
MQ-135 Air Quality / Gas Detector Sensor Module For Arduino
Detects CO2, NH3, NOx, alcohol, and benzene vapour. Add air quality context to your weather station for indoor/outdoor comparison.

Capacitive Soil Moisture Sensor
Complete your agricultural weather node with soil moisture data. Corrosion-resistant capacitive design, 3.3V compatible, direct ADC reading.
10. Frequently Asked Questions
Q: How accurate is a DIY weather station compared to commercial ones?
With a BME280 and proper calibration, you can achieve ±0.5°C temperature, ±3%RH humidity, and ±1 hPa pressure accuracy—comparable to low-cost commercial units (Davis Vantage Vue claims ±0.5°C). Professional WMO-standard stations cost ₹50,000+ and achieve ±0.1°C, which is overkill for home use. For personal monitoring, school projects, or agricultural guidance, DIY accuracy is more than sufficient.
Q: My BME280 reads 5°C too high. Is it broken?
Likely not. The BME280 has a self-heating effect from the ESP32 board when mounted too close. The sensor chip generates about 1–2°C of self-heating, and placing it within the enclosure next to the ESP32 adds more. Solutions: (1) use a long I2C cable to mount the BME280 outside the main enclosure, (2) apply a negative temperature offset correction in firmware, (3) use the sensor in forced mode (takes measurements quickly then sleeps) to minimise self-heating.
Q: Can I add a wind speed / direction sensor?
Yes. Anemometers use either a reed switch (count pulses to get RPM → m/s) or a DC generator (voltage proportional to speed). Wind direction vanes use a potentiometer or magnetic encoder. Connect the reed switch to a GPIO interrupt pin on the ESP32. Accumulate pulses over a 3-second window: wind_speed_ms = (pulses × 0.25) / 3 (coefficient depends on your anemometer model).
Q: How do I deal with WiFi dropout in the firmware?
The ESP32 WiFi stack is not 100% reliable in high-noise environments. Implement reconnection logic: check WiFi.status() != WL_CONNECTED before every MQTT publish, and call WiFi.reconnect() if disconnected. Set a watchdog timer (esp_task_wdt_init(30, true)) to reboot the ESP32 if it hangs for more than 30 seconds. Store readings in a small ring buffer to retransmit missed data after reconnection.
Q: Which MQTT broker is recommended for Indian makers?
For getting started: HiveMQ public broker (free, no account). For permanent deployment: Mosquitto on a Raspberry Pi on your home network (free, private), or HiveMQ Cloud free tier (up to 100 connections, TLS, MQTT over WebSocket for browser dashboards). AWS IoT Core is robust but adds complexity; consider it when scaling beyond 5 stations.
11. Conclusion
A personal IoT weather station built around the ESP32, BME280, and DS18B20 costs under ₹1,500 and provides hyperlocal environmental data that commercial apps simply cannot deliver. The project teaches practical skills across hardware assembly, embedded firmware, networking (MQTT, WiFi), and data visualisation—a complete full-stack IoT education in a single enclosure.
Start with the BME280 and ESP32 as your core, add sensors incrementally as your skills grow, and deploy your first outdoor node this weekend. All the sensors you need are available at Zbotic with fast delivery across India.
Shop BME280, DS18B20, DHT11/22, MQ-135, and capacitive soil sensors at Zbotic Sensors & Modules. Fast shipping across India.


Add comment