
Tricopter Build Guide: Unique Y-Frame Drone Design
In a world dominated by quadcopters, the tricopter is the odd one out — and proud of it. With three arms arranged in a Y-frame, a servo-controlled rear motor for yaw, and a distinctive sound that no quad can replicate, the tricopter is a uniquely satisfying build for hobbyists who want to go beyond the obvious.
This guide is a complete walkthrough of building a tricopter from scratch. We’ll cover the mechanical design, the servo yaw mechanism, component selection, flight controller setup, and the specific tuning adjustments that make tricopters fly well. Whether you’re drawn by the aesthetics, the efficiency, or simply the challenge of doing something different, this build will reward your effort.
- Why Build a Tricopter? The Case for Three Motors
- Tricopter Physics: How Yaw Control Works
- Y-Frame Design: Geometry and Arm Layout
- Component Selection for Your Tricopter
- Building the Servo Yaw Mechanism
- Full Assembly Walkthrough
- Flight Controller Configuration
- Betaflight Tricopter Mode Setup
- PID Tuning for Tricopters
- Frequently Asked Questions
- Conclusion
1. Why Build a Tricopter? The Case for Three Motors
Before we dive into the build, let’s address the obvious question: with quadcopters being so well-established, why would anyone choose a tricopter?
Efficiency Advantage
Three motors means less rotational mass than four. Tricopters can achieve better efficiency per gram of airframe for the same payload and flight time. The disc area of three larger propellers can exceed that of four smaller ones, improving hover efficiency.
Distinct Sound Profile
Tricopters produce a characteristic “thwop-thwop-thwop” sound that many pilots find more satisfying than the higher-pitched buzz of a quadcopter. If you’re creating video content, a tricopter’s audio signature is immediately distinctive.
Visual Uniqueness
At an Indian flying field or club meet, your tricopter will attract immediate attention and questions. It’s a conversation starter and demonstrates advanced build skills that a standard quadcopter doesn’t require.
Engineering Challenge
The servo yaw mechanism adds mechanical complexity that a quadcopter simply doesn’t have. Building and tuning it successfully is a genuine achievement that deepens your understanding of multirotor dynamics.
Tradeoffs to Consider
- More mechanical complexity: The tilt servo adds a failure point quads don’t have
- Slower yaw: Servo-based yaw is slower than differential thrust in a quad
- Less community support: Fewer tutorials, fewer ready-made FC profiles
- Prop sizing: Odd number of motors means one motor must counteract the net torque
2. Tricopter Physics: How Yaw Control Works
Understanding yaw control is fundamental to the tricopter. In a quadcopter, yaw is controlled by spinning clockwise (CW) motors faster or slower relative to counter-clockwise (CCW) motors — differential torque creates rotation around the vertical axis.
A tricopter has three motors. No matter how you arrange them, you cannot achieve balanced torque control using just motor speed variation — you’d always have one motor’s torque direction dominating. The solution is a servo-tilted rear motor.
How the Servo Yaw Works
The rear motor of a tricopter is mounted on a servo-actuated tilt mechanism. When the servo tilts the rear motor left, the motor’s thrust vector tilts, creating a side-force that rotates the tricopter around its vertical axis. When the servo tilts right, the rotation reverses.
This is elegant — it’s essentially the same principle as a helicopter’s tail rotor, but applied to a multirotor. The flight controller sends servo commands alongside the usual motor speed commands every time it wants to change yaw.
Motor Rotation Setup
For a Y-frame tricopter:
- Front left motor: Counter-clockwise (CCW)
- Front right motor: Clockwise (CW)
- Rear motor: Either CW or CCW (the servo handles yaw, so motor direction matters less)
The front two motors produce equal and opposite torque and cancel each other. The rear motor’s torque is compensated by the servo tilt at hover. During yaw manoeuvres, the servo tilts to add or subtract yaw moment.
3. Y-Frame Design: Geometry and Arm Layout
The Y-frame configuration has two front arms and one rear arm. The most common layouts are:
Symmetrical Y (Equal arm angles)
All three arms are 120 degrees apart. This gives the most balanced geometry but means the rear motor sits directly behind the center of gravity, which can cause prop wash interference in fast forward flight.
Wide Y (Common in FPV tricopters)
The two front arms are spread wider (150+ degrees apart) and the single rear arm bisects them. This improves forward visibility for the FPV camera and reduces prop wash on the rear motor.
Arm Length Considerations
Longer arms = more leverage = better yaw authority but more frame flex. For a 250–450mm wheelbase tricopter:
- Shorter arms (under 200mm): More compact, less yaw authority, less vibration damping
- Longer arms (200–250mm): Better stability, smoother flight, but larger footprint
Material Choices
Carbon fibre: Lightest and strongest, best vibration damping, but requires precision cutting. Preferred for performance builds.
Aluminium: Heavier but easier to fabricate at home. Good for prototype builds while you figure out your preferred geometry.
3D printed: Use for the servo mount, landing gear, and camera holders. Avoid 3D printing structural arm pieces — they flex too much.
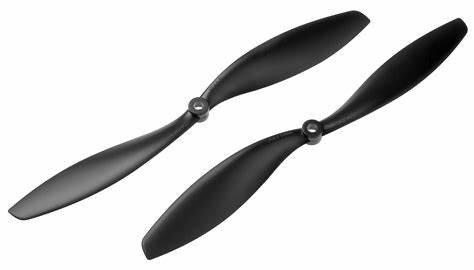
1045 2 Blades Carbon Fiber Propeller CW&CCW
High-quality carbon fibre props for medium-to-large tricopter builds. The stiff carbon construction minimises flex and provides consistent thrust, critical for stable tricopter flight.
View on Zbotic4. Component Selection for Your Tricopter
Here’s a full parts list for a mid-size FPV tricopter build (approximately 400mm wheelbase):
Motors (3x)
For a 400mm tricopter with 10-inch props, 900–1100 KV motors on 3S–4S are ideal. For a smaller 250mm build with 5-inch props, 2200–2400 KV on 3S–4S works well. All three motors should be identical for consistent performance.
ESCs (3x individual, or 1x 4-in-1 with one port unused)
Individual ESCs give more flexibility for placement. Use 30A–40A rated ESCs for a medium-size tricopter. The 4-in-1 stack can technically work with the 4th channel unused, but wastes board space and adds unnecessary weight.
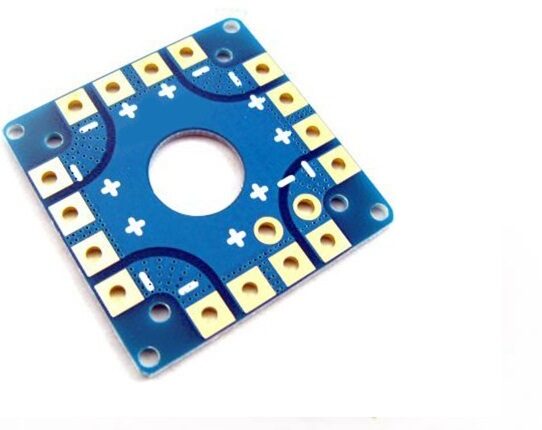
100A Multirotor ESC Power Distribution Battery Board For Quadcopter
A robust power distribution board that cleanly supplies battery power to all 3 ESCs (with one port unused) on your tricopter. Rated 100A continuous for demanding motors.
View on ZboticServo (1x)
The rear motor servo is the most critical and unique component of a tricopter. You need a metal gear, high-torque servo in the 9–13g weight class. Digital servos are strongly preferred over analogue — the faster response (up to 333Hz update rate) makes a substantial difference in yaw response.
Good choices: HiTec HS-65MG, KST X10 Mini, BMS-306 (widely available in India at RC hobby shops).
Flight Controller
Not all flight controllers support tricopter mode. Betaflight supports tricopters in its mixer configuration. Boards based on F4 or F7 processors work well. The FC needs at least 4 PWM/DSHOT outputs (3 for motors + 1 for servo) and ideally a dedicated servo rail with 5V power output.
Battery
For a 400mm tricopter, a 3S or 4S LiPo in the 2200–3000 mAh range gives 8–12 minutes of flight. Position the battery centrally to maintain the center of gravity (CG) near the geometric centre of the Y-frame.
5. Building the Servo Yaw Mechanism
The servo yaw mechanism is the defining mechanical challenge of a tricopter build. Here’s how to do it right:
Mechanism Design
The rear motor arm needs to rotate around a horizontal axis perpendicular to the arm. The servo horn connects to the motor mount via a pushrod. When the servo arm rotates, it pushes or pulls the motor mount, tilting it left or right.
Tilt Range
Design for ±30 degrees of tilt. This gives enough yaw authority without the servo hitting mechanical limits during aggressive manoeuvres. Set software limits in the flight controller (servo throws) to ±25 degrees to provide a mechanical safety margin.
Pushrod Construction
Use 2mm carbon rod or 2mm steel rod for the pushrod. Steel is heavier but more durable for the pushrod joints. The rod connects the servo horn to a horn on the motor tilt pivot. Use clevis ends (Z-bend or ball link) at both ends for play-free, bind-free movement.
Pivot Bearing
The motor tilt pivot must be smooth and precise. Use an MR84ZZ (4x8x3mm) bearing or similar at the pivot point. A stiff, high-friction pivot will fight the servo and cause poor yaw response. A loose, sloppy pivot will cause yaw oscillation.
Motor Mount Plate
The motor itself bolts to a plate that pivots on the bearings. This plate must be rigid — any flex here directly degrades yaw authority. Use 3mm carbon fibre or 3mm aluminium for the motor mount plate.
6. Full Assembly Walkthrough
- Cut or obtain the frame pieces: Two symmetrical front arms and one rear arm with the servo mechanism integrated.
- Mount the front arm motors: These are fixed (no tilt). Solder motor wires to individual ESCs or PDB, then route wires inside or along the arms.
- Assemble the rear servo mechanism: Install bearings in the pivot block, attach the motor mount plate, connect the servo and pushrod. Test full tilt range before closing up.
- Mount the FC: Use rubber anti-vibration grommets. Position it as close to the centre of mass as possible.
- Wire everything: ESCs to FC motor outputs (M1, M2, M3), servo signal wire to FC servo output, battery lead to PDB.
- Mount the FPV camera: Between the two front arms at the front of the frame. Tilt 15–20 degrees for FPV flying.
- Secure all wiring: Use cable ties and heatshrink. Pay extra attention to the rear arm — the servo movement means wires near the tilt mechanism must have enough slack to flex without pulling tight.
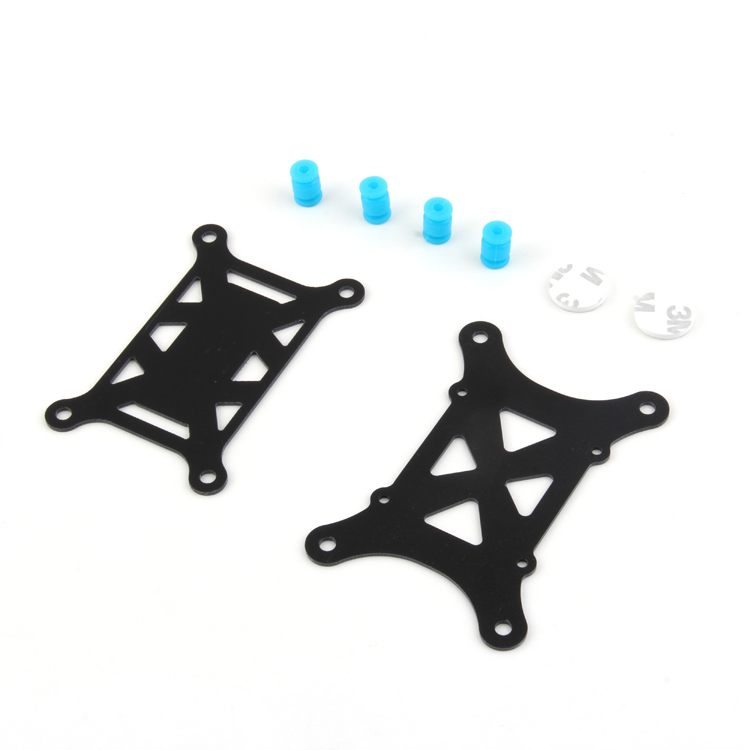
Anti-Vibration Shock Absorber for APM/KK/MWC/PixHawk
Rubber damping mounts for your flight controller. Essential for tricopters where the servo tilt mechanism can introduce low-frequency vibrations that confuse the gyro.
View on Zbotic7. Flight Controller Configuration
Setting up a flight controller for tricopter mode requires a few extra steps compared to a quad:
ArduPilot (recommended for stability-focused builds)
ArduPilot’s ArduCopter firmware has excellent tricopter support with dedicated motor/servo mixing. The TRICOPTER frame type automatically configures the servo output and mixing ratios. Recommended for heavy lifters and camera platforms.
Betaflight (recommended for FPV/freestyle)
Betaflight’s tricopter mode is less documented but fully functional. The mixer configuration must be set manually. See the next section for detailed setup.
8. Betaflight Tricopter Mode Setup
- Configuration Tab → Mixer Type: Select TRICOPTER (not QUADX)
- Motor outputs: M1 (front right), M2 (front left), M3 (rear)
- Servo output: S1 on the servo rail (usually a dedicated pin on the FC, check your FC wiring diagram)
- Servo configuration: In the Servos tab, set servo 0 to output on your servo pin. Configure mid-point (center), min, and max values. Test that the servo moves in the correct direction — push forward stick should tilt the rear motor to produce correct yaw response.
- Servo direction check: Arm the quad (without props) and test yaw input. If yaw is reversed, invert the servo direction in the Servos tab.
- Servo rate: Set to 333Hz if using a digital servo. 50Hz for analogue servos.
9. PID Tuning for Tricopters
Tricopters require different PID tuning approaches than quads, primarily because of the slow servo-based yaw axis:
Yaw PID
Keep yaw P-gain lower than on a quad (servo response is inherently slower than motor speed change). Start with P=20, I=60, D=0 on yaw. Increase P carefully — too much yaw P with a slow servo creates oscillation.
Roll and Pitch PID
Similar to a quad of equivalent size. Start conservatively and increase P until you see slight oscillation, then back off 15%.
Servo Deadband
Set a small servo deadband (5–10) in the servo configuration to prevent constant micro-movement of the servo at hover. This extends servo life significantly.
Gyro Filtering
Tricopters are more susceptible to low-frequency vibrations from the servo mechanism. Set the gyro lowpass filter cutoff lower than you would for a quad (80–100 Hz instead of 150–200 Hz) to filter out servo-induced noise.
Frequently Asked Questions
Is a tricopter harder to build than a quadcopter?
Yes, the servo yaw mechanism adds mechanical complexity not present in quads. The build is approximately 30–40% more involved than an equivalent quadcopter. That said, the additional complexity is manageable for anyone who has already built a quad successfully.
Can I use a standard quadcopter frame for a tricopter?
Not directly — you need a Y-frame specifically designed for three arms. However, some builders have modified quad frames by removing one arm and adding a servo tilt mechanism to an adjacent arm. It’s inelegant but functional for prototyping.
How do tricopters compare to quads for aerial photography?
For smooth camera work, tricopters can be excellent — the distinctive sound and visual silhouette add production value, and three-arm flight is smooth when well-tuned. However, yaw movements are slightly less crisp than a quad, and any servo wear affects footage quality. For professional use, most cinematographers prefer hexacopters or octocopters for redundancy.
What happens if the servo fails mid-flight?
If the servo fails (locks up or goes limp), the tricopter loses yaw control entirely and will likely crash. This is a key disadvantage vs. quads where a motor failure is more survivable. Always inspect the servo connection and mechanism before each flight.
Are there ready-made tricopter kits available in India?
Dedicated tricopter kits are rare in the Indian market. Most tricopter builders source components individually — frame custom-fabricated or ordered from abroad, motors and ESCs from domestic suppliers like Zbotic.in. The servo can usually be sourced from local RC model shops that stock aeroplane components.
Conclusion
Building a tricopter is one of the most technically rewarding projects in the drone hobby. The servo yaw mechanism is a fascinating piece of engineering, and getting a tricopter flying smoothly is a milestone that commands genuine respect in any drone community.
The tricopter won’t replace your quadcopter — it’s a different tool for different purposes and moods. But as a second or third build, or as a showpiece project, it offers something no quad can: a reminder that the Y-frame was flying drones well before the quad became standard, and it still has plenty to offer those willing to learn its quirks.
Source Your Tricopter Components at Zbotic
Props, PDBs, anti-vibration mounts, and more — everything you need to complete your tricopter build, available and shipped across India.
Shop Drone Components


Add comment