
Building an ESP32 NTP clock with OLED display is one of the most satisfying beginner-to-intermediate projects you can complete in a weekend. Unlike RTC module-based clocks that drift over time and need manual setting, an NTP (Network Time Protocol) clock automatically synchronises with internet time servers, keeping perfect time indefinitely. Combined with a crisp OLED display and the ESP32’s built-in WiFi, you get an always-accurate, Indian Standard Time (IST) clock that costs under ₹350 in components. This complete guide covers everything from hardware assembly to final code with IST timezone support.
Components Required
Here is everything you need for the complete ESP32 NTP clock build:
- ESP32 development board (NodeMCU ESP32, ESP32 DevKitC, or WROOM-32) — ~₹220
- 0.96″ SSD1306 OLED display (128×64, I2C) — ~₹80
- USB cable (Micro-USB or USB-C depending on your ESP32 board)
- Jumper wires (4 female-to-female for I2C)
- Optional: DHT11 or DHT20 sensor for temperature/humidity display
- Optional: 3D printed or plastic enclosure
The entire project can be powered from a USB phone charger — perfect for desk or bedside placement. Total cost including ESP32 and display: under ₹350.

DHT20 SIP Temperature and Humidity Sensor
I2C DHT20 sensor in compact SIP package — add real-time temperature and humidity to your ESP32 NTP clock without using extra pins beyond I2C.
Wiring the OLED to ESP32
The 0.96″ SSD1306 OLED uses I2C — only 4 wires needed, making this one of the simplest possible displays to connect:
| OLED Pin | ESP32 Pin | Notes |
|---|---|---|
| VCC | 3.3V | Use 3.3V, not 5V |
| GND | GND | Common ground |
| SDA | GPIO 21 | I2C data |
| SCL | GPIO 22 | I2C clock |
GPIO 21 (SDA) and GPIO 22 (SCL) are the default I2C pins for the ESP32. The I2C address is typically 0x3C for these OLED modules, but some are 0x3D — check the back of your module for the A0 solder bridge.
Adding a DHT sensor: Connect DHT20 SDA/SCL to the same I2C bus (GPIO 21/22). Both the OLED and DHT20 share I2C without conflict since they have different addresses. For DHT11, connect the data pin to any free GPIO (e.g., GPIO 4).
Library Setup in Arduino IDE
You need the following libraries. Install them via Sketch → Include Library → Manage Libraries:
- Adafruit SSD1306 — OLED display driver
- Adafruit GFX Library — graphics primitives (auto-installed as dependency)
- NTPClient by Fabrice Weinberg — NTP time synchronisation
- WiFi — built into ESP32 Arduino core, no manual install needed
- Optional: DHT sensor library by Adafruit (for temperature display)
Also ensure the ESP32 board is installed in Arduino IDE. Go to File → Preferences and add this URL to Additional Board Manager URLs:
https://raw.githubusercontent.com/espressif/arduino-esp32/gh-pages/package_esp32_index.jsonThen go to Tools → Board → Board Manager, search for “esp32” and install the Espressif package.
Complete NTP Clock Code with IST
Here is the complete, ready-to-use code for your ESP32 NTP OLED clock set to Indian Standard Time (UTC+5:30):
#include <WiFi.h>
#include <NTPClient.h>
#include <WiFiUdp.h>
#include <Wire.h>
#include <Adafruit_GFX.h>
#include <Adafruit_SSD1306.h>

// --- Configuration ---
const char* ssid     = "YOUR_WIFI_SSID";
const char* password = "YOUR_WIFI_PASSWORD";

// IST = UTC + 5 hours 30 minutes = 19800 seconds
const long utcOffsetInSeconds = 19800;

// NTP server (India-friendly)
const char* ntpServer = "in.pool.ntp.org";

// OLED display settings
#define SCREEN_WIDTH 128
#define SCREEN_HEIGHT 64
#define OLED_RESET    -1
#define SCREEN_ADDRESS 0x3C

// --- Global objects ---
Adafruit_SSD1306 display(SCREEN_WIDTH, SCREEN_HEIGHT, &Wire, OLED_RESET);
WiFiUDP ntpUDP;
NTPClient timeClient(ntpUDP, ntpServer, utcOffsetInSeconds, 60000);

// --- Helper: zero-pad single digit numbers ---
String zeroPad(int num) {
  return (num < 10) ? "0" + String(num) : String(num);
}

// --- Day name lookup ---
const char* dayNames[] = {"Sun", "Mon", "Tue", "Wed", "Thu", "Fri", "Sat"};
const char* monthNames[] = {"", "Jan", "Feb", "Mar", "Apr", "May", "Jun",
                             "Jul", "Aug", "Sep", "Oct", "Nov", "Dec"};

void setup() {
  Serial.begin(115200);

  // Initialise display
  if (!display.begin(SSD1306_SWITCHCAPVCC, SCREEN_ADDRESS)) {
    Serial.println("SSD1306 init failed!");
    for(;;);  // Halt
  }
  display.clearDisplay();
  display.setTextColor(WHITE);

  // Show connecting screen
  display.setTextSize(1);
  display.setCursor(10, 20);
  display.println("Connecting WiFi...");
  display.setCursor(10, 35);
  display.println(ssid);
  display.display();

  // Connect to WiFi
  WiFi.begin(ssid, password);
  int attempts = 0;
  while (WiFi.status() != WL_CONNECTED && attempts < 30) {
    delay(500);
    Serial.print(".");
    attempts++;
  }

  if (WiFi.status() == WL_CONNECTED) {
    Serial.println("nWiFi connected!");
    // Start NTP client
    timeClient.begin();
    timeClient.update();

    display.clearDisplay();
    display.setCursor(15, 25);
    display.println("NTP Synced!");
    display.display();
    delay(1500);
  } else {
    // WiFi failed — show error but continue
    display.clearDisplay();
    display.setCursor(5, 20);
    display.println("WiFi Failed!");
    display.setCursor(5, 35);
    display.println("Check credentials");
    display.display();
    delay(3000);
  }

  // Reduce brightness for long-running use
  display.ssd1306_command(SSD1306_SETCONTRAST);
  display.ssd1306_command(50);  // Reduced from max 255
}

void drawClock() {
  timeClient.update();

  int hours   = timeClient.getHours();
  int minutes = timeClient.getMinutes();
  int seconds = timeClient.getSeconds();
  int dayOfWeek = timeClient.getDay();  // 0=Sunday

  display.clearDisplay();

  // --- Large time display (centre) ---
  display.setTextSize(3);
  display.setCursor(4, 18);
  display.print(zeroPad(hours));
  display.print(":");
  display.print(zeroPad(minutes));

  // Blinking colon (blinks every second)
  display.setTextSize(2);
  display.setCursor(112, 22);
  if (seconds % 2 == 0) display.print(":");

  // --- Seconds bar ---
  int barWidth = map(seconds, 0, 59, 0, 128);
  display.fillRect(0, 56, barWidth, 8, WHITE);

  // --- Day and date header ---
  display.setTextSize(1);
  display.setCursor(0, 2);
  display.print(dayNames[dayOfWeek]);
  display.setCursor(50, 2);
  display.print("IST  ");

  // WiFi signal indicator
  if (WiFi.status() == WL_CONNECTED) {
    display.fillRect(120, 0, 8, 8, WHITE);
    display.setTextColor(BLACK);
    display.setCursor(121, 0);
    display.print("W");
    display.setTextColor(WHITE);
  }

  display.display();
}

void loop() {
  drawClock();
  delay(1000);
}
The code uses in.pool.ntp.org — the NTP pool for India, which routes your sync requests to geographically close servers for low latency. The UTC offset of 19800 seconds (5 hours 30 minutes = IST) handles the Indian timezone automatically.
Display Design and Customisation
The code above uses large size-3 text for the time display. Here are several customisation options:
12-Hour Format with AM/PM
bool isPM = (hours >= 12);
int hours12 = hours % 12;
if (hours12 == 0) hours12 = 12;

display.print(zeroPad(hours12));
display.print(":");
display.print(zeroPad(minutes));

display.setTextSize(1);
display.setCursor(110, 28);
display.print(isPM ? "PM" : "AM");
Custom Fonts with U8g2
For a more polished look, use the U8g2 library which includes dozens of fonts including large 7-segment style numerals that look like a real digital clock:
#include <U8g2lib.h>
U8G2_SSD1306_128X64_NONAME_F_HW_I2C u8g2(U8G2_R0);

// In setup:
u8g2.begin();
u8g2.setFont(u8g2_font_logisoso28_tf);  // 7-segment style, 28px

// In loop:
u8g2.clearBuffer();
u8g2.drawStr(0, 40, timeString.c_str());
u8g2.sendBuffer();
Pixel Shifting for Burn-In Prevention
// Add to drawClock: shift text by 0-2 pixels each minute
int shift = (minutes % 3);  // 0, 1, or 2 pixels
display.setCursor(4 + shift, 18 + shift);
// ... draw time as before
Adding Temperature and Humidity Display
Extend the clock with a DHT sensor to show current temperature and humidity — very useful for Indian summers:
#include "DHT.h"
#define DHTPIN 4
#define DHTTYPE DHT11
DHT dht(DHTPIN, DHTTYPE);

float temperature, humidity;
unsigned long lastSensorRead = 0;

void readSensor() {
  // Read sensor only every 5 seconds (DHT11 limitation)
  if (millis() - lastSensorRead > 5000) {
    temperature = dht.readTemperature();
    humidity    = dht.readHumidity();
    lastSensorRead = millis();
  }
}

// In drawClock(), after main time display:
readSensor();
display.setTextSize(1);
display.setCursor(0, 48);
display.print(temperature, 1);
display.print("C  ");
display.print(humidity, 0);
display.print("%RH");
DHT11 Temperature and Humidity Sensor Module with LED
Add live temperature and humidity data to your ESP32 NTP clock display — the onboard LED confirms sensor activity at a glance.
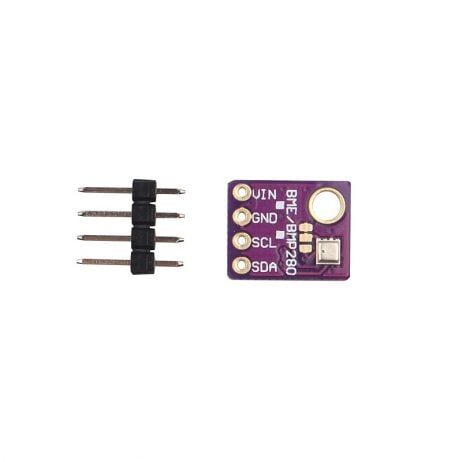
GY-BME280-5V Temperature, Humidity and Pressure Sensor
5V-compatible BME280 covering temperature, humidity and barometric pressure — upgrade your ESP32 NTP clock into a complete weather station on one display.
Enclosure and Power Options
Making the project look presentable is half the fun. Here are practical options for Indian makers:
Enclosure Ideas
- Cardboard box: Quick and zero-cost — cut holes for the display and USB port. Decorate with paper or craft materials.
- 3D printed case: Thingiverse has dozens of ESP32 + 0.96″ OLED case designs. Print in PLA at any local 3D printing shop in India for ₹100–₹200.
- Acrylic box: Available from local hardware stores or cut to size at an acrylic fabrication shop. Looks very professional.
- Old phone case: Some Nokia or old smartphone cases can be repurposed with creative cutting.
Power Supply
- USB power bank: Completely portable clock — runs for 10–20 hours on a 5000 mAh bank
- 5V wall adapter: Plug into any USB charger for a permanent desk clock
- Solar + LiPo: For outdoor use, a 5V solar panel + TP4056 charger + 18650 LiPo cell gives full off-grid operation
Power consumption tip: The ESP32 in WiFi active mode draws about 80–150 mA. To save power, use deep sleep between time syncs: sync NTP every hour, then sleep with only a basic time counter running. The display itself draws 20–30 mA at moderate brightness.

LM35 Temperature Sensors
Classic analog temperature sensor — a budget-friendly option for adding temperature to your ESP32 clock project using the ADC input without extra libraries.
Frequently Asked Questions
Q1: My ESP32 connects to WiFi but the time shows wrong — how do I fix IST timezone?
IST is UTC+5:30, which is 5 × 3600 + 30 × 60 = 19800 seconds. In the NTPClient constructor, make sure the third parameter is exactly 19800: NTPClient timeClient(ntpUDP, "in.pool.ntp.org", 19800, 60000);. Alternatively, use the ESP32’s built-in configTime(19800, 0, "in.pool.ntp.org") which also handles daylight saving correctly (India does not observe DST, so the second parameter is 0).
Q2: The NTP time drifts when WiFi disconnects — how to maintain time?
The ESP32’s internal RTC keeps time using its crystal oscillator, which drifts about 5–30 seconds per day. To minimise impact: sync NTP on startup, then re-sync whenever WiFi reconnects (use WiFi.onEvent() callback). For more accurate offline timekeeping, add a DS3231 RTC module — it drifts less than 2 seconds per month.
Q3: Can I use ESP8266 (NodeMCU) instead of ESP32 for this project?
Yes — the wiring and code are nearly identical. Replace #include <WiFi.h> with #include <ESP8266WiFi.h>. The SSD1306 I2C pins on NodeMCU v3 are SDA=D2 (GPIO4) and SCL=D1 (GPIO5). NTPClient library works identically. ESP8266 is slightly cheaper but has less RAM — avoid large U8g2 font sizes.
Q4: How do I add a buzzer alarm to the clock?
Connect a passive buzzer to any GPIO (e.g., GPIO 25). Add alarm time variables and check them in your loop: if hours == alarmHour && minutes == alarmMinute && seconds == 0, call tone(25, 1000, 500) to beep. For a user-configurable alarm, add two buttons connected to GPIOs to increment/decrement the alarm hour and minute.
Q5: Is in.pool.ntp.org reliable in India?
Yes — the NTP Pool Project has dedicated Indian servers. You can also use pool.ntp.org (global), time.google.com, or time.cloudflare.com as alternatives. For best reliability, specify multiple servers: use the configTime approach with 2–3 server arguments: configTime(19800, 0, "in.pool.ntp.org", "time.google.com", "pool.ntp.org");
Build Your ESP32 NTP Clock This Weekend
An ESP32 NTP clock with OLED display is the perfect weekend project — under ₹350 in parts, perfectly accurate Indian Standard Time, and a great learning experience with WiFi, I2C, and display programming all in one build.
Get all the components you need — ESP32 boards, OLED displays, sensors, and more — at Zbotic.in, India’s favourite electronics components store with competitive prices and fast delivery across India.


Add comment