
Table of Contents
- Why Bed Adhesion Is Critical
- Glue Stick: The Reliable Workhorse
- PEI Sheet: The Gold Standard
- BuildTak and Similar Build Surfaces
- Plain Glass and Borosilicate Glass
- Hairspray and Other Sprays
- Full Comparison Table by Material
- India-Specific Considerations
- First Layer Tips Beyond Adhesion
- Frequently Asked Questions
- Conclusion
A failed first layer is one of the most demoralising experiences in 3D printing. You set up your model, started the print, walked away for a minute, and came back to find a spaghetti mess on the bed because the first layer let go halfway through. Bed adhesion is not glamorous, but it is absolutely fundamental to successful 3D printing.
In this detailed guide we compare every major bed adhesion method — from the humble glue stick to premium PEI and BuildTak surfaces — and tell you exactly which one works best for each filament type, including considerations specific to Indian printing conditions like high ambient temperatures and humidity.
Why Bed Adhesion Is Critical
The first layer is the foundation of your entire print. As the extruder deposits hot plastic, the plastic needs to stick to the bed surface strongly enough to:
- Resist the force of subsequent layers being printed on top
- Withstand the drag force of the nozzle moving over it
- Survive thermal expansion and contraction during the print
- Stay flat without warping (especially with ABS and large PETG parts)
But adhesion must also be releasable — after printing, you need to remove the finished part without breaking it or damaging the bed. The perfect bed surface holds during printing and releases cleanly after.
Poor bed adhesion manifests as warping corners, parts detaching mid-print, elephant foot (first layer squashed too hard to compensate for weak adhesion), and delamination. Getting adhesion right eliminates all of these at once.
Glue Stick: The Reliable Workhorse
How It Works
Washable PVA glue sticks (Fevicol or any office glue stick) applied in a thin, even layer on a glass bed create a slightly tacky surface that grips most filaments well. When the bed cools, the PVA contracts and releases the part. The coating can be reactivated with a drop of water for the next print.
Advantages
- Cost: A ₹20–₹50 glue stick lasts months of printing
- Availability: Available in every stationery shop across India
- Material compatibility: Works with PLA, ABS, PETG, and even some TPU grades
- Bed independence: Works on glass, mirror tiles, or any smooth surface
- Easy cleanup: Water-soluble, wipes off completely
Disadvantages
- Requires reapplication every few prints
- Inconsistent coverage leads to inconsistent adhesion
- Not ideal for very large prints (coverage uniformity is difficult)
- Hot beds can cook the glue into a hard residue that is harder to clean
Best For
PLA and ABS on glass beds. Budget-conscious setups where you want reliable results without investing in premium surfaces. Also a great backup when your primary surface is damaged or being cleaned.
How to Apply Correctly
Apply 2–3 thin layers in alternating directions on a cold or slightly warm bed (30–40°C). Avoid thick globs — thin and even is key. Allow to dry slightly before printing. One coat typically lasts 3–8 prints depending on part size.
PEI Sheet: The Gold Standard
What Is PEI?
PEI (Polyetherimide) is a high-performance thermoplastic that was originally developed for industrial applications. As a build surface, PEI is applied as a thin sheet (0.1–0.3mm) adhered to a spring steel plate or directly to a glass bed using pressure-sensitive adhesive.
PEI has become the gold standard in consumer FDM printing because of its outstanding property: it holds prints firmly at printing temperature and releases them easily at room temperature. This temperature-dependent adhesion change makes it nearly magical in use.
Types of PEI Surfaces
- Smooth PEI on glass: Maximum detail on the first layer, harder to release (flex required)
- Textured PEI on spring steel: Flex-to-release, slight texture on bottom of parts
- Double-sided (smooth + textured): The most versatile option — flip for different needs
Advantages
- No consumables required — no glue, no spray
- Consistent adhesion print after print
- Excellent with PLA and PETG at no-bed-treatment conditions
- Magnetic spring steel variants are extremely convenient (snap on/off)
- Lasts hundreds or thousands of prints with proper care
Disadvantages
- Higher upfront cost (₹800 – ₹3,000 for a quality PEI sheet)
- PEI can be damaged by ABS acetone smoothing and some solvents
- Over time, PEI loses adhesion and needs re-seasoning or replacement
- PETG can stick too well to smooth PEI and rip chunks off the surface
- Requires glue stick or release agent with PETG on smooth PEI to prevent damage
Best For
PLA: excellent on both smooth and textured PEI, no treatment needed. ABS: great on smooth PEI at 100°C+ bed temperature. PETG: use textured PEI or apply a very thin glue stick layer on smooth PEI to prevent surface damage. TPU: excellent adhesion — may need flex or slight prying to release.
Care and Maintenance
Clean PEI with IPA (isopropyl alcohol) every 5–10 prints. Avoid touching the surface with bare hands (skin oils degrade adhesion). If adhesion decreases, a light sand with 1000-grit paper refreshes the surface. For smooth PEI sheets without spring steel, a few drops of water under the part help release it without flexing.

Frosted Heated Bed Sticker Build Plate Tape – 220×220mm with Adhesive Backing
Affordable build surface with frosted texture — provides reliable adhesion for PLA, ABS, and PETG without glue.
BuildTak and Similar Build Surfaces
What Is BuildTak?
BuildTak is a brand name for a polyethylene-based build surface that offers strong adhesion, particularly for PLA and ABS. Similar products are sold generically as “build plate stickers” or “print surface sheets.” They are typically 0.4–0.6mm thick adhesive sheets applied directly to the print bed.
Advantages
- Strong first-layer adhesion out of the box
- Works well for PLA and ABS without any preparation
- Affordable (₹300 – ₹800 for a 220×220mm sheet)
- Easy to apply, replaceable when worn
Disadvantages
- Parts can be difficult to remove — requires scraper, which can damage the surface
- Wears out faster than PEI (typically 50–200 prints depending on use)
- PETG and TPU can bond too strongly, potentially tearing the surface
- Cannot be cleaned as effectively as PEI — oil and debris accumulates in the texture
Best For
Budget setups where you want better adhesion than bare glass but do not want to invest in PEI. Good for PLA printing specifically. Avoid for PETG and TPU unless you apply a release layer.
Generic Frosted Build Plate Stickers
The frosted (matte) surface build stickers available in India are a cost-effective alternative to both BuildTak and PEI. They provide good adhesion for PLA and moderate ABS adhesion. The frosted texture naturally releases parts better than smooth surfaces. Highly recommended as a first upgrade for Ender 3 and similar budget printers.
Plain Glass and Borosilicate Glass
Plain Glass
Ordinary window glass or mirror tiles were the original 3D printing bed surface before specialised products existed. They provide a perfectly flat surface but poor adhesion on their own. Always used with glue stick, hairspray, or other adhesion aids.
In India, mirror tiles from a hardware store (₹50–₹100 for a 200×200mm piece) make a perfectly functional and cheap bed surface for Ender 3 class printers. The mirror’s polished surface also produces glossy first-layer finishes.
Borosilicate Glass
Borosilicate glass (sold as “Pyrex” type glass) has excellent thermal properties — it heats uniformly and resists thermal shock. It is the premium glass option for heated beds. Thicker than typical window glass (3–4mm vs 2mm), it stays flatter at printing temperatures.
Borosilicate glass + glue stick is still the combination of choice for ABS printing in enclosures because the glue stick provides better adhesion than PEI at the high bed temperatures needed for ABS (100–110°C).
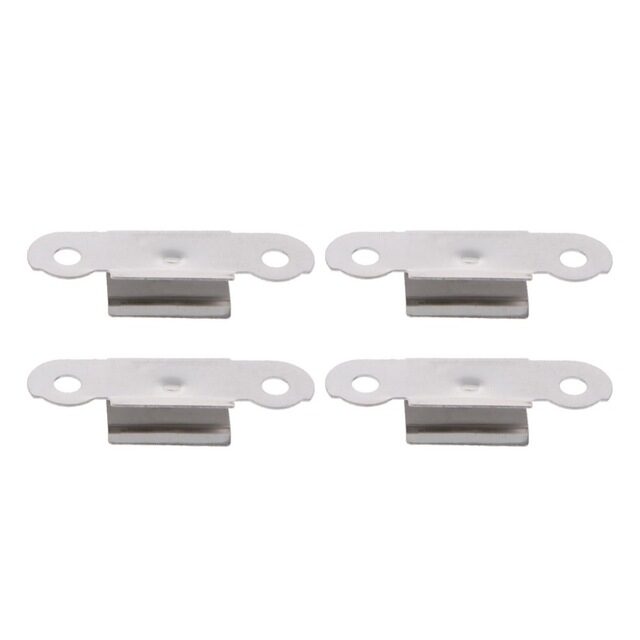
3D Printer Build Platform Glass Retainer Heated Bed Clip – Pack of 4
Stainless steel clips to secure glass bed firmly — prevents shifting during printing for consistent first-layer adhesion.
Hairspray and Other Sprays
Hairspray (particularly AquaNet, a US brand, but any high-hold hairspray works) has a devoted following in the 3D printing community. It deposits a thin, even layer of polymers on the glass that provides reliable PLA adhesion.
In India, hairspray is readily available and costs ₹150–₹400. Apply from 25–30cm distance, let dry, and print. Wash off with water when coverage becomes uneven. Disadvantages: fumes, less predictable chemistry between brands, and the smell.
Specialized 3D printing adhesion sprays are also available but harder to find and more expensive in India. For most users, glue stick or PEI is a more reliable choice.
Full Comparison Table by Material
| Filament | Glue Stick | Smooth PEI | Textured PEI | BuildTak/Frosted | Plain Glass |
|---|---|---|---|---|---|
| PLA | ✅ Excellent | ✅ Excellent | ✅ Excellent | ✅ Good | ⚠️ With glue |
| ABS | ✅ Good | ✅ Good (100°C+) | ⚠️ Moderate | ⚠️ Moderate | ⚠️ With glue |
| PETG | ✅ Good | ⚠️ Use release | ✅ Good | ⚠️ Use release | ⚠️ With glue |
| TPU | ⚠️ Moderate | ✅ Excellent (flex to release) | ✅ Good | ✅ Good | ❌ Poor |
| Nylon | ✅ With PVA stick | ⚠️ Moderate | ⚠️ Moderate | ❌ Poor | ❌ Poor |
India-Specific Considerations
High Ambient Temperature
In Indian summers (May–June), ambient temperatures of 35–45°C mean that PLA can warp even off the bed if the environment is too warm. Use a fan to cool finished prints, and consider printing early morning when ambient temperature is lower. High ambient temperature also means bed heating uses more electricity to maintain setpoint.
Humidity Effects on Adhesion
High humidity (common in coastal cities) causes moisture absorption in both the filament and the glue stick coating. Wet filament produces micro-bubbles that reduce first-layer bond strength. Always store filament in sealed containers with silica gel. Reapply glue stick more frequently in humid seasons.
Power Fluctuations
Indian power supplies can have voltage fluctuations, especially in tier-2 and tier-3 cities. Sudden voltage drops can reduce heater output mid-print, causing the bed to cool below the adhesion threshold and resulting in part detachment. A voltage stabiliser (₹1,000–₹2,000) is a worthwhile investment if you experience this problem.
Local Availability of Surfaces
PEI spring steel sheets must typically be imported or purchased online in India — local hardware stores do not stock them. Build plate stickers and glass tiles are available locally. Glue sticks are universally available. Plan accordingly if you cannot wait for shipping times.
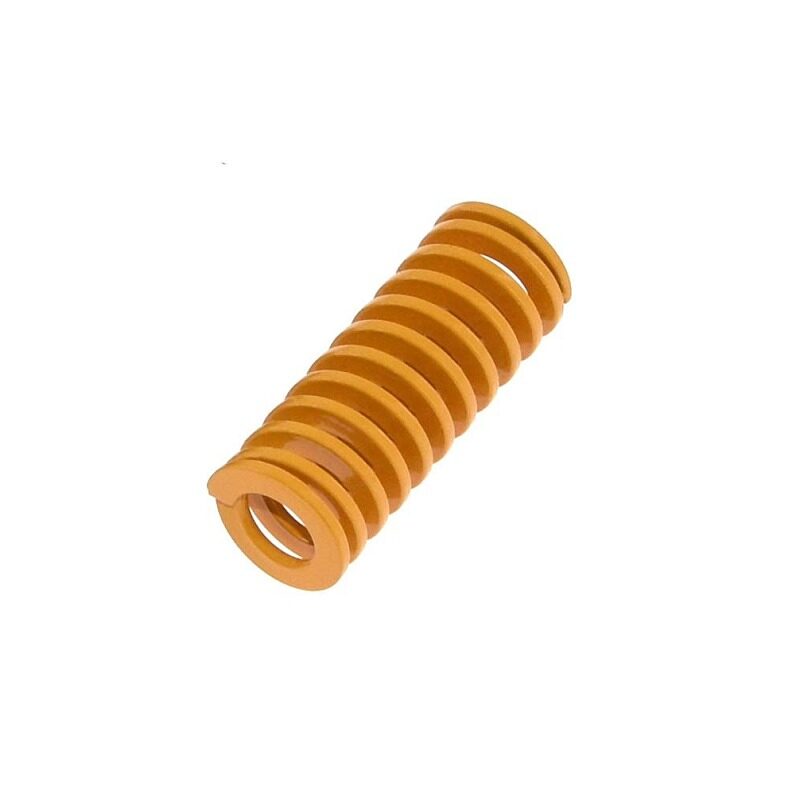
3D Printer Parts Spring for Heated Bed – MK3 CR-10 Hotbed
Replacement bed levelling springs for consistent bed height — proper levelling is as important as bed surface for first-layer adhesion.
First Layer Tips Beyond Adhesion
Even the best bed surface will fail if your slicer and printer settings are not optimised. Here are the most impactful first layer settings:
First Layer Height
Print your first layer at 0.2–0.3mm regardless of your general layer height. A thicker first layer compresses against the bed and creates a larger contact area. Avoid 0.1mm first layers — they do not squish enough for reliable adhesion.
First Layer Speed
Print the first layer at 25–35mm/s maximum. Slow speed gives the plastic time to flow and adhere before the nozzle moves on. Fast first layers are a common cause of adhesion failures even on good surfaces.
First Layer Flow Rate
Increase first layer flow to 105–110% in your slicer. This slight over-extrusion ensures good contact area and compensates for minor bed height variation.
Live Z Offset Adjustment
The most important hardware adjustment. The nozzle should be close enough to slightly squish the first layer flat — you should see a shiny, slightly wider than normal track. Too far = no adhesion. Too close = clogged nozzle and torn surface.
First Layer Temperature Bump
Printing the first layer 5–10°C hotter than subsequent layers increases flow and adhesion. Many slicer profiles include this as a separate first-layer temperature setting.
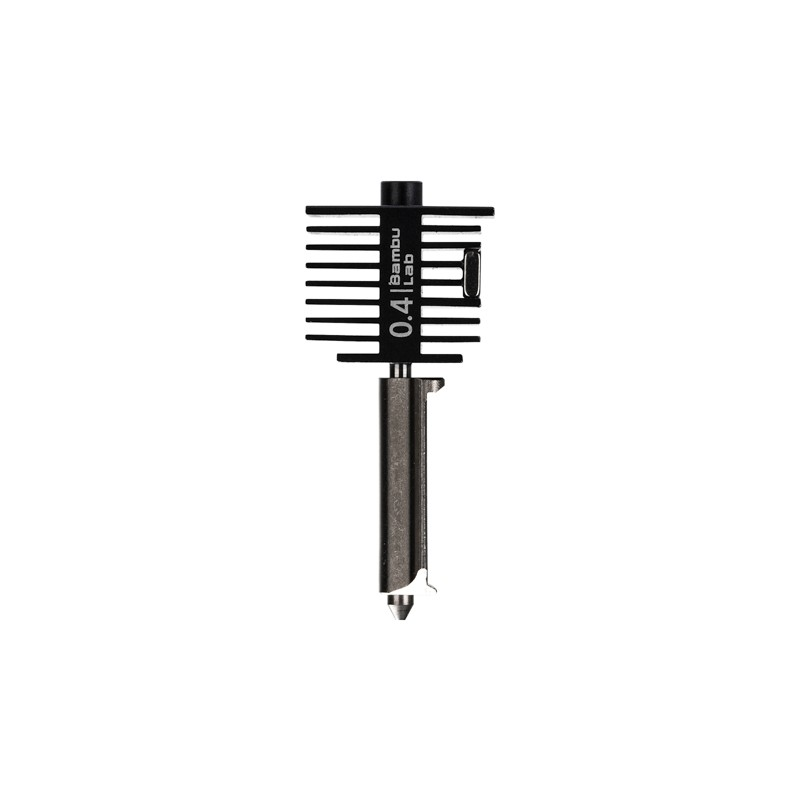
Bambu Lab Hotend with Hardened Steel Nozzle – 0.4mm
Genuine Bambu Lab replacement hotend — precise nozzle height control is essential for consistent first-layer adhesion.
Frequently Asked Questions
What is the best bed adhesion for PLA in India?
For most Indian makers printing PLA, textured PEI on spring steel is the best all-around solution — no glue required, easy release, consistent results. If budget is a concern, a frosted build plate sticker at 60°C bed temperature works very reliably for PLA.
How do I stop ABS from warping?
ABS warping is caused by rapid cooling of the bottom layers relative to the top. Solutions: print in an enclosure to maintain ambient temperature, use a glass bed at 100–110°C with glue stick, add a brim in the slicer (5–10mm width), and disable part cooling fan for the first 5 layers.
Can I use Fevicol as a glue stick alternative for 3D printing?
Yes, liquid Fevicol (PVA-based) diluted with water (1:4 ratio) and applied with a sponge creates a similar surface to glue stick. Let it dry completely before printing. This is a popular DIY solution in India and works well for PLA and ABS. Wash off with water when it builds up unevenly.
Why does PETG stick too hard to my build surface?
PETG is chemically aggressive toward many surfaces at printing temperature. It forms a near-weld bond with smooth PEI, textured PEI (to a lesser extent), and bare glass. Solutions: apply a very thin glue stick layer as a release agent, reduce bed temperature by 5°C, or use a dedicated PETG-specific surface.
How often should I replace my build surface?
Glue stick: reapply every 3–8 prints. Frosted stickers/BuildTak: replace when the texture wears flat or adhesion drops (typically 50–200 prints). PEI sheet: can last 1,000+ prints with proper care (clean with IPA, avoid sharp scrapers). The texture on textured PEI naturally wears with use — smooth PEI generally lasts longer.
Does a magnetic bed help with adhesion?
Magnetic spring steel beds do not directly improve adhesion — the bed surface material still determines adhesion. However, magnetic beds make removing parts much easier (flex the sheet) and allow swapping between different surface types quickly. Very convenient for multi-material setups.
Conclusion
There is no single perfect bed adhesion solution for all materials and all printers. But there are clear winners for each use case:
- Best for PLA (any budget): Textured PEI spring steel sheet — no consumables, excellent adhesion, easy release
- Best for ABS: Glass bed at 100–110°C with glue stick — proven, reliable, inexpensive
- Best for PETG: Textured PEI with a thin glue stick release layer
- Best for TPU: Smooth PEI (flex to release) or frosted sticker
- Best budget option: Frosted build plate sticker — works well for PLA and ABS at very low cost
Remember that bed adhesion is only one part of the first-layer equation. Proper nozzle height (Z offset), slow first layer speed, and adequate bed temperature all contribute equally to successful first layers. Get all three right, and failed prints due to adhesion will become a rare occurrence rather than a daily frustration.
Shop 3D printer bed accessories, nozzles, thermistors, and filaments at Zbotic for all your FDM printing needs.
Bed clips, springs, build surfaces, nozzles — keep your printer running at peak performance with quality spare parts.


Add comment