
Building a Telegram bot with ESP32 for remote control via a messaging app is one of the most practical and satisfying IoT projects you can complete in a weekend. Instead of building a custom mobile app or dealing with complex cloud dashboards, you get a secure, free, and globally accessible control interface right inside Telegram — an app most Indian smartphone users already have. In this tutorial, you will learn how to set up a Telegram bot, connect it to an ESP32, and use it to control relays, read sensor data, and even stream status updates, all from your phone.
Why Telegram for ESP32 Remote Control?
India has over 100 million active Telegram users, and the platform has one of the most developer-friendly bot APIs in the world. Unlike WhatsApp (which requires a business account and charges per message), Telegram bots are completely free, support unlimited messages, and work over both mobile data and Wi-Fi. For ESP32-based remote control systems, this makes Telegram an ideal choice for several reasons:
- No port forwarding needed: The ESP32 polls Telegram’s servers (outbound HTTPS), so it works behind NAT, CGNAT (common with Indian ISPs like Jio and Airtel broadband), and even behind mobile data.
- End-to-end SSL: All communication is encrypted by default. No custom SSL certificates needed on your ESP32.
- Rich interface: Telegram supports custom keyboards, inline buttons, photos, and formatted text — far richer than SMS or simple HTTP endpoints.
- Multi-user support: You can control your device from multiple phones, or create a group bot that multiple family members can use.
- Free for life: No subscriptions, no tiers, no rate limit concerns for typical home automation use.
Step 1: Creating Your Telegram Bot with BotFather
Before writing a single line of ESP32 code, you need to register a bot with Telegram. The process takes about two minutes:
- Open Telegram and search for @BotFather (the official Telegram bot for creating bots).
- Send the command
/newbot. - BotFather will ask for a display name (e.g., “Home Controller”) and a username (must end in “bot”, e.g., “myhomecontrollerbot”).
- BotFather will reply with your bot’s HTTP API token — a long string like
1234567890:ABCDEF.... Save this securely; it is your bot’s password. - Next, you need your personal chat ID. Search for @userinfobot on Telegram, send it any message, and it will reply with your numeric chat ID (e.g.,
987654321).
You will embed both the token and your chat ID into the ESP32 firmware. The chat ID acts as an authorisation filter — the bot will only respond to commands coming from your specific account.
Step 2: Hardware Setup and Required Components
For this tutorial, we will build a system that:
- Controls a relay (simulating a light or appliance) via Telegram commands
- Reads temperature and humidity from a DHT11 sensor and reports it on demand
- Sends an automatic alert when temperature exceeds a threshold
Components needed:
- ESP32 development board (NodeMCU-32S or similar)
- DHT11 or DHT22 temperature/humidity sensor
- 1-channel 5V relay module
- LED (for visual feedback during testing)
- Jumper wires and breadboard
- USB cable and computer for flashing
Wiring:
- DHT11 DATA pin → ESP32 GPIO4, VCC → 3.3V, GND → GND
- Relay IN pin → ESP32 GPIO26, VCC → 5V (from VIN if USB-powered), GND → GND
- LED (with 220Ω resistor) → GPIO2, GND → GND

Ai Thinker NodeMCU-32S ESP32 Development Board – IPEX Version
A reliable ESP32 dev board with IPEX connector for optional external antenna — great for installations where the ESP32 is inside a metal enclosure or far from the router.

DHT11 Digital Relative Humidity and Temperature Sensor Module
The DHT11 is the classic beginner-friendly sensor for temperature and humidity readings — easy to wire and supported by the widely-used DHT library for Arduino/ESP32.
Step 3: Installing the Universal Telegram Bot Library
The easiest way to use Telegram with ESP32 is via Brian Lough’s Universal Telegram Bot library, which abstracts the Telegram Bot API into simple C++ methods. Install it via the Arduino Library Manager:
- Open Arduino IDE → Sketch → Include Library → Manage Libraries
- Search for “Universal Telegram Bot” and install it (by Brian Lough)
- Also install ArduinoJson (version 6.x) which the Telegram library depends on
- Install DHT sensor library by Adafruit
If you are using ESP-IDF or PlatformIO, you can add the library as a dependency in your platformio.ini or use the ESP-IDF component manager. The library handles HTTPS by using the ESP32’s built-in SSL stack with Telegram’s root certificate — no additional certificate files needed.
Step 4: Writing the Firmware — Commands, Relays, and Sensors
Below is a complete, production-ready sketch. Read it carefully — comments explain every important section.
#include <WiFi.h>
#include <WiFiClientSecure.h>
#include <UniversalTelegramBot.h>
#include <DHT.h>

// ----- Configuration -----
const char* WIFI_SSID     = "YourWiFiSSID";
const char* WIFI_PASSWORD = "YourWiFiPassword";
const char* BOT_TOKEN     = "1234567890:ABCDEF...";
const long  CHAT_ID       = 987654321LL; // Your Telegram chat ID

#define RELAY_PIN   26
#define DHT_PIN     4
#define DHT_TYPE    DHT11
#define TEMP_ALERT  35.0  // Alert if temperature > 35°C

// ----- Globals -----
WiFiClientSecure client;
UniversalTelegramBot bot(BOT_TOKEN, client);
DHT dht(DHT_PIN, DHT_TYPE);

bool relayState = false;
unsigned long lastBotCheck = 0;
const unsigned long BOT_INTERVAL = 1500; // Poll every 1.5 seconds
unsigned long lastTempCheck = 0;
bool alertSent = false;

// ----- Setup -----
void setup() {
  Serial.begin(115200);
  pinMode(RELAY_PIN, OUTPUT);
  digitalWrite(RELAY_PIN, LOW);
  dht.begin();

  WiFi.begin(WIFI_SSID, WIFI_PASSWORD);
  Serial.print("Connecting to WiFi");
  while (WiFi.status() != WL_CONNECTED) {
    delay(500); Serial.print(".");
  }
  Serial.println("nConnected: " + WiFi.localIP().toString());

  // Use Telegram's root CA (included in ESP32 core)
  client.setCACert(TELEGRAM_CERTIFICATE_ROOT);

  bot.sendMessage(CHAT_ID, "ESP32 is online! Send /help for commands.", "");
}

// ----- Handle incoming messages -----
void handleMessages(int numMsg) {
  for (int i = 0; i < numMsg; i++) {
    String chatId = bot.messages[i].chat_id;
    if (chatId.toInt() != CHAT_ID) {
      bot.sendMessage(chatId, "Unauthorised access.", "");
      continue;
    }
    String text = bot.messages[i].text;
    if (text == "/on") {
      relayState = true;
      digitalWrite(RELAY_PIN, HIGH);
      bot.sendMessage(CHAT_ID, "Relay is ON", "");
    } else if (text == "/off") {
      relayState = false;
      digitalWrite(RELAY_PIN, LOW);
      bot.sendMessage(CHAT_ID, "Relay is OFF", "");
    } else if (text == "/status") {
      float h = dht.readHumidity();
      float t = dht.readTemperature();
      String msg = "Relay: " + String(relayState ? "ON" : "OFF") +
                   "nTemperature: " + String(t, 1) + "°C" +
                   "nHumidity: " + String(h, 1) + "%";
      bot.sendMessage(CHAT_ID, msg, "");
    } else if (text == "/help") {
      bot.sendMessage(CHAT_ID,
        "/on - Turn relay ONn/off - Turn relay OFFn/status - Read sensor datan/help - Show this menu", "");
    }
  }
}

// ----- Loop -----
void loop() {
  unsigned long now = millis();
  if (now - lastBotCheck > BOT_INTERVAL) {
    lastBotCheck = now;
    int msgCount = bot.getUpdates(bot.last_message_received + 1);
    handleMessages(msgCount);
  }
  // Temperature alert every 60 seconds
  if (now - lastTempCheck > 60000) {
    lastTempCheck = now;
    float t = dht.readTemperature();
    if (t > TEMP_ALERT && !alertSent) {
      bot.sendMessage(CHAT_ID, "ALERT: Temperature " + String(t,1) + "°C exceeded threshold!", "");
      alertSent = true;
    } else if (t <= TEMP_ALERT) {
      alertSent = false; // Reset so alert fires again if it rises again
    }
  }
}
Flash this to your ESP32, open the Serial Monitor, and within a few seconds you should see “Connected” and receive a “ESP32 is online!” message on Telegram. Send /on and your relay will click. Send /status and you will get live temperature and humidity readings.
Step 5: Advanced Features — Keyboards, Alerts, and Groups
Custom Inline Keyboards: Instead of typing text commands, you can send a keyboard with buttons. Use bot.sendMessageWithInlineKeyboard() to send a JSON-formatted keyboard. For example, two buttons “ON” and “OFF” that send callback data. This makes the bot much more user-friendly on mobile.
Sending Photos: If you add an ESP32-CAM to your setup, you can send JPEG images directly to your Telegram chat using bot.sendPhoto(). This is perfect for a doorbell camera or a garden monitoring system — motion detected, photo sent instantly to your phone.
Group Bots: Add your bot to a Telegram group so multiple family members can control the same device. Use a whitelist of chat IDs (each person’s ID) instead of a single ID. The bot checks if the sender’s chat ID is in the whitelist before executing any command.
Scheduled Reports: Use millis()-based timers to send hourly or daily summary messages automatically. This is excellent for greenhouse monitoring, server room temperature tracking, or water tank level alerts.
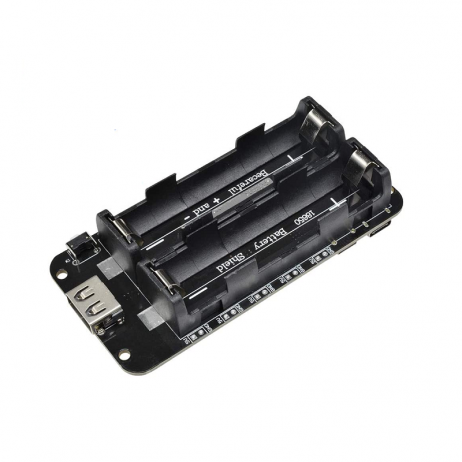
2 x 18650 Lithium Battery Shield for Arduino/ESP32/ESP8266
Power your Telegram-controlled ESP32 node from 18650 batteries with built-in charging and 5V/3.3V output — ideal for untethered installations.
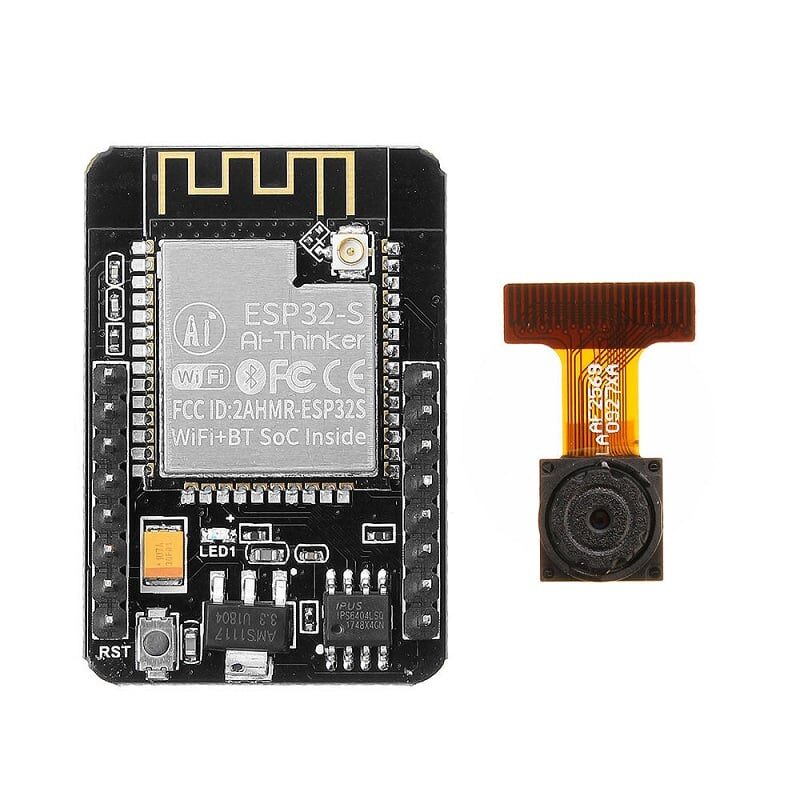
Ai Thinker ESP32 CAM Development Board WiFi+Bluetooth with AF2569 Camera
Combine this ESP32-CAM with the Telegram bot to build a remote camera that sends photos on command or on motion detection — no cloud subscription needed.
Step 6: Security Considerations for Production Use
For a home hobby project, storing your Telegram token in plaintext firmware is acceptable. For any device deployed in a business or accessible to the public, follow these hardening steps:
- Store credentials in NVS: Use the ESP32’s Non-Volatile Storage (NVS) to store the Wi-Fi password and bot token, provisioned via BLE during first setup. Never hardcode secrets in production firmware.
- Whitelist chat IDs: Always verify the sender’s chat ID against a whitelist. Never process commands from unknown senders.
- Rate limiting: Implement a per-sender command rate limit (e.g., max 10 commands per minute) to prevent flooding.
- OTA updates: Use ESP32’s built-in OTA (Over-the-Air) update mechanism to push firmware patches without physical access. Sign your firmware images using Secure Boot.
- Avoid relaying dangerous commands remotely: For safety-critical actuators (gas valves, high-voltage relays), add a confirmation step — the bot asks “Are you sure? Reply /confirm” before executing.
Frequently Asked Questions
Does the Telegram bot work when the ESP32 is on mobile data (hotspot)?
Yes, since the ESP32 initiates outbound HTTPS connections to Telegram’s servers, it works on any internet-connected network including mobile hotspots. There is no need for a static IP or port forwarding — this is one of the biggest advantages over raw TCP socket servers.
What is the polling delay and can it be reduced?
With getUpdates() polling every 1.5 seconds, command response latency is typically 1.5–3 seconds. You can reduce the polling interval to 500ms for faster response, but this uses more power and hits the Telegram API more frequently. For near-instantaneous response, you would need to set up a webhook on a public server — not feasible directly on ESP32 without port forwarding, but achievable via an MQTT bridge.
Can multiple ESPs be controlled from the same Telegram bot?
Yes. Each ESP32 can use the same bot token but respond to different commands. Alternatively, create separate bots for each device for cleaner separation. A more scalable approach is to use MQTT as a backbone and have a single Telegram-to-MQTT gateway that routes commands to many ESP32 nodes.
What happens if the internet goes down?
The ESP32 will keep retrying Wi-Fi connections and Telegram polls. Commands sent during the outage will be delivered once connectivity is restored (Telegram queues messages on its servers). For critical systems, always include a local fallback (physical button or local HTTP endpoint) in case internet is unavailable.
Conclusion
Building a Telegram bot with ESP32 for remote control via a messaging app is genuinely one of the most practical IoT projects for Indian hobbyists and professionals. It requires no cloud subscription, no custom app development, and no port forwarding — just a Telegram account, an ESP32, and a few sensors. The code is simple enough to understand in an afternoon yet powerful enough to form the backbone of a real home automation system. Start with the relay and DHT11 example above, then expand to cameras, door sensors, water tank monitors, and beyond.


Add comment