
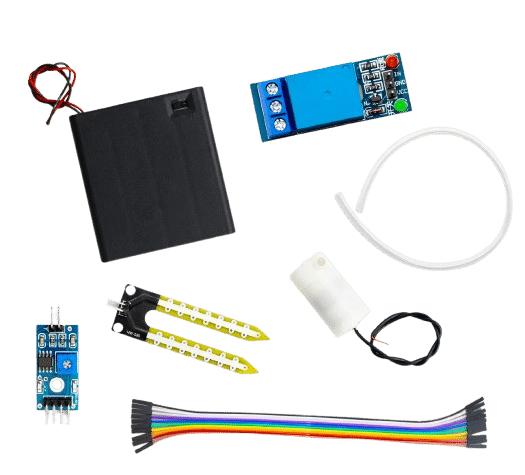
Monsoon seasons across India bring months of unpredictable rainfall — and for electronics makers, that rainfall is an opportunity. A rain sensor module is a simple, inexpensive board that detects the presence of water droplets and measures rainfall intensity. Combined with an Arduino, it can automate window closers, trigger irrigation system pauses, log weather data, or send SMS alerts — all for under ₹100 in parts.
This comprehensive guide covers exactly how the rain sensor works, how to wire and calibrate it, how to get reliable analogue and digital readings, and five practical project ideas you can build right now.
1. What Is a Rain Sensor Module?
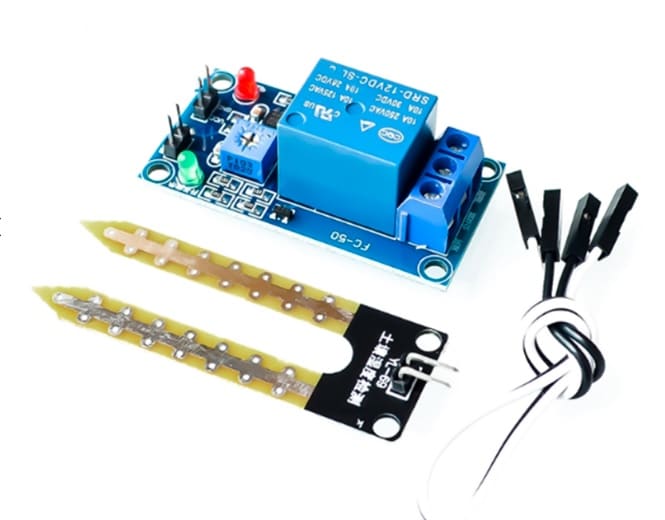
A rain sensor module (also called a rain detector or water sensor) is a two-part kit consisting of a sensing pad (the exposed PCB with interleaved conductive tracks) and a control board (with comparator IC, potentiometer, and indicator LED). The sensing pad is placed outdoors to catch rain, while the control board is kept in a sheltered location and connected to your microcontroller.
The module provides two output types:
- Digital output (DO): HIGH or LOW based on whether rain is detected above a threshold set by the onboard potentiometer
- Analogue output (AO): A variable voltage (0–5 V) proportional to how much water is on the sensing pad — more water = lower resistance = lower voltage at the output
These two outputs make the module suitable for both simple rain/no-rain switching and quantitative rainfall intensity measurement.
2. How It Works: Resistive Detection
The sensing pad consists of two sets of interlocking conductive copper traces printed on a PCB, separated by small gaps. In dry conditions, the resistance between the two trace sets is very high (megaohms) — essentially an open circuit. When water bridges the gaps between the traces, it creates a conductive path that reduces the resistance dramatically (down to a few kilohms for heavy rainfall).
The control board’s LM393 comparator IC monitors this resistance (via a voltage divider) and compares it against a reference voltage set by the trimmer potentiometer. When the measured resistance drops below the threshold (i.e., enough water is present), the comparator output switches LOW, which drives the digital output pin LOW and lights the onboard LED.
The analogue output is taken directly from the voltage divider — giving a continuously variable signal rather than a threshold-crossed binary.
3. Module Components Explained
| Component | Function |
|---|---|
| Sensing Pad (PCB) | Exposed interleaved traces act as a variable resistor — resistance drops when wet |
| LM393 Comparator | Compares sensor voltage vs reference; outputs digital HIGH/LOW |
| Trimmer Potentiometer | Sets the detection threshold — adjust clockwise to increase sensitivity |
| Power LED | Confirms the module is powered |
| Signal LED | Lights when rain detected (DO goes LOW) |
| DO Pin | Digital output — LOW when raining, HIGH when dry |
| AO Pin | Analogue output — voltage drops with more water (0–5 V) |
| VCC / GND | Power supply: 3.3 V or 5 V |
4. Wiring to Arduino
The rain sensor control board exposes 4 pins. Connect as follows:
| Rain Sensor Pin | Arduino Pin | Notes |
|---|---|---|
| VCC | 5V | Module works at 3.3V and 5V |
| GND | GND | Common ground |
| DO | D7 (any digital pin) | LOW = rain detected |
| AO | A0 (any analogue pin) | 0–1023 ADC reading; lower = wetter |
The sensing pad connects to the control board via a 3-pin JST connector (or bare wire depending on your kit). Run this cable through a hole in your enclosure to keep the pad outdoors and the electronics inside.
5. Reading the Digital Output
#define RAIN_DO_PIN 7

void setup() {
  Serial.begin(9600);
  pinMode(RAIN_DO_PIN, INPUT);
  Serial.println("Rain Sensor Ready");
}

void loop() {
  int rainState = digitalRead(RAIN_DO_PIN);
  if (rainState == LOW) {
    Serial.println("RAIN DETECTED!");
  } else {
    Serial.println("Dry — no rain.");
  }
  delay(500);
}
The digital output is active-low: LOW means rain is detected (enough water on the pad to cross the comparator threshold). Use INPUT_PULLUP if your control board does not have its own pull-up resistor on DO.
6. Reading the Analogue Output
#define RAIN_AO_PIN A0

void setup() {
  Serial.begin(9600);
  Serial.println("Rain Intensity Monitor");
}

void loop() {
  int raw = analogRead(RAIN_AO_PIN);
  // Higher raw value = drier; lower = wetter
  int intensity = map(raw, 0, 1023, 100, 0); // 0=dry, 100=soaked

  Serial.print("Raw ADC: ");
  Serial.print(raw);
  Serial.print(" | Rain Intensity: ");
  Serial.print(intensity);
  Serial.println("%");

  if (intensity < 10)      Serial.println(" Status: DRY");
  else if (intensity < 40) Serial.println(" Status: LIGHT RAIN");
  else if (intensity < 70) Serial.println(" Status: MODERATE RAIN");
  else                     Serial.println(" Status: HEAVY RAIN");

  delay(500);
}
Note that the map() function inverts the reading because a drier pad has higher resistance and higher ADC reading, while a wet pad pulls the voltage lower. This gives an intuitive 0–100% wetness scale.
7. Calibrating the Sensitivity Potentiometer
The onboard blue trimmer potentiometer sets the threshold voltage for the LM393 comparator. Here is how to calibrate it precisely:
- Connect the module and open the Serial Monitor showing the digital output state.
- Dry condition: Ensure the sensing pad is completely dry. The DO pin should read HIGH (no rain). If it reads LOW on a dry pad, turn the potentiometer clockwise to raise the threshold until DO goes HIGH.
- Wet condition test: Apply a few drops of water to the pad. DO should go LOW. If it doesn’t trigger with light rain, turn the potentiometer counter-clockwise to lower the threshold (increase sensitivity).
- Find the sweet spot: You want the sensor to ignore condensation and morning dew but trigger reliably on even a light drizzle. Drizzle corresponds to a few small droplets bridging 3–5 trace gaps.
- Seal the potentiometer: Once set, apply a small drop of clear nail varnish or hot glue over the pot wiper to prevent vibration-induced drift.
Important: Direct current flowing through water on the sensing pad causes electrolytic corrosion of the copper traces over time. For long-term outdoor deployment, consider powering the sensing pad through a GPIO pin set HIGH only during measurement (100 ms pulses every 5 seconds) rather than continuously from VCC. This dramatically extends the sensing pad’s life.
8. Extending Sensor Life Outdoors
The sensing pad is bare PCB copper — it will oxidise and corrode after weeks of outdoor exposure in a humid Indian climate. Three strategies help:
Tin Coating
Apply a thin coat of solder to all exposed copper traces using rosin flux and a fine-tipped iron. Tin (solder) oxidises far slower than bare copper and maintains good electrical conductivity.
Conformal Coating on Control Board
Spray the control board PCB (not the sensing pad) with a conformal coating spray or clear acrylic lacquer. This protects against condensation and moisture ingress on the active electronics.
Pulse-Power the Sensing Pad
Connect VCC of the sensing pad to a GPIO pin rather than permanent 5V. In your loop, set the pin HIGH, wait 50 ms for the voltage to stabilise, read the AO/DO values, then set it LOW again. This limits electrolysis to under 1% duty cycle, extending pad life from months to years.
#define SENSOR_POWER 8
#define RAIN_AO A0

void loop() {
  digitalWrite(SENSOR_POWER, HIGH);
  delay(50);
  int reading = analogRead(RAIN_AO);
  digitalWrite(SENSOR_POWER, LOW);
  // Process reading...
  delay(5000); // Read every 5 seconds
}
9. Five Rain Sensor Arduino Projects
Project 1: Automatic Window Closer Alert
Connect the DO pin to an Arduino interrupt. When rain is detected, trigger a buzzer and an LED array — or send a signal to a motorised window servo. Add a 2-minute timeout (using millis()) before re-checking so brief drizzles don’t cause rapid motor cycling.
Project 2: Smart Irrigation System Pause
Integrate the rain sensor into a soil moisture-based irrigation controller. When rain is detected, override the irrigation schedule and skip the next watering cycle. Resume normal scheduling after the pad has been dry for a set period (e.g., 4 hours with no rain detection).
Project 3: IoT Rainfall Logger with ESP8266
Connect the rain sensor AO to an ESP8266 (NodeMCU) analogue input. Every 10 minutes, read rain intensity and upload to a ThingSpeak channel. Visualise rainfall patterns over days and weeks with ThingSpeak’s built-in charting. Add a DS18B20 temperature sensor to correlate rain with temperature data.
Project 4: Car Wiper Speed Controller
Use the analogue output to control wiper motor speed proportionally. Map ADC values to three wiper speed settings (off, intermittent, continuous) via a relay or motor driver. Mount the sensor on the car roof or use an existing rain-sensing windshield refit kit for the antenna connector.
Project 5: Rooftop Solar Panel Rain Alert
Solar panels lose efficiency when dirty, but rainfall naturally cleans them. Install a rain sensor on the rooftop and connect to an ESP32 running Wi-Fi. Send a WhatsApp or Telegram notification via an API when it rains and again when dry — so you know when the panels are being cleaned naturally and when to schedule manual cleaning.
10. Recommended Products from Zbotic

Capacitive Soil Moisture Sensor
Pair with a rain sensor for a complete smart irrigation system. Capacitive design is corrosion-resistant unlike resistive types — perfect for long-term outdoor deployment.
DIY Automatic Flower Watering Irrigation Module with Pump
Complete irrigation module with soil moisture detection and pump control. Add a rain sensor override to pause watering automatically during rainfall.
5V/12V Soil Moisture Sensor Relay Control Module
Standalone relay module that switches irrigation pumps without an Arduino. Combine with a rain sensor circuit for a fully autonomous weather-aware watering system.

GY-BME280-3.3 Precision Altimeter Atmospheric Pressure Sensor
Build a full weather station. The BME280 adds temperature, humidity, and barometric pressure to complement your rain sensor — all on one I2C bus.
11. Frequently Asked Questions
Will the rain sensor work for detecting other liquids like oil or juice?
The sensor detects any electrically conductive liquid. Pure oil and non-conductive liquids will NOT trigger it (they do not complete the electrical circuit). Juice, salt water, and most water-based liquids will trigger it. Pure distilled water has very low conductivity and may not trigger with just a few drops.
How do I prevent false triggers from morning dew or condensation?
Set the potentiometer to a lower sensitivity (clockwise turn) so only significant rainfall triggers the digital output. For firmware-based hysteresis, use the analogue output and only trigger your action when the reading drops below a threshold for at least 30 consecutive seconds.
Can the rain sensor measure exact rainfall in millimetres?
Standard resistive rain sensor modules cannot measure absolute rainfall in mm. They indicate relative wetness. For quantitative rainfall measurement (mm/hour), use a tipping bucket rain gauge — a mechanical sensor where each bucket tip equals a fixed rainfall amount (typically 0.2–0.5 mm).
My sensing pad traces are turning green. What should I do?
Green oxidation (copper oxide/patina) on the sensing pad reduces conductivity and measurement accuracy. Clean with a cotton bud dipped in isopropyl alcohol (IPA) or a pencil eraser. Then apply a light tin coating as described above to prevent recurrence.
Can I use the rain sensor with a Raspberry Pi?
For the digital output: yes, directly (3.3 V compatible). For the analogue output: the Raspberry Pi has no built-in ADC. Use an MCP3008 SPI ADC chip between the rain sensor AO and the Pi to convert the analogue reading to digital. Alternatively, use an Arduino as an I2C co-processor to handle analogue reading and forward data to the Pi.
12. Conclusion
The rain sensor module is a brilliant starter sensor for weather-aware electronics projects in India. At under ₹100, it delivers both digital rain/no-rain output and an analogue intensity reading that you can use in irrigation automation, window systems, IoT loggers, and vehicle wiper controllers. With a bit of care — tin coating the traces and pulse-powering to minimise corrosion — a well-maintained sensor will reliably serve outdoor applications through multiple monsoon seasons.
Start with the basic digital detection sketch, then move to the analogue output for more nuanced rainfall classification. Combine with a BME280 for full weather monitoring or a soil moisture sensor for a complete autonomous irrigation system that never over-waters during the monsoon.
Start Your Weather Sensing Project
Browse rain sensors, soil moisture sensors, and IoT modules — all available and shipped fast across India from Zbotic.


Add comment