
Integrating a Home Assistant ESP32 sensor using ESPHome is the most beginner-friendly way to build a fully functional, professional-grade smart home sensor network in India. ESPHome is a firmware framework that lets you configure ESP32 and ESP8266 devices using simple YAML files — no C++ programming required. Combined with Home Assistant’s powerful automation engine, you can create sensor dashboards, automation rules, and alerts for everything from room temperature to water tank levels to motion detection, all running locally on your home network with zero cloud dependency. This tutorial covers the complete workflow: setting up ESPHome, flashing your first ESP32 sensor, and integrating it with Home Assistant.
What is ESPHome and Why Use It?
ESPHome is an open-source firmware generation system created by Nabu Casa (the company behind Home Assistant). You describe your device in a YAML file — specifying the board type, Wi-Fi credentials, and which sensors or outputs are connected — and ESPHome compiles a custom firmware binary for you. Flash it to your ESP32 or ESP8266, and the device automatically shows up in Home Assistant as a fully functional integration with no manual API coding required.
The advantages over writing custom firmware from scratch are enormous:
- No C++ required: YAML configuration is readable and modifiable even by beginners.
- Hundreds of built-in components: DHT11, DHT22, DHT20, BME280, DS18B20, BMP280, HC-SR04, PIR sensors, relays, buttons, displays — all supported out of the box.
- OTA updates: After the first flash, all future firmware updates are pushed wirelessly over your home network.
- Native Home Assistant API: ESPHome uses a custom encrypted protocol for Home Assistant communication — faster and more reliable than MQTT for local networks.
- Active development: ESPHome is continuously updated with new components, bug fixes, and security patches.
For the Indian maker and smart home enthusiast, ESPHome is particularly valuable because it eliminates dependence on cloud services (no Tuya, no Alexa, no monthly subscription) and runs entirely on your local router network.
Hardware You Need
For this tutorial, we’ll build a room environment monitor with temperature, humidity, and motion detection. You’ll need:
- ESP32 development board (30-pin or any standard variant)
- DHT20 or BME280 sensor for temperature and humidity
- PIR motion sensor module
- Micro-USB or USB-C data cable (for first flash)
- A computer running Home Assistant (Raspberry Pi, Intel NUC, or any x86/ARM system)
- Jumper wires and breadboard (for prototyping)

30Pin ESP32 Expansion Board with Type-C USB and Micro USB Dual Interface
This expansion board breaks out all 30 ESP32 pins with breadboard-friendly spacing and supports both Type-C and Micro USB — great for Home Assistant sensor prototyping.

DHT11 Digital Relative Humidity and Temperature Sensor Module
The DHT11 is one of the most widely supported sensors in ESPHome, making it ideal for your first Home Assistant temperature and humidity sensor build.
Installing ESPHome
There are two ways to use ESPHome: as a Home Assistant add-on (the easiest method if you already have Home Assistant OS), or as a standalone Python package on any computer.
Method 1: Home Assistant Add-on (Recommended)
- Open Home Assistant and go to Settings → Add-ons → Add-on Store.
- Search for “ESPHome” and click Install.
- After installation, click Start and enable Show in sidebar.
- Navigate to the ESPHome dashboard from the sidebar — you should see a clean interface ready for your first device.
Method 2: Standalone Python Installation
If you prefer to run ESPHome on a separate machine:
pip install esphome
esphome wizard my-sensor.yaml
The wizard will ask you a series of questions about your board and Wi-Fi network, generating a starter YAML file for you.
Writing Your First ESPHome Configuration
Here is a complete ESPHome YAML configuration for our room environment monitor with a BME280 sensor and a PIR motion detector:
esphome:
  name: room-sensor-1
  friendly_name: "Living Room Sensor"

esp32:
  board: esp32dev
  framework:
    type: arduino

wifi:
  ssid: !secret wifi_ssid
  password: !secret wifi_password
  ap:
    ssid: "Room-Sensor Fallback"
    password: "fallback1234"

captive_portal:

api:
  encryption:
    key: !secret api_encryption_key

ota:
  - platform: esphome
    password: !secret ota_password

logger:

i2c:
  sda: GPIO21
  scl: GPIO22
  scan: true

sensor:
  - platform: bme280_i2c
    address: 0x76
    temperature:
      name: "Room Temperature"
      unit_of_measurement: "°C"
      accuracy_decimals: 1
    humidity:
      name: "Room Humidity"
      unit_of_measurement: "%"
    pressure:
      name: "Room Pressure"
      unit_of_measurement: "hPa"
    update_interval: 60s

binary_sensor:
  - platform: gpio
    pin: GPIO14
    name: "Motion Sensor"
    device_class: motion
    filters:
      - delayed_off: 30s
A few important notes on this configuration:
- Secrets file: ESPHome uses a
secrets.yamlfile to store sensitive values like Wi-Fi passwords and API keys. Never hardcode these in the main config. The!secrettag references a key from this file. - Captive portal: If Wi-Fi connection fails, the ESP32 creates its own access point so you can reconfigure it — essential for devices installed in walls or ceilings.
- API encryption: All communication between ESPHome devices and Home Assistant is encrypted with a 32-byte key you generate. This prevents unauthorised access on your local network.
- Motion sensor delayed_off: The PIR sensor output stays HIGH for some time after motion stops. The
delayed_off: 30sfilter ensures the Home Assistant binary sensor stays in the ON state for at least 30 seconds after the last detected motion, preventing rapid toggling.
Flashing the Firmware
From the ESPHome dashboard, click your device and press Install. Choose Plug into this computer for the first flash (requires USB connection). Select the correct serial port (usually /dev/ttyUSB0 on Linux or COM3 on Windows). ESPHome will compile the firmware and flash it automatically — this takes 2–4 minutes. All subsequent updates will be sent wirelessly via OTA.
Adding the Device to Home Assistant
Once the ESP32 is flashed and connects to your Wi-Fi network, Home Assistant will automatically discover it. You’ll see a notification in Settings → Devices & Services saying a new ESPHome device was found. Click Configure and enter the API encryption key from your config. That’s it — within seconds, the room temperature, humidity, pressure, and motion sensor entities will appear in Home Assistant, ready to use in dashboards and automations.
Creating a Dashboard Card
- Go to Overview → Edit Dashboard → Add Card.
- Choose Entities card and add your sensor entities.
- Alternatively, use the Gauge card for temperature or a History Graph card to show trends over the past 24 hours.
Automations
Once your sensor is in Home Assistant, you can create powerful automations. Example: when the room temperature exceeds 32°C and it’s daytime, send a notification to your phone and turn on the AC (via a smart plug). Here’s a simple automation YAML:
alias: High Temperature Alert
trigger:
  platform: numeric_state
  entity_id: sensor.room_temperature
  above: 32
action:
  - service: notify.mobile_app
    data:
      title: "Room Too Hot!"
      message: "Living room is {{ states('sensor.room_temperature') }}°C"
Advanced Sensors and Automations
Adding a DS18B20 Temperature Sensor
The DS18B20 is a waterproof one-wire temperature sensor that’s perfect for measuring outdoor temperatures, water tank temperatures, or refrigerator monitoring. In ESPHome:
one_wire:
  - platform: gpio
    pin: GPIO4

sensor:
  - platform: dallas_temp
    name: "Water Tank Temperature"
    update_interval: 30s
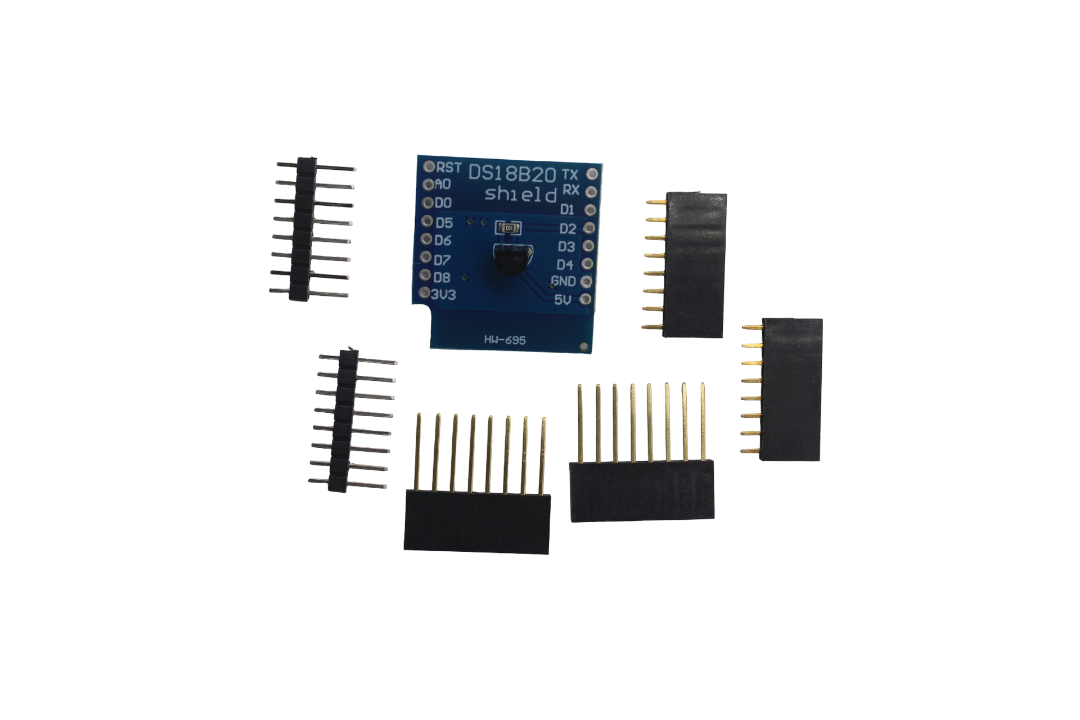
DS18B20 Module for D1 Mini – Temperature Measurement Sensor Module
A plug-and-play DS18B20 temperature sensor module with onboard pull-up resistor, compatible with ESP32 and D1 Mini — perfect for ESPHome water or outdoor temperature sensing.
Motion-Triggered Lighting with PIR
ESPHome PIR sensors work seamlessly with Home Assistant automations for motion-triggered lighting. Connect any standard HC-SR501 or similar PIR module’s output to a GPIO pin and configure it as a binary_sensor with device_class: motion. In Home Assistant, create an automation that turns a Philips Hue lamp or a smart plug on when motion is detected at night.
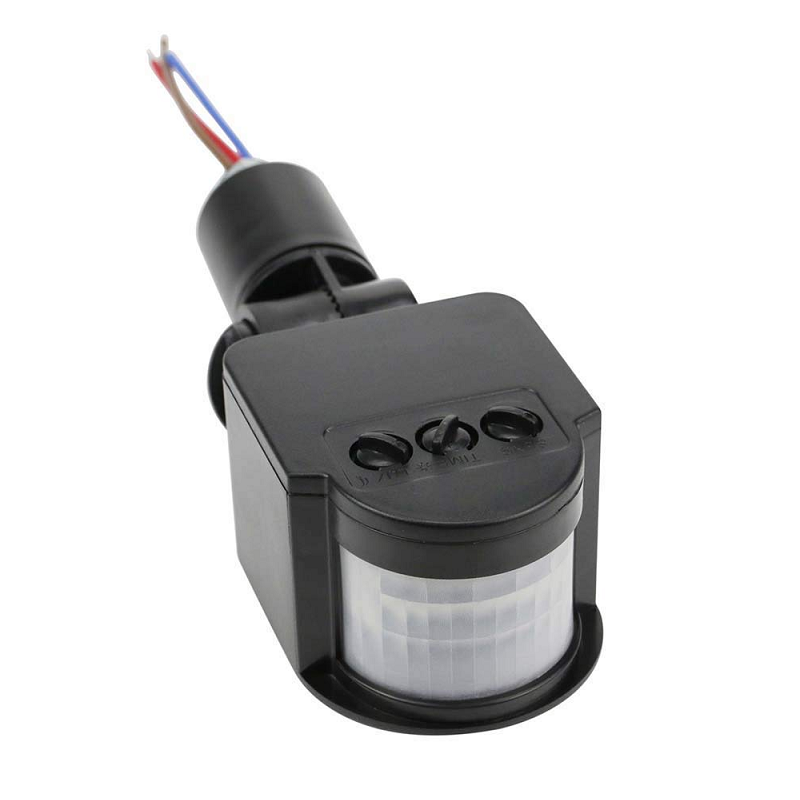
AC 220V Security PIR Human Body Motion Sensor Detector LED Light Switch
A mains-voltage PIR sensor that directly controls LED lights — combine with a relay-controlled ESP32 node for a complete Home Assistant-integrated motion-lighting system.
Multi-Room Sensor Network
The real power of ESPHome and Home Assistant becomes apparent when you deploy multiple nodes across your home. Each room can have its own ESP32 with temperature, humidity, and motion sensors. Home Assistant aggregates all the data and lets you create cross-room automations: “If the kids’ room temperature is above 30°C and motion is detected, turn on the fan in that room only.” With ESPHome OTA updates, you can push firmware changes to all 10 nodes simultaneously from the Home Assistant dashboard.
Frequently Asked Questions
Do I need a Raspberry Pi to run Home Assistant?
No. Home Assistant runs on a Raspberry Pi 4, but also on any x86-based mini PC (like an Intel NUC or a spare laptop), a VM on your existing desktop, or Synology NAS (via Docker). For a small home with under 20 ESPHome devices, a Raspberry Pi 4 with 4 GB RAM is perfectly adequate. Home Assistant OS is the recommended installation method as it handles backups, add-ons, and updates automatically.
Can ESPHome work without Home Assistant?
Yes, partially. ESPHome devices can expose data via MQTT, a REST API, or even simple HTTP endpoints. However, the native ESPHome API is designed specifically for Home Assistant and provides the best experience (automatic discovery, encrypted communication, entity auto-naming). For non-HA setups, configuring MQTT output in ESPHome and pointing it at a standalone Mosquitto broker is a common alternative.
How many ESPHome devices can Home Assistant handle?
Home Assistant can comfortably handle hundreds of ESPHome devices on a home network. The limiting factor is usually your router’s ability to handle many Wi-Fi clients, not Home Assistant’s processing power. For networks with more than 20–30 ESP devices, consider using a dedicated IoT VLAN or a separate access point on the 2.4 GHz band exclusively for IoT devices.
Is ESPHome secure?
ESPHome uses API-level encryption (a 256-bit key exchange) for all communication between devices and Home Assistant. All OTA updates are password-protected. The devices do not communicate with the internet — all traffic stays on your local network. This makes ESPHome one of the most privacy-friendly smart home solutions available, especially compared to cloud-dependent platforms like Tuya Smart.
Can I use ESPHome with ESP8266 D1 Mini?
Yes. ESPHome has full support for ESP8266 boards. The configuration is nearly identical — just change the platform declaration from esp32 to esp8266 and specify the board (e.g., d1_mini). You lose BLE and have fewer GPIO pins, but for simple temperature/humidity/motion sensors the D1 Mini is excellent and very affordable.
Build Your Home Assistant Sensor Network
Get ESP32 boards, sensors, and accessories for your ESPHome + Home Assistant project from Zbotic — fast delivery across India with genuine components.


Add comment