
ESP32 camera streaming MJPEG video to a browser is one of the most impressive demonstrations of what a sub-₹500 microcontroller module can do. The ESP32-CAM board combines a powerful dual-core ESP32 chip, an OV2640 image sensor capable of 2-megapixel images, and 4 MB of PSRAM for frame buffering — all on a board roughly the size of a matchbox. Using the built-in camera streaming server example from Espressif, you can have a live MJPEG video feed accessible from any web browser on your local network in under 30 minutes. This tutorial takes you from unboxing to streaming and beyond.
Hardware: ESP32-CAM and OV2640 Overview
The ESP32-CAM is manufactured by Ai-Thinker and is the most popular camera-equipped ESP32 module in India. It uses the OV2640 camera sensor which supports resolutions from 96×96 (QQVGA) all the way up to 1600×1200 (UXGA). The module comes with a standard M12 lens mount, and the included lens has a fixed focus distance of approximately 30 cm — suitable for most surveillance and inspection applications.
Key specifications of the Ai-Thinker ESP32-CAM:
| Specification | Value |
|---|---|
| SoC | ESP32-S (dual-core Xtensa LX6, 240 MHz) |
| PSRAM | 4 MB (required for frame buffering) |
| Flash | 4 MB (some versions: 8 MB) |
| Camera sensor | OV2640 (2 MP, JPEG output) |
| Max resolution | 1600×1200 (UXGA) |
| Wi-Fi | 802.11 b/g/n (2.4 GHz) |
| MicroSD slot | Yes (SPI mode, up to 4 GB FAT32) |
| Supply voltage | 5 V (3.3 V LDO onboard) |
One important caveat: the ESP32-CAM does NOT have a built-in USB-to-serial converter. You cannot program it directly via a standard USB cable like you would an ESP32 DevKit. You need either a dedicated USB-to-TTL programmer or the ESP32-CAM-MB board (which includes a CH340G programmer).
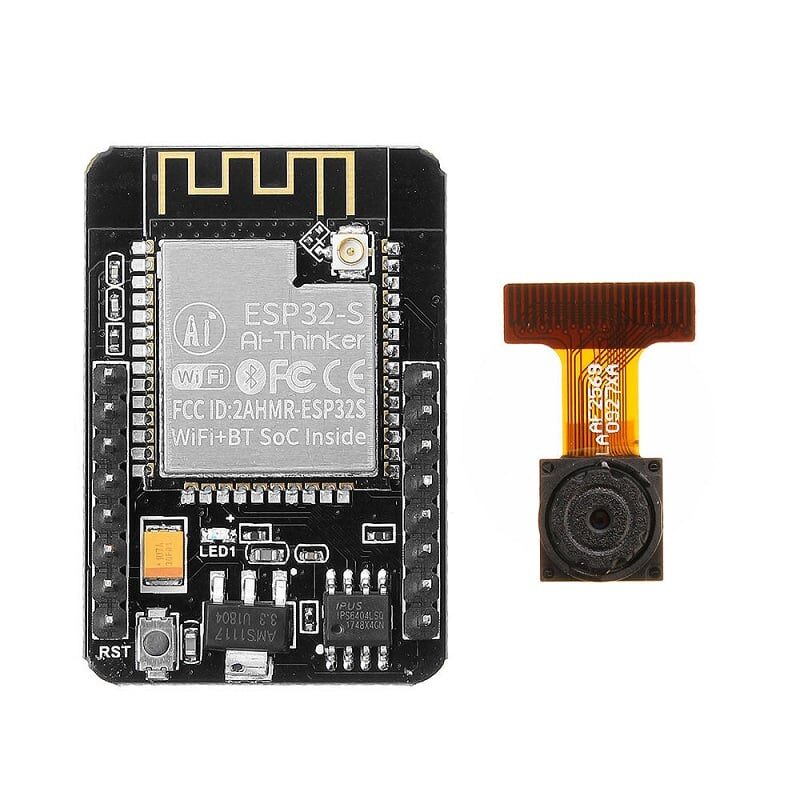
Ai Thinker ESP32 CAM Development Board WiFi+Bluetooth with AF2569 Camera Module
The genuine Ai-Thinker ESP32-CAM with OV2640 sensor — the go-to board for MJPEG streaming and face recognition projects in India.
Wiring and Programming the ESP32-CAM
Using an FTDI Programmer / USB-to-TTL Adapter
To enter programming mode on the ESP32-CAM, you must connect GPIO0 to GND before powering up. This tells the bootloader to enter download mode.
Wiring between ESP32-CAM and a 3.3 V FTDI programmer:
- ESP32-CAM 5V → FTDI VCC (set FTDI jumper to 5V)
- ESP32-CAM GND → FTDI GND
- ESP32-CAM U0TXD → FTDI RXD
- ESP32-CAM U0RXD → FTDI TXD
- ESP32-CAM GPIO0 → GND (ONLY during programming — remove after)
After uploading: disconnect GPIO0 from GND, press the onboard RST button, and the sketch runs normally.
Using the ESP32-CAM-MB Programmer Board (Recommended)
The ESP32-CAM-MB is a dedicated programmer board that plugs directly onto the ESP32-CAM’s headers. It has a CH340G USB-to-serial chip, a BOOT button (holds GPIO0 LOW), and a microUSB connector. Just plug it in, press BOOT while clicking Upload in Arduino IDE — no jumper wires needed. This is the most beginner-friendly approach.
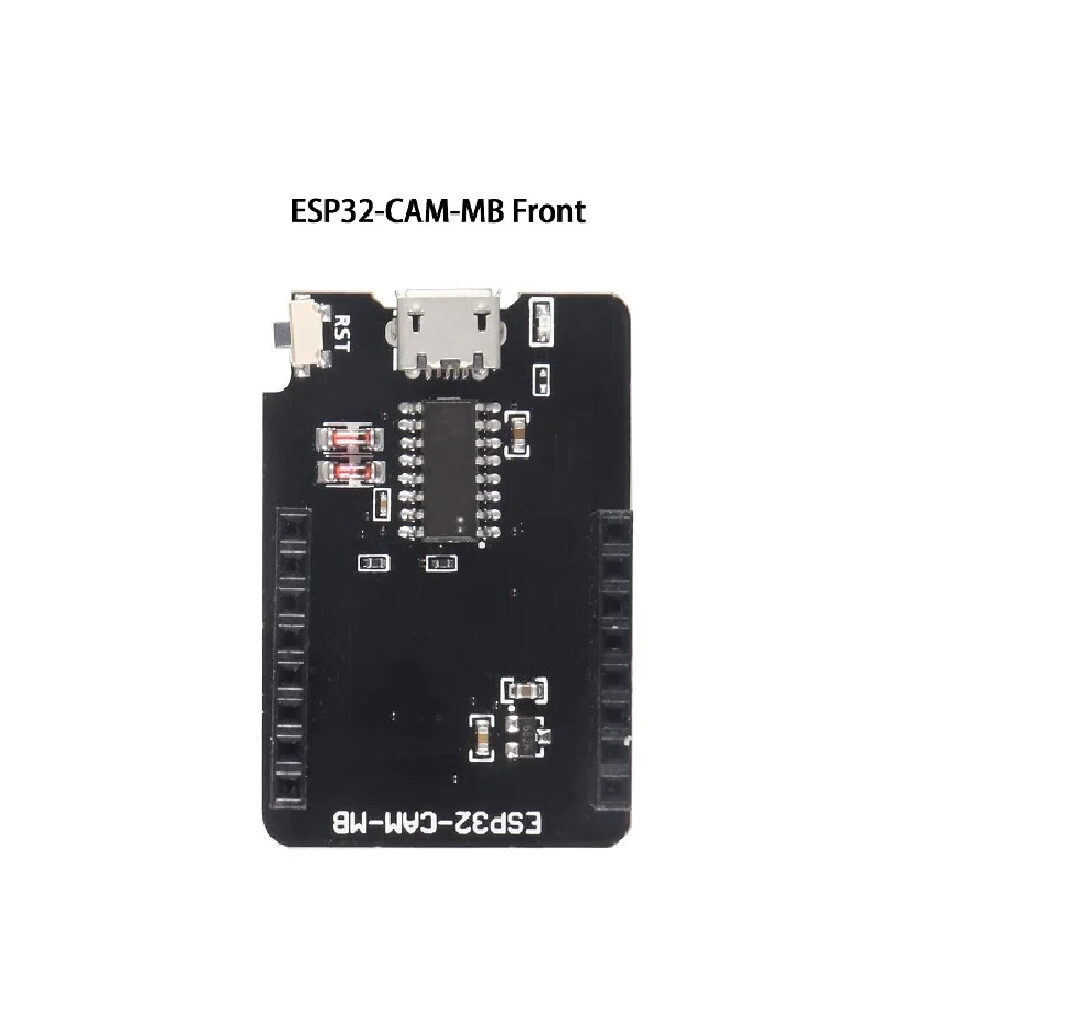
ESP32-CAM-MB MICRO USB Download Module for ESP32 CAM Development Board
Eliminates the need for external programmers — plug, press BOOT, and upload your MJPEG streaming sketch directly from Arduino IDE.
MJPEG Streaming Web Server Code
The easiest way to get started is using Espressif’s official CameraWebServer example, which is bundled with the Arduino ESP32 board package. Open it via File → Examples → ESP32 → Camera → CameraWebServer.
In the example, select the correct camera model at the top of the file:
// Comment out all other camera models and uncomment this line:
#define CAMERA_MODEL_AI_THINKER  // Has PSRAM
Then fill in your Wi-Fi credentials:
const char* ssid     = "YourWiFiSSID";
const char* password = "YourWiFiPassword";
In Arduino IDE, set the board to AI Thinker ESP32-CAM (under ESP32 Arduino boards). Set the Partition Scheme to Huge APP (3MB No OTA/1MB SPIFFS) — the camera example is too large for the default partition scheme.
After uploading and resetting, open the Serial Monitor at 115200 baud. The board prints its IP address. Open that IP in a browser and you will see the CameraWebServer interface with a live stream button, resolution selector, and quality controls.
Minimal MJPEG Streaming Server (No Dependencies)
If you want a stripped-down streaming server without the full CameraWebServer interface, here is a minimal implementation:
#include "esp_camera.h"
#include <WiFi.h>

// AI Thinker ESP32-CAM pin definitions
#define PWDN_GPIO_NUM  32
#define RESET_GPIO_NUM -1
#define XCLK_GPIO_NUM   0
#define SIOD_GPIO_NUM  26
#define SIOC_GPIO_NUM  27
#define Y9_GPIO_NUM    35
#define Y8_GPIO_NUM    34
#define Y7_GPIO_NUM    39
#define Y6_GPIO_NUM    36
#define Y5_GPIO_NUM    21
#define Y4_GPIO_NUM    19
#define Y3_GPIO_NUM    18
#define Y2_GPIO_NUM     5
#define VSYNC_GPIO_NUM 25
#define HREF_GPIO_NUM  23
#define PCLK_GPIO_NUM  22

const char* ssid     = "YourWiFiSSID";
const char* password = "YourWiFiPassword";

WiFiServer server(80);

void startCamera() {
  camera_config_t config;
  config.ledc_channel = LEDC_CHANNEL_0;
  config.ledc_timer   = LEDC_TIMER_0;
  config.pin_d0       = Y2_GPIO_NUM;
  config.pin_d1       = Y3_GPIO_NUM;
  config.pin_d2       = Y4_GPIO_NUM;
  config.pin_d3       = Y5_GPIO_NUM;
  config.pin_d4       = Y6_GPIO_NUM;
  config.pin_d5       = Y7_GPIO_NUM;
  config.pin_d6       = Y8_GPIO_NUM;
  config.pin_d7       = Y9_GPIO_NUM;
  config.pin_xclk     = XCLK_GPIO_NUM;
  config.pin_pclk     = PCLK_GPIO_NUM;
  config.pin_vsync    = VSYNC_GPIO_NUM;
  config.pin_href     = HREF_GPIO_NUM;
  config.pin_sccb_sda = SIOD_GPIO_NUM;
  config.pin_sccb_scl = SIOC_GPIO_NUM;
  config.pin_pwdn     = PWDN_GPIO_NUM;
  config.pin_reset    = RESET_GPIO_NUM;
  config.xclk_freq_hz = 20000000;
  config.pixel_format = PIXFORMAT_JPEG;
  config.frame_size   = FRAMESIZE_VGA;  // 640x480
  config.jpeg_quality = 12;             // 0-63, lower=better quality
  config.fb_count     = 2;              // 2 frame buffers for PSRAM
  config.fb_location  = CAMERA_FB_IN_PSRAM;
  esp_camera_init(&config);
}

void setup() {
  Serial.begin(115200);
  startCamera();
  WiFi.begin(ssid, password);
  while (WiFi.status() != WL_CONNECTED) delay(500);
  Serial.println("Stream: http://" + WiFi.localIP().toString());
  server.begin();
}

void loop() {
  WiFiClient client = server.available();
  if (!client) return;
  String header = client.readStringUntil('r');
  client.readStringUntil('n');
  // Send MJPEG stream headers
  client.println("HTTP/1.1 200 OK");
  client.println("Content-Type: multipart/x-mixed-replace; boundary=frame");
  client.println();
  while (client.connected()) {
    camera_fb_t *fb = esp_camera_fb_get();
    if (!fb) continue;
    client.printf("--framernContent-Type: image/jpegrnContent-Length: %urnrn",
                  fb->len);
    client.write(fb->buf, fb->len);
    client.println();
    esp_camera_fb_return(fb);
  }
}
ESP32 CAM WiFi Module Bluetooth with OV2640 Camera Module 2MP For Face Recognition
2MP OV2640 camera with ESP32 — supports MJPEG streaming and the built-in face detection/recognition firmware from Espressif.
How MJPEG Streaming Works
MJPEG (Motion JPEG) is a video format where each frame is a separately compressed JPEG image transmitted over an HTTP connection using a special content type: multipart/x-mixed-replace. The browser keeps the HTTP connection open indefinitely and replaces the displayed image every time a new JPEG frame arrives in the stream, creating the illusion of smooth video.
The advantages of MJPEG for ESP32 projects:
- No codec required on the device: The OV2640 outputs JPEG hardware-compressed frames directly from the sensor — the ESP32 never needs to compress raw pixel data in software, saving enormous CPU time.
- Works in all browsers: The
multipart/x-mixed-replaceprotocol is supported natively in Chrome, Firefox, Safari, and Edge without any plugins. - Simple to implement: A few dozen lines of code versus hundreds for H.264/H.265 streaming.
- Low latency: Each JPEG is independent — there is no inter-frame dependency, so the latency is essentially one frame period. At 10 fps, latency is about 100 ms.
Disadvantages: MJPEG has poor compression efficiency compared to H.264. A 640×480 MJPEG stream at quality 12 uses around 500 KB/s to 1 MB/s of bandwidth. This is fine for local Wi-Fi but challenging for cloud streaming.
Optimising Resolution and Frame Rate
The ESP32-CAM’s achievable frame rates at different resolutions over Wi-Fi:
| Resolution | FRAMESIZE constant | Typical FPS (JPEG quality 12) |
|---|---|---|
| 160×120 | FRAMESIZE_QQVGA | 25–30 fps |
| 320×240 | FRAMESIZE_QVGA | 20–25 fps |
| 640×480 | FRAMESIZE_VGA | 10–15 fps |
| 800×600 | FRAMESIZE_SVGA | 5–8 fps |
| 1280×1024 | FRAMESIZE_SXGA | 2–4 fps |
| 1600×1200 | FRAMESIZE_UXGA | 1–2 fps |
For surveillance applications, VGA (640×480) at 10–12 fps is the sweet spot — good enough to identify faces and read number plates in good lighting, while keeping Wi-Fi utilisation manageable. For live monitoring of a small area (desk, plant, pet), QVGA at 20+ fps gives a smooth video experience.
The jpeg_quality parameter ranges from 0 (maximum quality, largest file) to 63 (minimum quality, smallest file). Values between 10 and 20 are the practical range for surveillance use.
Adding Basic Motion Detection
A simple but effective motion detection algorithm for the ESP32-CAM compares consecutive JPEG frames after decoding them to grayscale. Because this requires raw pixel data, you must switch the camera from JPEG mode to GRAYSCALE mode momentarily, compute the frame difference, then switch back. A simpler approach uses a difference of JPEG file sizes as a cheap proxy for motion: if frame size changes significantly between captures, something moved.
// Simple motion detection using JPEG size difference
size_t prevSize = 0;
const size_t MOTION_THRESHOLD = 5000;  // bytes

void checkMotion() {
  camera_fb_t *fb = esp_camera_fb_get();
  if (!fb) return;
  size_t diff = abs((int)fb->len - (int)prevSize);
  if (prevSize > 0 && diff > MOTION_THRESHOLD) {
    Serial.println("Motion detected!");
    // Trigger alarm, send Telegram notification, etc.
    saveFrameToSD(fb);  // save the triggering frame
  }
  prevSize = fb->len;
  esp_camera_fb_return(fb);
}
For more accurate motion detection, the ESP32-CAM can run Espressif’s built-in face detection model (SqueezeNet-based) which is included in the CameraWebServer example. This runs entirely on-device at about 10 fps on QVGA resolution.
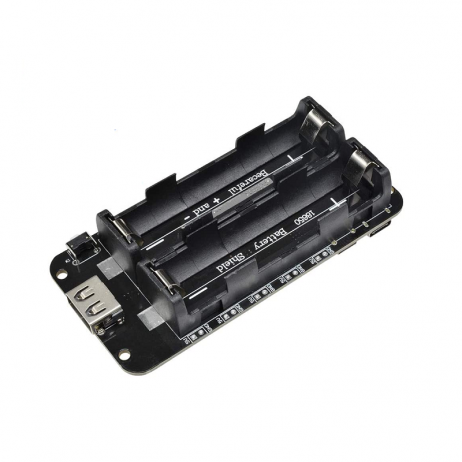
2 x 18650 Lithium Battery Shield for Arduino, ESP32, ESP8266
Power your ESP32-CAM surveillance camera wirelessly for hours using dual 18650 cells with USB charging and 5 V boost output.
Frequently Asked Questions
Can I stream the ESP32-CAM feed over the internet, not just local Wi-Fi?
Yes, with some additional setup. The simplest approach is to use ngrok or similar tunnelling software on a computer on the same network to expose the ESP32-CAM’s local IP to a public URL. For a self-contained solution, the ESP32-CAM can push JPEG frames to an MQTT broker, and a server-side script can serve them as a web stream. Port forwarding on your router is another option but exposes the device directly to the internet — use with caution and always add HTTP authentication.
Why does the stream freeze or disconnect after a few seconds?
The most common causes are: (1) insufficient power — the ESP32-CAM draws up to 300–400 mA during streaming; use a quality 1 A USB adapter not a PC USB port; (2) Wi-Fi signal too weak — the onboard antenna on the Ai-Thinker module is a PCB trace antenna with limited range, keep the board within 10 metres of the router; (3) browser timeout — some browsers disconnect if no data is received for 30 seconds; reduce resolution to ensure continuous frame delivery; (4) the stream is being received by two clients simultaneously, which doubles the bandwidth demand and halves the frame rate.
Can I record video to the microSD card while streaming?
Yes, but only at lower resolutions. Recording and streaming simultaneously requires two frame buffers: one being streamed to Wi-Fi, one being written to the SD card. Configure fb_count = 2 in PSRAM mode. At VGA resolution, simultaneous stream + SD record works at about 5–7 fps. The SD card must be a Class 10 or faster card — slow cards cause the frame buffer to overflow.
What is the difference between the OV2640 and OV5640 camera sensors?
The OV2640 (used in standard ESP32-CAM) is a 2 MP sensor with hardware JPEG compression at up to 15 fps in UXGA mode. The OV5640 is a 5 MP sensor with autofocus support and better low-light performance, but it does not include hardware JPEG compression — the ESP32 would need to compress raw frames in software, which is extremely slow. Some newer ESP32-based boards use the OV5640 with a companion ISP chip to handle compression. For general ESP32-CAM projects, the OV2640 remains the better choice.
Is the ESP32-CAM suitable for face recognition in a home security system?
It is suitable for basic face detection (detecting that a face is present in the frame) at QVGA resolution and about 10 fps. Full face recognition (identifying whose face it is) is also possible using Espressif’s ESP-WHO library, which can enrol up to 7 faces in flash memory and identify them in real time. For a serious home security application serving an Indian household, the key limitation is lighting — the OV2640 struggles in low-light conditions below 10 lux. Adding IR LEDs with an IR-cut filter significantly improves night performance.
Build Your Own Camera Streaming System
Zbotic stocks the complete ESP32-CAM ecosystem — camera modules, programmer boards, battery shields, and accessories. All shipped from India with fast delivery.


Add comment