
Modern drones have evolved far beyond simple remote-controlled flying machines. With the integration of a companion computer — typically a Raspberry Pi — you can unlock powerful capabilities like real-time object detection, visual tracking, terrain mapping, and fully autonomous missions. This guide dives deep into what a companion computer is, why Raspberry Pi is the go-to choice for Indian drone makers, and how to set everything up from scratch.
What Is a Companion Computer?
A companion computer is a secondary computing unit mounted on a drone that works alongside the main flight controller (FC). While the FC (like Pixhawk or APM) handles low-level flight stabilisation, motor control, and sensor fusion at high frequency, the companion computer handles high-level tasks that demand more processing power — vision processing, machine learning inference, mission planning, and communication with the ground station.
Think of the flight controller as the drone’s brainstem (reflex control) and the companion computer as the cerebral cortex (intelligent decision-making). Together, they enable truly autonomous and intelligent drone behaviour.
Common companion computers used in the Indian drone community include:
- Raspberry Pi 4 / 5 — Most popular, excellent community support
- NVIDIA Jetson Nano / Xavier — GPU-accelerated vision, expensive
- Intel NUC — High power, heavier
- Orange Pi / Banana Pi — Budget alternatives
For most vision tasks on mid-size drones, the Raspberry Pi 4 (4GB or 8GB RAM) hits the sweet spot of performance, weight, price, and availability in India.
Why Raspberry Pi for Drone Vision?
The Raspberry Pi has earned its place as the default companion computer choice for several compelling reasons:
1. Weight and Power Efficiency
A Raspberry Pi 4 weighs just 46 grams and consumes 3–7W under load. For drones where every gram affects flight time, this matters enormously. Compare that to a laptop-grade Intel NUC at 200+ grams.
2. Python and OpenCV Ecosystem
Python is the lingua franca of computer vision. OpenCV, TensorFlow Lite, PyTorch, and DroneKit all run natively on Raspberry Pi OS. You can prototype vision algorithms quickly without any cross-compilation headaches.
3. MAVLink Compatibility
The MAVLink protocol — used by ArduCopter, ArduPilot, and PX4 — is fully supported via the pymavlink and DroneKit Python libraries on Raspberry Pi. Setting up UART communication between Pixhawk and Raspberry Pi is well-documented and reliable.
4. Availability and Price in India
Raspberry Pi 4 is available from multiple Indian distributors. At approximately ₹6,000–₹8,000 for the 4GB variant, it’s significantly cheaper than Jetson-class hardware while still capable enough for most vision tasks.
5. Community Support
Thousands of ArduPilot + Raspberry Pi tutorials, GitHub repos, and forum threads exist. If you hit a problem in your Bhopal workshop at 11pm, someone on the ArduPilot forums or Reddit’s r/drones has likely solved it already.
Hardware You Need
Before you start wiring things together, assemble the following components:
Core Components
- Raspberry Pi 4 (4GB or 8GB recommended)
- Pixhawk flight controller (or compatible — Cube Orange, Matek H743, etc.)
- Raspberry Pi Camera Module v2 or v3 (or a USB webcam)
- MicroSD card (32GB+, Class 10)
- UART-to-USB cable or direct UART connection cables
- 5V BEC (voltage regulator) to power Raspberry Pi from LiPo
- A suitable drone frame
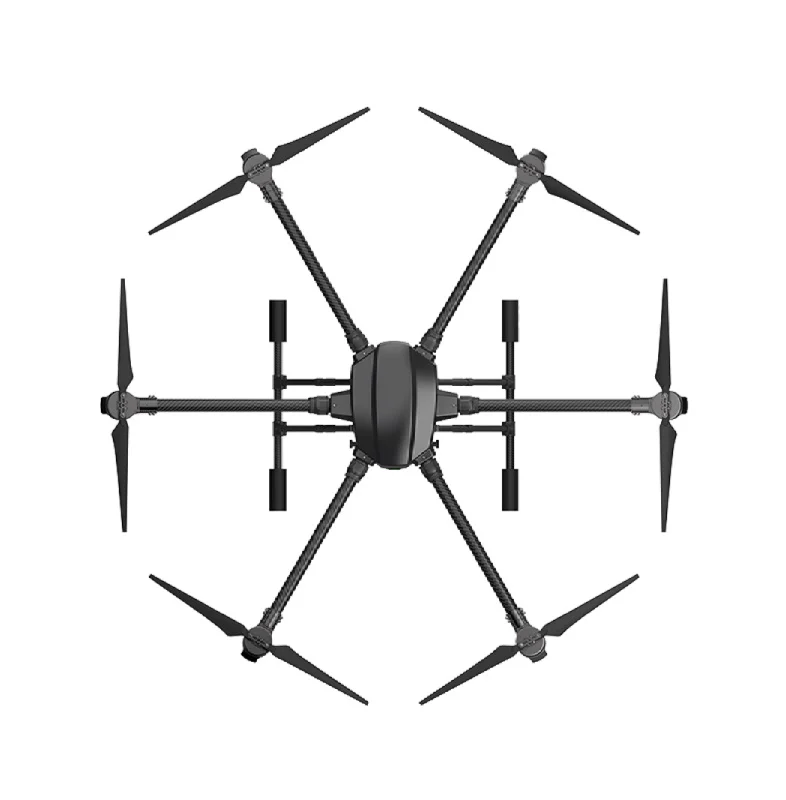
EFT 6120 Multifunction Surveillance Drone Frame
A robust hexacopter frame with dedicated payload bays — ideal for mounting a Raspberry Pi companion computer and camera module for surveillance and vision tasks.

2-6S 5V 5A BEC For Quadcopter Drone
A regulated 5V 5A BEC to safely power your Raspberry Pi directly from the drone’s 2S–6S LiPo battery without any voltage spikes.

3DR 100mW Radio Telemetry 915MHZ For APM PX4 Pixhawk
915MHz telemetry radio pair for maintaining ground control station communication while your companion computer handles onboard processing.
Connecting Raspberry Pi to the Flight Controller
The standard method is a UART serial connection between the Pixhawk’s TELEM2 port and the Raspberry Pi’s GPIO UART pins.
Wiring
| Pixhawk TELEM2 Pin | Raspberry Pi GPIO Pin |
|---|---|
| TX (Pin 2) | RX (GPIO 15, Pin 10) |
| RX (Pin 3) | TX (GPIO 14, Pin 8) |
| GND (Pin 6) | GND (Pin 6) |
Important: Pixhawk operates at 3.3V logic. Raspberry Pi GPIO is also 3.3V, so no level shifter is needed for most modern Pixhawk variants. However, always verify your specific FC’s voltage levels.
Raspberry Pi UART Configuration
Enable UART on Raspberry Pi and disable the serial console (which conflicts with MAVLink):
# In /boot/config.txt
enable_uart=1

# Disable serial console in /boot/cmdline.txt
# Remove: console=serial0,115200
Then install the required Python libraries:
sudo pip3 install pymavlink dronekit dronekit-sitl opencv-pythonMAVLink Communication Setup
MAVLink is the lightweight messaging protocol used between the FC and companion computer. Here’s a minimal DroneKit script to verify communication:
from dronekit import connect, VehicleMode
import time

# Connect to Pixhawk via UART
vehicle = connect('/dev/serial0', baud=921600, wait_ready=True)

print(f"Mode: {vehicle.mode.name}")
print(f"GPS: {vehicle.gps_0}")
print(f"Battery: {vehicle.battery}")
print(f"Altitude: {vehicle.location.global_relative_frame.alt}")

vehicle.close()
Set Pixhawk’s SERIAL2_BAUD parameter to 921 (for 921600 baud) in Mission Planner or QGroundControl. Also set SERIAL2_PROTOCOL to 2 (MAVLink2).
Setting Up Vision Tasks
With communication established, you can now implement various vision capabilities on the Raspberry Pi. Here are the most popular use cases in the Indian drone community:
1. Object Detection and Counting
Used in agricultural surveys (counting trees, plants, anomalous zones) and security surveillance. TensorFlow Lite with MobileNet SSD runs well on Raspberry Pi 4:
- Frame rate: ~15–20 FPS at 640×480 on Pi 4
- Classes: 90 COCO classes or custom-trained models
- Library:
tflite-runtimeortensorflow-lite
2. Fiducial Marker Landing (ArUco)
ArUco markers (QR-code-like patterns) allow precise autonomous landing on a target. OpenCV’s aruco module detects the marker, calculates its position relative to the drone, and DroneKit sends corrective velocity commands. This is widely used for delivery drones and precision agriculture.
3. Optical Flow Stabilisation
In GPS-denied indoor environments, optical flow from the camera combined with a downward-facing rangefinder provides position hold. The companion computer processes camera frames and feeds velocity estimates back to the FC.
4. Person/Vehicle Tracking
Combine a YOLO-based detector with a tracker (SORT, DeepSORT, or ByteTrack) to continuously follow a detected object. The drone adjusts yaw, pitch, and throttle to keep the subject centred in frame.
Real-Time Object Detection with OpenCV
Here’s a practical starting point for camera capture and detection on Raspberry Pi:
import cv2
import numpy as np
from picamera2 import Picamera2

# Initialize camera
picam2 = Picamera2()
picam2.configure(picam2.create_preview_configuration(
    main={"size": (640, 480), "format": "RGB888"}
))
picam2.start()

# Load pre-trained model
net = cv2.dnn.readNetFromCaffe('deploy.prototxt', 'model.caffemodel')
CONF_THRESHOLD = 0.5

while True:
    frame = picam2.capture_array()
    blob = cv2.dnn.blobFromImage(frame, 0.007843, (300, 300), 127.5)
    net.setInput(blob)
    detections = net.forward()

    for i in range(detections.shape[2]):
        confidence = detections[0, 0, i, 2]
        if confidence > CONF_THRESHOLD:
            # Extract bounding box and label
            box = detections[0, 0, i, 3:7] * np.array([640, 480, 640, 480])
            (x1, y1, x2, y2) = box.astype(int)
            cv2.rectangle(frame, (x1, y1), (x2, y2), (0, 255, 0), 2)

    # Stream or save frame
    cv2.imwrite('/tmp/latest_frame.jpg', frame)
Visual Servoing: Making the Drone React to Camera
Visual servoing closes the control loop between camera observations and drone actuation. The basic approach:
- Detect the target in the camera frame and calculate its pixel offset from centre
- Convert pixel error to angular or velocity error using camera intrinsics
- Send velocity commands via MAVLink SET_POSITION_TARGET_LOCAL_NED
- Use a PID controller to dampen oscillation
from dronekit import connect, VehicleMode
from pymavlink import mavutil

def send_velocity(vehicle, vx, vy, vz):
    """Send NED velocity command to drone."""
    msg = vehicle.message_factory.set_position_target_local_ned_encode(
        0, 0, 0,
        mavutil.mavlink.MAV_FRAME_BODY_NED,
        0b0000111111000111,
        0, 0, 0,
        vx, vy, vz,
        0, 0, 0,
        0, 0
    )
    vehicle.send_mavlink(msg)

# Simple P-controller for centering target
Kp = 0.002  # pixels to m/s
image_centre = (320, 240)

def track_target(vehicle, target_x, target_y):
    err_x = target_x - image_centre[0]  # lateral error
    err_y = target_y - image_centre[1]  # forward/back error
    vy = Kp * err_x
    vx = -Kp * err_y  # NED: positive x = north/forward
    send_velocity(vehicle, vx, vy, 0)
Power Management Tips
Running a Raspberry Pi on a drone battery requires careful power management to maximise flight time:
- Use a quality 5V BEC: Cheap BECs introduce noise that crashes the Pi. Use a filtered, regulated BEC rated for at least 3A continuous (Pi 4 peaks at 1.2A, camera adds ~0.4A, thermal margin needed).
- Disable unused interfaces: Turn off HDMI, Bluetooth, and LEDs in
/boot/config.txtto save ~0.5W. - Use CPU governor: Set to
ondemandinstead ofperformancewhen vision processing is bursty. - Monitor temperature: Pi 4 throttles at 80°C. In summer India, add a heatsink and ensure airflow from propeller wash.
- Graceful shutdown: Add a simple circuit (push button + GPIO) to safely shut down the Pi before battery disconnect to avoid SD card corruption.
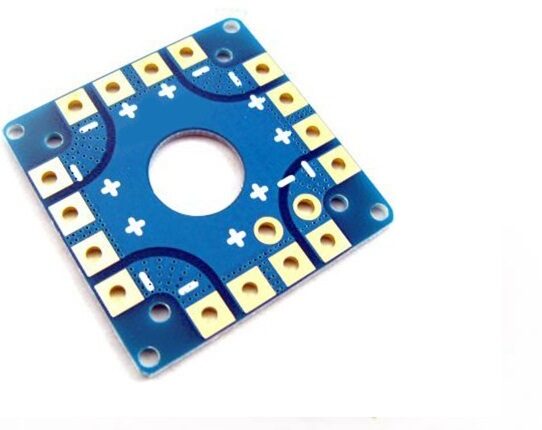
100A Multirotor ESC Power Distribution Battery Board
A centralised power distribution board that routes battery power to all ESCs and includes BEC pads for powering companion computers and accessories cleanly.
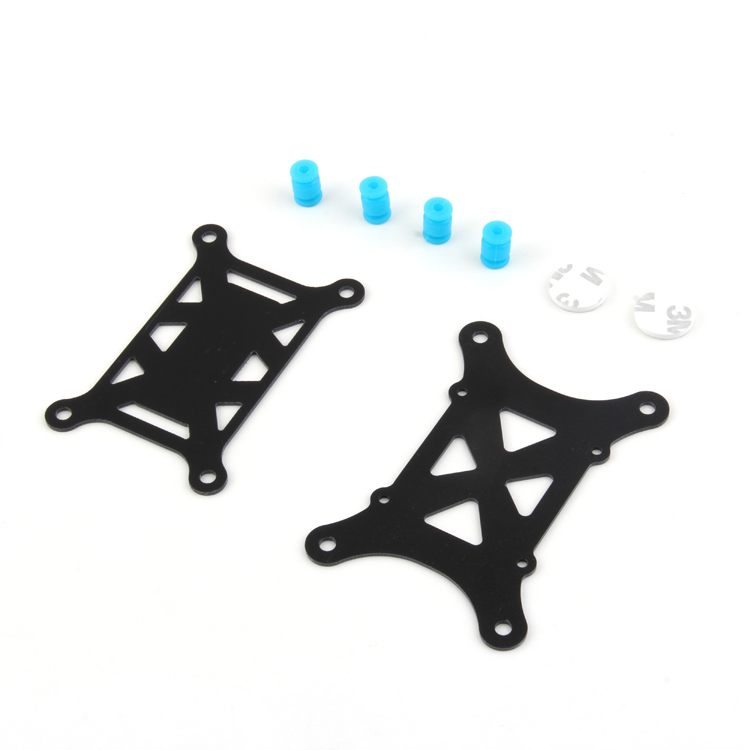
Anti-Vibration Shock Absorber for APM/KK/MWC/PixHawk
Reduces motor vibrations transmitted to the FC and companion computer, preventing image blur and improving IMU accuracy for vision-guided drones.
DGCA Regulations to Keep in Mind
Operating a drone with a companion computer for surveillance or autonomous tracking in India requires compliance with DGCA drone rules 2021:
- Remote ID: All drones above 250g must broadcast Remote ID. Companion computers can implement this via Wi-Fi or Bluetooth beacon.
- Autonomous operations: BVLOS (Beyond Visual Line of Sight) operations require specific DGCA permission and are not blanket-permitted for hobbyists.
- No-fly zones: Never run vision-tracking missions near airports, military installations, or state capitals without prior permission. Use the DigitalSky platform to check zones.
- Green category drones (250g–2kg): require UIN registration and DGCA type certification for the complete system.
Always fly within legal parameters. Autonomous vision systems can impress but also attract regulatory attention if operated irresponsibly.
Frequently Asked Questions
Q: Can I use a Raspberry Pi Zero 2W instead of Pi 4?
The Zero 2W (weighs only 10g) is tempting for small drones, but its quad-core Cortex-A53 at 1GHz struggles with real-time object detection. It can handle optical flow and ArUco detection adequately, but for neural network inference, the Pi 4 is the minimum recommended platform.
Q: Which is better for drone vision — Raspberry Pi or NVIDIA Jetson Nano?
Jetson Nano’s 128-core Maxwell GPU enables CUDA-accelerated inference at 10–20x faster than Pi 4 for deep learning tasks. However, it costs 3–4x more, consumes 5–10W (vs Pi 4’s 3–7W), and is harder to source in India. For most hobby and research projects, Pi 4 is the better starting point. Graduate to Jetson when you need real-time YOLO-class detection at 30+ FPS.
Q: What baud rate should I use for UART between Pixhawk and Raspberry Pi?
921600 baud is recommended for companion computer links. It gives sufficient bandwidth for high-rate telemetry streams (attitude at 50Hz, position at 10Hz, etc.) without overwhelming the Pi’s serial buffer. The Pixhawk parameter is SERIAL2_BAUD = 921.
Q: Can the companion computer take over control from the pilot?
Yes — when in GUIDED mode (ArduCopter), the companion computer can send position, velocity, or attitude targets via MAVLink. The FC still handles stabilisation, but high-level navigation commands come from the Pi. The pilot can always reclaim control by switching modes from the RC transmitter.
Q: Does the companion computer need internet connectivity during flight?
No. All vision processing runs locally on the Pi. Internet is only needed for initial setup, software updates, or if you’re streaming video to a remote server. During flight, the Pi communicates only with the FC and optionally a local ground station over Wi-Fi or telemetry radio.
Conclusion
Adding a Raspberry Pi companion computer to your drone transforms it from a remote-controlled toy into an intelligent autonomous platform. With MAVLink bridging the gap between the flight controller and the Pi’s vision pipeline, you can implement everything from precision ArUco landing to real-time object tracking — all running on a lightweight, affordable, India-friendly platform.
Start small: get the UART link working, verify DroneKit communication, then layer in the camera. Add one vision capability at a time, test thoroughly in simulation (SITL) before real-world flights, and always keep a reliable RC override ready. The Indian drone ecosystem is growing rapidly, and companion computer skills will be increasingly valuable for research, agriculture, delivery, and defence applications.
Ready to Build Your Autonomous Drone?
Zbotic stocks drone frames, power distribution boards, BECs, telemetry radios, and all the components you need to build a vision-capable companion computer drone in India.


Add comment