
18650 Battery Holder Design: Parallel vs Series Pack Build
The 18650 cylindrical lithium-ion cell is the workhorse of DIY battery technology. Named after its dimensions — 18mm diameter, 65mm length — these cells power everything from laptop batteries and electric bicycles to DIY power walls and portable robotics. But knowing how to correctly configure 18650 battery holders in parallel vs series configurations is the essential knowledge every Indian maker needs before building their first custom battery pack. This tutorial walks you through every aspect of designing, assembling, and protecting a 18650 battery pack safely.
18650 Cell Basics: Capacity, C-Rate and Choosing Cells
Before building a pack, you need to understand what the individual cells can and cannot do. 18650 cells come in a wide range of grades from world-class brands (Panasonic, Samsung SDI, LG Chem, Murata/Sony) to unbranded and counterfeit cells that are rampant in the Indian market.
Key specifications to check for every cell:
- Nominal capacity (mAh): Typically 2000–3500mAh for genuine cells. Be very sceptical of cells claiming 4000mAh or above at low prices — legitimate 18650 cells do not exceed 3500mAh as of 2025.
- Continuous discharge current (A): Power cells (e.g., Samsung 25R, LG HG2) handle 20–25A continuous. Energy cells (e.g., Panasonic NCR18650B) handle only 5–7A continuous. Using an energy cell in a high-current application causes premature aging and dangerous heating.
- Internal resistance (mΩ): Fresh genuine cells measure 20–60mΩ. High internal resistance (>100mΩ) indicates a weak or recycled cell. Always measure IR before building your pack.
- C-rate: A 2500mAh cell with 5A max discharge is rated at 2C (5A = 2 × 2.5Ah). Match your C-rate to your application’s peak current demand.
Spotting counterfeit cells in India: Buy cells from reputable suppliers only. Counterfeit cells often have incorrect weight (genuine Samsung INR18650-25R weighs 45g — counterfeits are often 38–40g), painted markings that rub off, and capacity that is often 40–60% of stated value. Always weigh your cells and test capacity on a known-good charger before building a pack.
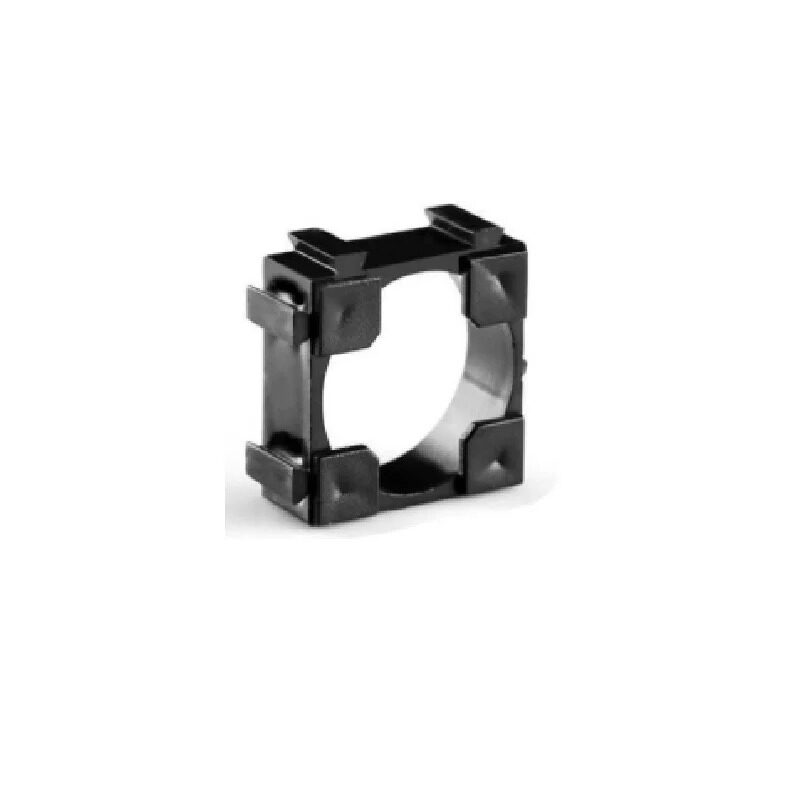
1×18650 Battery Holder with 18.4mm Bore Diameter – Pack of 4
Individual spring-loaded 18650 holders with 18.4mm bore — the right fit for standard 18650 cells with button tops or flat tops with spacers. Wire up multiple holders in series or parallel for your custom pack. Sold in a pack of 4.
Series vs Parallel: What Changes and Why It Matters
This is the foundational concept of battery pack design. Understanding it correctly prevents dangerous mistakes:
Series connection (S): Positive terminal of one cell connects to the negative terminal of the next.
- Voltage adds up: 2S = 7.4V nominal, 3S = 11.1V, 4S = 14.8V
- Capacity stays the same as one cell
- Current capability stays the same as one cell
- All cells must be the same model and capacity
- Cell matching is critical — cells with different internal resistance heat unevenly under load
Parallel connection (P): All positive terminals connect together, all negative terminals connect together.
- Voltage stays the same as one cell (3.7V nominal)
- Capacity multiplies: 2P = 2× capacity, 3P = 3× capacity
- Current capability multiplies: 2P can deliver 2× the continuous current
- An internal equalisation current flows momentarily when cells are first connected in parallel (can be hundreds of amps if voltage difference is large) — always match cell voltages before paralleling
Combined configurations (e.g., 3S2P, 4S3P):
Real packs combine both. A 3S2P pack has 6 cells: 3 pairs of 2 cells in parallel, with the 3 pairs connected in series. This gives 11.1V nominal and 2× single-cell capacity. Notation is always S first, then P: nS×mP means n series groups, each group having m cells in parallel.
| Configuration | Voltage (nominal) | Capacity (2500mAh cells) | Typical Application |
|---|---|---|---|
| 1S1P | 3.7V | 2500mAh | Flashlights, sensors |
| 2S1P | 7.4V | 2500mAh | Small FPV drones, RC cars |
| 3S2P | 11.1V | 5000mAh | Portable tools, robots |
| 4S2P | 14.8V | 5000mAh | E-bikes (small), power stations |
| 7S4P | 25.9V | 10,000mAh | E-bike, e-scooter packs |
18650 Holder Selection Guide
For prototyping and small packs, plastic 18650 holders with spring contacts are the fastest and safest way to build. They allow you to swap cells easily for testing, avoid the need for spot welding equipment, and are mechanically robust enough for non-vibration applications.
Types of 18650 holders:
- Single-cell holders: Individual holders you wire together. Maximum flexibility — any configuration is possible. Contact resistance is slightly higher than welded nickel strips.
- Multi-cell holders (2×1, 3×1, 2×3, etc.): Pre-moulded holders that fix the physical layout. More compact and rigid, but you are locked into their series/parallel wiring pattern.
- PCB-mount holders: Through-hole or SMD holders for integration into a PCB design. Used in devices where the battery is part of the PCB layout (e.g., laptop battery packs, portable instruments).
Contact quality: Always check that holder spring contacts are nickel-plated steel or stainless steel — not bare steel that rusts. The contact resistance should be below 50mΩ per contact. For high-current applications above 3A per cell, holder contacts may be the limiting factor — consider spot-welded nickel strip assembly instead.
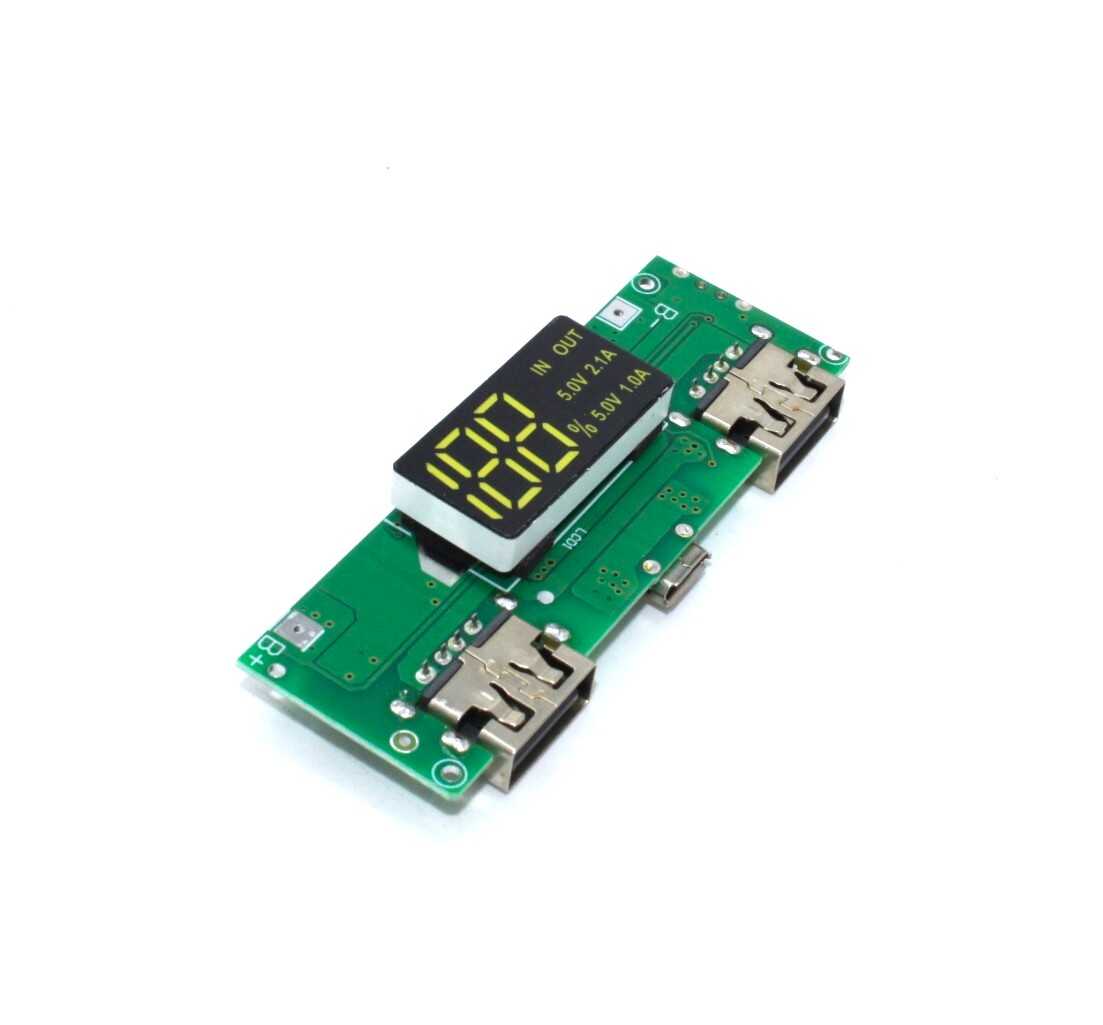
18650 5V 1A/2A Lithium Battery Charging Module with Dual USB and Display
A complete 1S 18650 power bank module with built-in boost converter, dual USB output, and battery level indicator. Perfect for wiring up to a pair of 1×18650 holders for a quick portable charger build.
Building a Series Pack (2S, 3S, 4S)
A series pack is straightforward to build with individual 18650 holders. Here is the step-by-step process for a 3S pack (11.1V nominal, 12.6V fully charged):
Step 1: Cell matching. Measure the open-circuit voltage of all candidate cells. Only use cells within 10mV of each other. Ideally, capacity-test them all and group by capacity. Mismatched cells will charge unevenly and the weakest cell will reach cut-off voltage first, limiting the whole pack.
Step 2: Wire the series connections. Take three 1×18650 holders. Connect the positive (red) wire of holder 1 to the negative (black) wire of holder 2. Connect the positive wire of holder 2 to the negative wire of holder 3. The pack’s positive terminal is holder 1’s negative wire; the negative terminal is holder 3’s positive wire.
Wait — that sounds backwards. Let me clarify: in a standard holder, the red wire connects to the positive terminal (the nub end of the cell) and the black wire to the negative (flat end). To connect in series: Red(1) is the positive output. Black(1) connects to Red(2). Black(2) connects to Red(3). Black(3) is the negative output.
Step 3: Measure voltage. With cells installed, measure across the pack terminals. For 3 cells at 3.7V each, you should read approximately 11.1V. Any reading significantly below this suggests a broken connection or backward-installed cell.
Step 4: Balance wires for BMS. A 3S BMS needs access to each cell’s voltage. Run a thin wire from each cell-junction point: B0 (negative of pack), B1 (junction between cell 1 and 2), B2 (junction between cell 2 and 3), B3 (positive of pack). These go to the BMS balance header pins.
Building a Parallel Pack (2P, 3P, 4P)
Parallel packs require more caution than series packs because connecting cells of different voltages causes instantaneous high currents:
Step 1: Pre-charge all cells to the same voltage. This is critical. Charge all cells individually and discharge them to the same voltage (e.g., 3.7V each). A voltage difference of 100mV between two 18650 cells connected in parallel will cause an equalisation current of approximately 100mV ÷ 40mΩ (internal resistance) = 2.5A instantly. This spike stresses the cells and can weld the nickel strip in an unexpected location.
Step 2: Connect through a small resistor first. For initial parallel connection, briefly connect cells through a 1Ω resistor to limit the equalisation current spike. Once the cells have equalised (a few seconds), remove the resistor and make the direct connection.
Step 3: Wire the parallel connections. All positive terminals connect together (red wires joined). All negative terminals connect together (black wires joined). Use wire gauges appropriate for the combined current — if each cell delivers 5A and you have 3P, the main lead must handle 15A (use at least 18AWG, preferably 16AWG).
Step 4: Fusing parallel cells. Best practice is to add a small fuse (or PTC resettable fuse) in series with each individual cell in a parallel group. If one cell develops an internal short, the fuse blows and isolates that cell without affecting the others. A 3A–5A fuse per cell is typical.
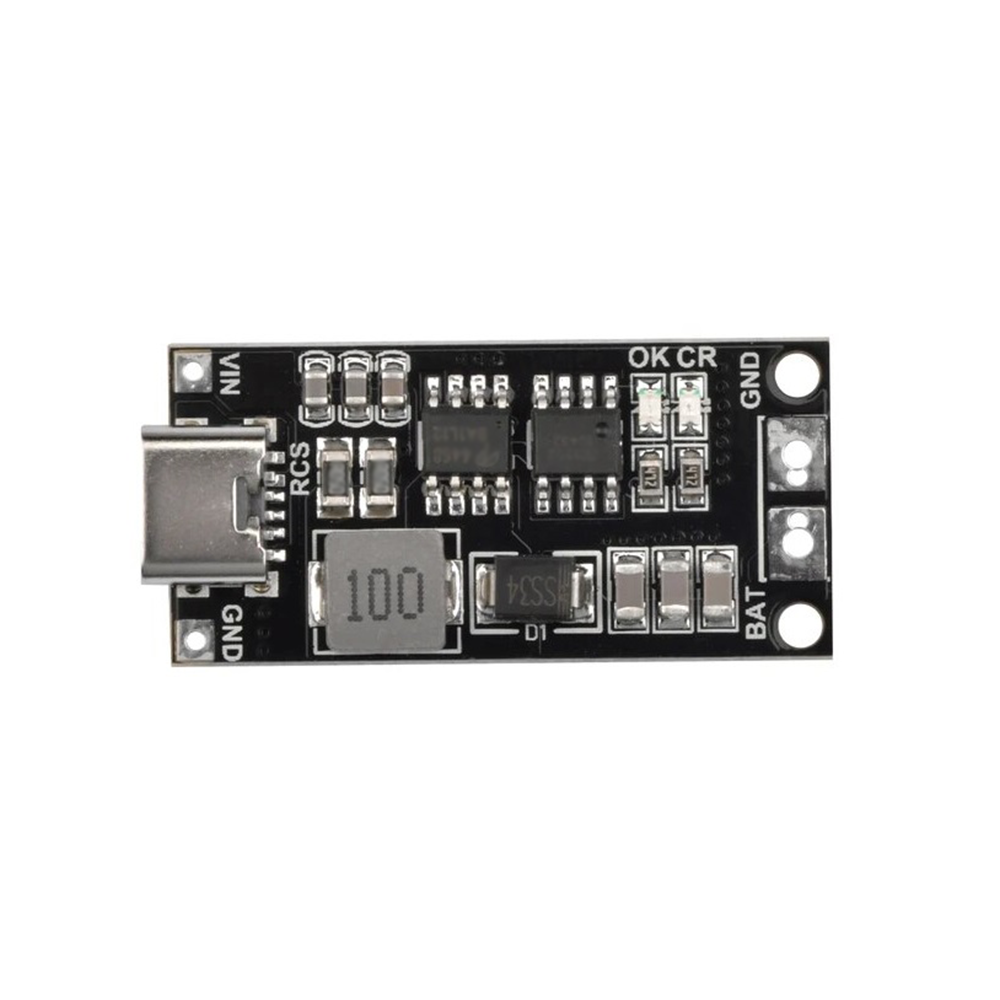
18650 Polymer Li-Ion Type-C to 3S 12.6V 4A Booster Module
Charge your 3S 18650 series pack directly from USB Type-C at up to 4A. An efficient and compact solution that eliminates the need for a separate bench charger for your series pack project.
BMS Selection and Wiring for Your Pack
Every 18650 pack needs a Battery Management System. The BMS protects against:
- Overcharge: disconnects charge input when any cell exceeds 4.20V
- Over-discharge: disconnects load when any cell drops below 2.5–3.0V
- Over-current: disconnects load when current exceeds rated threshold
- Short circuit: ultra-fast disconnect (microseconds) to prevent cell venting
- Cell balancing: equalises cell voltages during charging (passive balancing dissipates excess energy as heat; active balancing transfers energy between cells)
BMS specifications to match to your pack:
- Cell count (S): Must match your series configuration exactly. A 3S BMS will not work with a 4S pack.
- Continuous current: Must be rated above your maximum load current. For a 2A load, use a BMS rated for 3A minimum. For a 15A motor, use a 20A BMS.
- Balance current: Typically 50–200mA for passive balancing. Higher is better for mismatched cells.
- Communication: For advanced projects, choose a BMS with I2C, UART or CAN output for SoC monitoring and fault logging.
BMS wiring for a 3S pack:
BMS Pins:   B- → Pack Negative
            B1 → Cell1-Cell2 junction
            B2 → Cell2-Cell3 junction
            B+ → Pack Positive
            P- → Load Negative output
            C- → Charger Negative input
            P+/C+ → Load/Charger Positive (connected to B+)
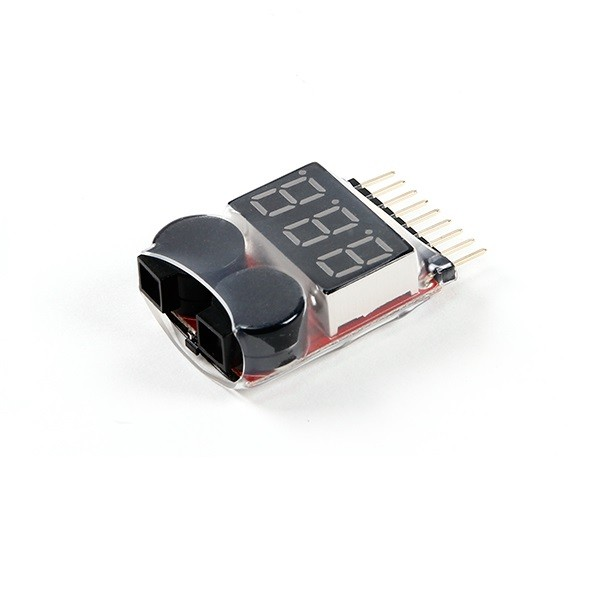
1-8S Lipo Battery Voltage Tester without Alarm
An essential tool when building multi-cell packs — instantly verify individual cell voltages through the balance connector to check cell matching quality and BMS balance performance after charging cycles.
Safety Testing and Quality Checks
Before using your pack in any application, run through this safety checklist:
- Voltage check: Measure pack voltage at B+ and B-. Should match expected series voltage within ±0.1V.
- Balance check: Use a cell voltage tester on the balance connector. All cells should be within 20mV of each other after a full charge cycle.
- Short circuit protection test: Using a load resistor (NOT a dead short), apply a brief momentary current above the BMS rated limit. The BMS should trip and disconnect the output within milliseconds.
- Charge completion test: Charge fully and verify the charger enters CV phase and tapers to near-zero current. Check that no cell exceeds 4.22V.
- Thermal check: Under rated load current, measure cell surface temperature after 10 minutes. Should stay below 45°C. If cells are hot to the touch, your discharge rate is too high for the cells you chose.
- Capacity test: Discharge at 0.5C to the cut-off voltage and measure actual mAh delivered. Should be 90%+ of rated capacity for fresh cells. Below 80% indicates counterfeit or degraded cells.
Frequently Asked Questions
Q1: Can I mix different brands of 18650 cells in the same pack?
Technically possible but strongly inadvisable, especially in series configurations. Different brands have different internal resistance and capacity, causing uneven heating and capacity utilisation. The weakest cell determines the pack’s overall performance. If you must mix cells, put cells of different capacity in parallel (not series) — in parallel, the stronger cell will carry more current but the weaker cell is not forced to discharge beyond its capability.
Q2: Do I need spot welding equipment to build an 18650 pack?
Not for prototyping. Individual 18650 holders with spring contacts and wire connections are perfectly adequate for packs up to 5A continuous current. For production packs or high-current applications above 10A, spot-welded nickel strips provide lower resistance and better mechanical integrity. A basic spot welder in India costs ₹1,500–3,000 for DIY kit versions.
Q3: How do I store 18650 cells long-term between projects?
Store at 40–60% SoC (approximately 3.7–3.8V per cell) in a cool, dry place. Never store fully charged or fully discharged. At 40% SoC and 20–25°C, cells lose less than 2% capacity per year from calendar aging. Never store 18650 cells in direct sunlight or in a hot car — Indian summer temperatures inside a parked car can exceed 70°C, permanently damaging cells.
Q4: What is the maximum safe continuous current for a plastic 18650 holder?
Most plastic single-cell holders are rated for 3–5A continuous. The spring contact resistance (typically 30–80mΩ) causes I²R heating at the contact point. For currents above 5A per cell, switch to spot-welded nickel strip assemblies. For currents above 10A per cell, use 0.2mm thick pure nickel strip (not nickel-plated steel) for minimum resistance.
Q5: Can I charge a parallel pack with a charger rated for a single cell?
Yes — a parallel pack looks like a single cell from the charger’s perspective (same voltage, higher capacity). A charger set to 4.2V/cell CV will correctly charge any number of parallel cells. The charge time will be proportionally longer: a 2P pack takes approximately 2× longer than a single cell at the same charge current. Increase your charge current proportionally if your charger supports it (e.g., charge a 2P 5000mAh pack at 2A instead of 1A to maintain the same ≈C/2.5 rate).
Build Your Custom 18650 Battery Pack
Zbotic stocks 18650 battery holders, BMS protection boards, charger modules, and testing tools to help you build safe and reliable custom battery packs for any project. Whether it is a portable power bank, robot battery, or solar storage, get the right components delivered across India.


Add comment