
If your CNC machine, 3D printer, or robotic arm makes an alarming buzz or skips steps at certain speeds, you have likely encountered stepper motor resonance. Resonance and vibration are among the most frustrating problems in stepper motor systems — but they are well-understood and entirely fixable once you know what causes them. This guide covers the physics behind resonance, how to diagnose it, and a comprehensive set of damping techniques ranked from easy software tweaks to mechanical modifications.
What Is Stepper Motor Resonance?
A stepper motor moves by switching current between its coil phases, pulling the rotor from one equilibrium position to the next. Each step landing is not perfectly clean — the rotor overshoots its target and oscillates around the equilibrium like a pendulum. At most speeds, the next step command arrives before the oscillation decays, effectively dampening it. But at certain step rates, the command frequency matches the motor’s natural oscillation frequency, and each step reinforces the vibration instead of cancelling it. This is mechanical resonance.
The effect ranges from audible buzzing and vibration (mild resonance) to complete loss of synchronisation and stalled motion (severe resonance). On 3D printers, it shows up as ringing artefacts in prints. On CNC machines, it can cause lost steps that ruin a workpiece.
Understanding Natural Frequency
Every stepper motor has a natural mechanical resonance frequency determined by:
- Rotor inertia (J)
- Holding torque (T)
- Number of full steps per revolution (N)
The approximate natural frequency f_n (in Hz) is:
f_n is approximately (1 / 2pi) x sqrt(K / J)
where K = (N x T x pi) / 180  (torque stiffness constant)
For a typical NEMA 17 motor with 200 steps/rev and 40 N-cm holding torque, the natural frequency usually falls between 100 Hz and 200 Hz, corresponding to a full-step rate of 100-200 steps per second. This translates to roughly 30-60 RPM in full-step mode — the classic mid-speed resonance zone.

NEMA17 5.6 kg-cm Stepper Motor with D-Type Shaft
High-quality NEMA 17 motor for CNC, 3D printing, and robotic builds — understanding its resonance zone helps you tune your system perfectly.
Symptoms and How to Diagnose
Resonance exhibits specific, identifiable symptoms depending on severity:
Audible Signs
- Mid-speed buzz or screech: Most noticeable at a specific RPM band. If the noise disappears at higher or lower speeds, it is resonance, not a mechanical fault.
- Rhythmic rattling: Often caused by resonance amplifying vibration in the chassis or mounting hardware.
Motion Signs
- Stalling or skipped steps within a narrow speed range, even under light load
- Inconsistent speed — the axis accelerates and decelerates audibly through the resonance band
- Ringing in 3D prints: Parallel ripples on vertical surfaces near sharp corners (input shaping is the advanced fix for this)
Diagnosis Method
- Command the motor to run at continuously increasing speed from near-zero to maximum.
- Listen and observe for the specific speed at which buzz peaks. Note the step rate (steps/second).
- If behaviour is speed-specific and not load-dependent, it is resonance.
- If the same problem occurs at all speeds, check for mechanical binding, loose coupling, or under-current.
Low-Speed vs Mid-Speed Resonance
Resonance manifests differently at different speeds:
Low-speed resonance (below 100 steps/sec): Caused by individual step oscillations. Each discrete step is visible as a tiny oscillation. Common in hobby CNC builds running at very low feed rates.
Mid-speed resonance (100-300 steps/sec in full-step): The most problematic range. The step frequency approaches the natural frequency of the rotor. The motor loses synchronisation easily here under any load. This is what most builders mean by stepper resonance.
High-speed resonance (parasitic): Less common but can occur when the motor cable acts as an antenna at high PWM frequencies, causing RF-induced current noise in the coils.
Fix 1: Microstepping
Microstepping is the single most effective technique for reducing mid-speed resonance. Instead of switching the full current between phases in discrete steps, the driver applies carefully proportioned currents to both phases simultaneously, placing the rotor at intermediate angular positions. A 1/16 microstepping driver delivers 3200 steps per revolution instead of 200, so the step frequency entering the resonance band (at the same RPM) is 16 times higher — well beyond the natural frequency.
Driver chips like the A4988 support 1, 1/2, 1/4, 1/8, and 1/16 microstepping. The TMC2208 and TMC2209 go further with 1/256 microstepping and add StealthChop — a current control algorithm that further smooths motion by eliminating the torque ripple that causes resonance at low speeds.

A4988 Stepper Motor Driver Controller Board
Popular 1/16 microstepping driver that dramatically reduces resonance compared to full-step operation — a great first upgrade.
Fix 2: Current Tuning
Running a stepper motor at higher than necessary current increases the torque stiffness constant K, which raises the natural frequency and shifts resonance to higher speeds. But it also increases heat and vibration from the increased magnetic forces.
The counterintuitive fix: reduce the current to 60-70% of rated on lightly loaded axes. Lower current reduces the restoring torque, lowers the resonance frequency below your operating range, and reduces heat. For 3D printer extruder motors that stall only during resonance, this often eliminates the problem immediately.
Trim the Vref potentiometer on your A4988 or DRV8825 driver. Formula: Vref = Irms x (8 x Rsense). For a 2 A motor at 70%, target Vref for 1.4 A.
Fix 3: Acceleration Ramp Tuning
If your firmware allows, set the acceleration ramp to pass through the resonance speed range as quickly as possible. In Marlin, GRBL, and similar firmware, the DEFAULT_MAX_ACCEL values control how fast the motor accelerates. A higher acceleration value means the motor spends less time in the resonant speed range, reducing the time available for vibration to build up.
Additionally, use an S-curve acceleration profile if your firmware supports it. S-curve ramps smooth the jerk (rate of change of acceleration) at the beginning and end of each movement, which dramatically reduces resonance excitation.
Fix 4: Mechanical Dampers
Software fixes do not always solve structural resonance amplified by the machine chassis. Mechanical interventions include:
Stepper Motor Damper Pads
Rubber or silicone pads between the motor flange and the mounting plate absorb vibration before it enters the frame. Even 1-2 mm thick rubber sheet under the motor makes a measurable difference. Dedicated laser-cut rubber motor gaskets are available for NEMA 17 and NEMA 23 frames.
Anti-Vibration Mount
Specialised NEMA 17 anti-vibration dampers (sold as stepper dampers in the 3D printing community) are threaded stand-offs with internal rubber isolation. They are one of the cheapest and most effective upgrades for a noisy 3D printer.
Coupler Selection
Rigid shaft couplers transmit every vibration impulse from motor to lead screw. Replacing a rigid coupler with a flexible jaw coupler (spider coupler) introduces a small amount of angular compliance that breaks the resonance path between motor and load.
Frame Stiffening
On 2020/2040 aluminium extrusion frames (common in 3D printers), loose T-slot nuts and under-tightened corner brackets amplify resonance. Check every fastener in the frame when troubleshooting vibration — often tightening six bolts eliminates a persistent buzz.
Fix 5: Closed-Loop Control
A closed-loop stepper system adds an encoder to the motor shaft and a controller that monitors actual position versus commanded position. When resonance begins to cause position error, the controller adjusts the current waveform to actively damp the oscillation — the same principle as active noise cancelling headphones.
This is the most reliable fix for demanding applications. Controllers like the Trinamic TMC4671 implement field-oriented control (FOC) for steppers. For hobbyists, products like the Bigtreetech S42B closed-loop servo module can retrofit NEMA 17 steppers with encoder feedback.
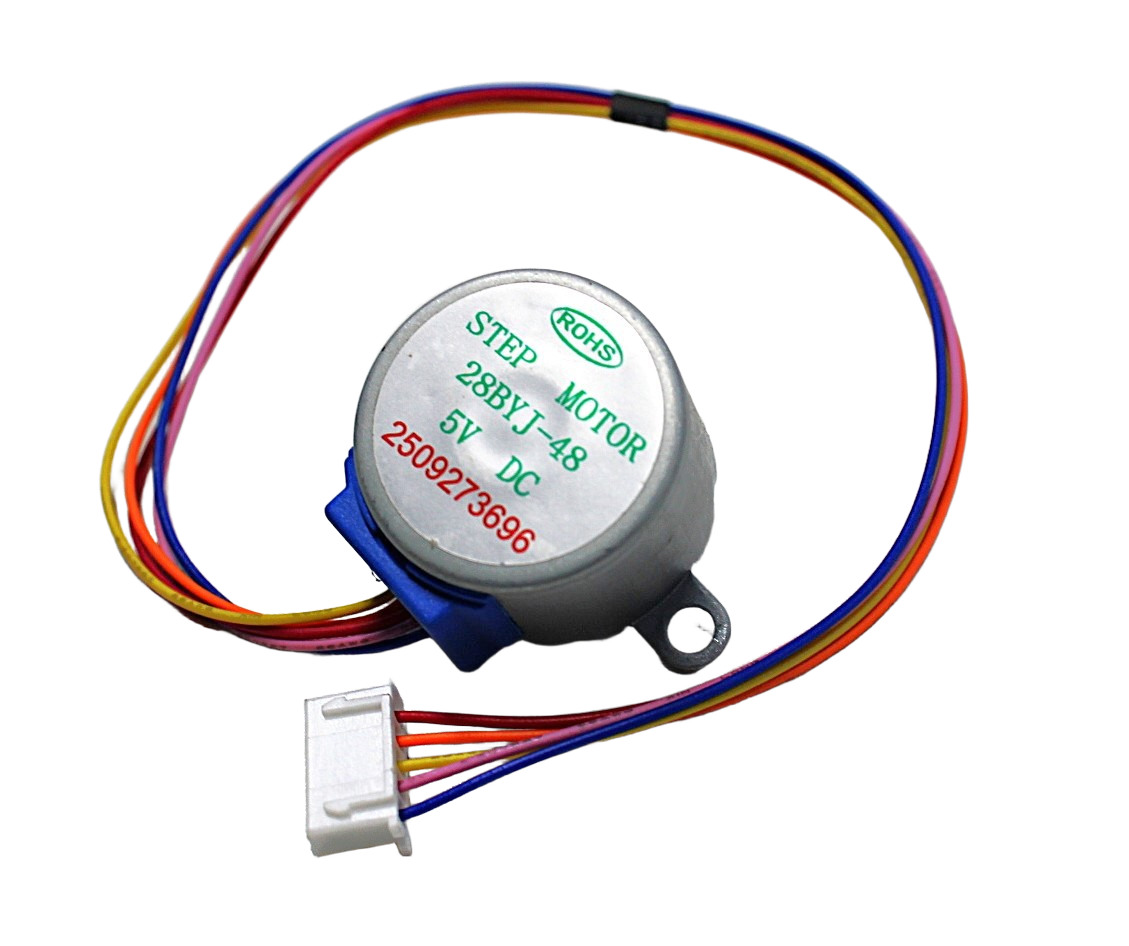
28BYJ-48 5V Stepper Motor
Compact 5V stepper motor with a built-in gearbox — the gearbox reduces the effective step angle and naturally limits resonance, making it ideal for beginners.
Fix 6: Driver Selection
Not all stepper drivers are equal in resonance suppression:
- A4988: 1/16 microstepping, basic decay modes. Resonance is reduced vs full-step but not eliminated.
- DRV8825: 1/32 microstepping, slightly improved. Better for higher-current motors.
- TMC2208/TMC2209 (UART): 1/256 interpolated microstepping, StealthChop2, SpreadCycle. The best choice for silent 3D printers and low-vibration CNC. StealthChop runs voltage-mode control that completely eliminates coil current ripple at low speeds.
- TMC5160: For high-current NEMA 23 motors (up to 20 V, 3 A peak), with all TMC features.
Frequently Asked Questions
Why does my stepper motor vibrate only at one specific speed?
This is the defining characteristic of mechanical resonance. When the step frequency matches the motor’s natural oscillation frequency, each step reinforces the previous oscillation instead of settling to the target position. At other speeds, steps occur before the oscillation builds to dangerous amplitude.
Does microstepping reduce torque?
Yes, microstepping reduces the available holding torque — 1/16 microstepping provides only about 70% of the full-step holding torque. However, in most systems the reduction in resonance and smoother motion outweigh the torque cost. For high-load applications, increase the supply voltage (within driver limits) to compensate.
Can the motor cable cause vibration problems?
Yes. Long, unshielded stepper motor cables act as antennas and can pick up electrical noise that introduces phantom step pulses. Use shielded cable for motor connections over 30 cm, and route cable away from PWM power lines. Also ensure the cable connector is fully seated — a loose pin causes intermittent open-circuit faults that mimic resonance.
What is input shaping and does it help?
Input shaping is a control technique that pre-filters the step command signal to cancel the motor’s natural oscillation. It is implemented in Klipper 3D printer firmware and is highly effective for eliminating print ringing. It requires an accelerometer (ADXL345) connected to the printer to measure the actual resonance frequency.
My NEMA 17 motor buzzes even when stationary. Is it damaged?
No — a stationary stepper motor held in position by active current will always have some acoustic noise from the chopper current regulation in the driver. This is normal. Switching from full-current hold to reduced hold current (a feature in most modern drivers) eliminates this noise when the motor is not moving.
Need to upgrade your stepper system? Zbotic stocks NEMA 17 stepper motors, A4988 drivers, and accessories for 3D printers, CNC machines, and robotic builds — all shipped fast across India.


Add comment