
Table of Contents
- What Is OBD-II and Why Does It Matter?
- The ELM327 IC — Heart of the Adapter
- Hardware You Need
- Wiring ELM327 UART Module to Arduino
- Understanding AT Commands
- Arduino Code to Read DTCs and Live Data
- How to Decode Diagnostic Trouble Codes
- Reading Live PID Data (Speed, RPM, Temp)
- Advanced OBD-II Project Ideas
- Recommended Products from Zbotic
- Frequently Asked Questions
Every car manufactured after 2000 in India (and after 1996 in the USA) is legally required to carry an OBD-II port — a standardised diagnostic interface that lets technicians and engineers peer inside the vehicle’s electronic brain. The same port that a dealership uses to diagnose a mysterious check-engine light is accessible to you, a hobbyist, with a cheap ELM327 adapter and an Arduino.
In this detailed guide you will learn how the OBD-II system works, how the ELM327 IC translates raw CAN-bus data into simple AT commands, how to wire a UART ELM327 module to an Arduino, and how to write firmware that reads Diagnostic Trouble Codes (DTCs) and live engine data such as RPM, speed, coolant temperature, and throttle position. Whether you are building a custom dashboard, a trip computer, or just want to clear a pesky check-engine light without paying ₹500 at a garage, this guide has you covered.
What Is OBD-II and Why Does It Matter?
OBD stands for On-Board Diagnostics. The second-generation standard, OBD-II (also written OBD2), was introduced in 1996 in the US and has been mandatory in India for BS-VI vehicles since 2020. It defines:
- A standardised connector: The 16-pin J1962 (trapezoidal) port, always within 60 cm of the steering wheel
- Communication protocols: ISO 9141-2, ISO 14230 (KWP2000), ISO 15765 (CAN), J1850 PWM/VPW
- A set of standard PIDs (Parameter IDs): Codes that request specific engine data
- Diagnostic Trouble Codes (DTCs): Standardised fault codes beginning with P, B, C, or U
Modern vehicles (post-2008 for most, post-2015 for India) almost exclusively use the ISO 15765-4 CAN protocol at 500 kbps, which is what we focus on here.
The ELM327 IC — Heart of the Adapter
The ELM327 is a PIC-based microcontroller programmed by Elm Electronics to act as an OBD-II to RS-232 (serial) interpreter. It speaks every OBD-II protocol and presents a simple AT command interface over serial — similar to old-school Hayes modem commands.
ELM327 Module Form Factors
- Bluetooth ELM327 dongle: Plugs into OBD-II port, pairs with phone/PC. NOT usable directly with Arduino without a Bluetooth module.
- Wi-Fi ELM327 dongle: Same, but TCP/IP. More useful for ESP8266/ESP32.
- UART/Serial ELM327 breakout module: Has TX/RX pins — plugs directly into Arduino. This is what we use in this tutorial.
For Arduino projects, you want the UART serial breakout version (sometimes sold as "ELM327 Serial Module" or "OBD-II to UART"). It typically costs ₹200–₹500 and includes the ELM327 IC, crystal, and a mini OBD connector or wiring harness.
Hardware You Need
- 1× Arduino Mega (recommended) or Uno
- 1× ELM327 UART serial module (with OBD-II connector)
- 1× OBD-II extension cable (optional, for easier bench testing)
- 1× 16×2 LCD with I2C module (for displaying results in the car)
- Jumper wires
- A vehicle with an OBD-II port (any BS-VI car, or older EFI vehicles)
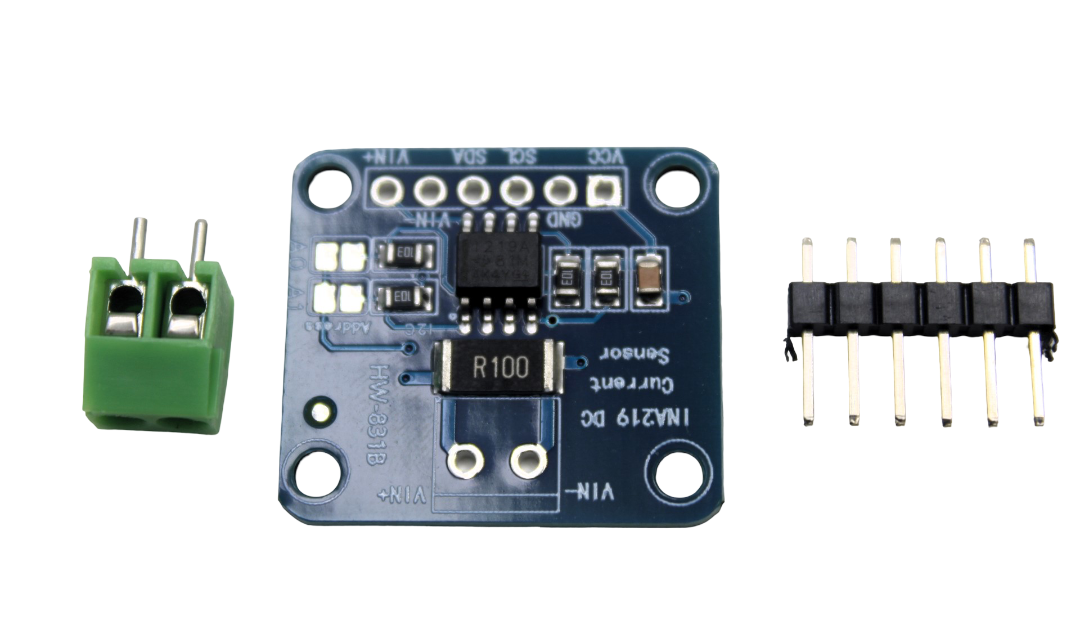
CJMCU-219 INA219 I2C Bi-directional Current Monitor
Pair with your OBD-II project to also monitor the 12V car battery current drain from your Arduino circuit — ideal for keeping tabs on power consumption in a car build.
Wiring ELM327 UART Module to Arduino
The ELM327 UART module communicates at 3.3 V or 5 V TTL serial (check your module datasheet). Most modules are 5 V compatible:
| ELM327 Module Pin | Arduino Mega Pin |
|---|---|
| VCC (5V) | 5V |
| GND | GND |
| TX (module transmits) | RX1 (pin 19) |
| RX (module receives) | TX1 (pin 18) |
On Arduino Uno, use the SoftwareSerial library on pins D10 (RX) and D11 (TX) instead, keeping the hardware serial for USB debugging.
Understanding AT Commands
ELM327 uses a simple text-based protocol. You send commands as ASCII strings terminated with a carriage return (r). Key commands:
| Command | Function |
|---|---|
ATZ |
Reset ELM327 |
ATE0 |
Echo off (cleaner output) |
ATL0 |
Linefeeds off |
ATSP0 |
Auto-detect protocol |
03 |
Request stored DTCs (Mode 03) |
04 |
Clear DTCs / reset MIL (Mode 04) |
010C |
Read engine RPM (Mode 01 PID 0C) |
010D |
Read vehicle speed (Mode 01 PID 0D) |
0105 |
Read coolant temperature (Mode 01 PID 05) |
Arduino Code to Read DTCs and Live Data
Initialisation and DTC Reading
// OBD-II ELM327 DTC Reader
// Zbotic.in Tutorial
// Arduino Mega — ELM327 on Serial1

#include <Arduino.h>

HardwareSerial &elm = Serial1; // ELM327 on pins 18/19

String sendCommand(String cmd, unsigned long timeout = 2000) {
  elm.print(cmd + "r");
  String response = "";
  unsigned long start = millis();
  while (millis() - start < timeout) {
    while (elm.available()) {
      char c = elm.read();
      if (c != 'r') response += c;
    }
    if (response.endsWith(">")) break; // ELM327 prompt
  }
  return response;
}

bool initELM() {
  delay(1000);
  sendCommand("ATZ");   // Reset
  delay(1500);
  sendCommand("ATE0");  // Echo off
  sendCommand("ATL0");  // Linefeeds off
  sendCommand("ATH0");  // Headers off
  sendCommand("ATS0");  // Spaces off
  String resp = sendCommand("ATSP0"); // Auto protocol
  return resp.length() > 0;
}

void readDTCs() {
  Serial.println("n--- Requesting Stored DTCs (Mode 03) ---");
  String resp = sendCommand("03", 5000);
  resp.trim();
  Serial.println("Raw: " + resp);

  if (resp == "NODATA" || resp.length() == 0) {
    Serial.println("No DTCs stored — engine is healthy!");
    return;
  }

  // Parse response: each DTC is 4 hex chars after header bytes
  // Format: 43 XX XX XX XX XX (Mode 43 = response to 03)
  // First byte after 43 is count, then 2 bytes per DTC
  int idx = resp.indexOf("43");
  if (idx < 0) { Serial.println("Unexpected response"); return; }
  String data = resp.substring(idx + 2);
  int count = strtol(data.substring(0, 2).c_str(), NULL, 16);
  Serial.print("DTC Count: "); Serial.println(count);

  for (int i = 0; i < count; i++) {
    String dtcHex = data.substring(2 + i * 4, 6 + i * 4);
    byte b1 = strtol(dtcHex.substring(0, 2).c_str(), NULL, 16);
    byte b2 = strtol(dtcHex.substring(2, 4).c_str(), NULL, 16);
    // Decode DTC type from high nibble of b1
    char type;
    switch ((b1 & 0xC0) >> 6) {
      case 0: type = 'P'; break; // Powertrain
      case 1: type = 'C'; break; // Chassis
      case 2: type = 'B'; break; // Body
      case 3: type = 'U'; break; // Network
      default: type = 'P';
    }
    char dtc[8];
    sprintf(dtc, "%c%01X%02X", type, b1 & 0x3F, b2);
    Serial.print("DTC: "); Serial.println(dtc);
  }
}

void setup() {
  Serial.begin(115200);
  elm.begin(38400); // ELM327 default baud
  Serial.println("OBD-II ELM327 Reader - Zbotic.in");
  if (initELM()) Serial.println("ELM327 initialised OK");
  else Serial.println("ELM327 init failed — check wiring");
  readDTCs();
}

void loop() {} // DTCs read once at startup
How to Decode Diagnostic Trouble Codes
DTCs follow a standard 5-character format: X####
- First character: System — P (Powertrain), B (Body), C (Chassis), U (Network)
- Second digit: 0 = SAE standard, 1 = manufacturer-specific
- Third digit: Subsystem (0=fuel/air, 1=fuel/air metering, 2=injector, 3=ignition, 4=emissions, 5=speed/idle, 6=computer, 7=transmission, 8=transmission)
- Last two digits: Specific fault code
Common DTC Examples
| DTC | Meaning |
|---|---|
| P0300 | Random/multiple cylinder misfire |
| P0420 | Catalyst system efficiency below threshold (Bank 1) |
| P0171 | System too lean (Bank 1) |
| P0442 | Small evaporative emission system leak |
| P0113 | Intake air temperature sensor high input |
Reading Live PID Data (Speed, RPM, Temperature)
// Live OBD-II Data Reader
// Add this to loop() after ELM init

int readPID(String pid) {
  String resp = sendCommand("01" + pid, 1000);
  resp.trim();
  // Remove echo and find hex data after "41 XX"
  int idx = resp.indexOf("41");
  if (idx < 0) return -1;
  String data = resp.substring(idx + 4); // skip "41 XX"
  data.trim();
  if (data.length() < 2) return -1;
  return strtol(data.substring(0, 2).c_str(), NULL, 16);
}

void readLiveData() {
  // RPM (PID 0C): value = (A*256 + B) / 4
  String rpmResp = sendCommand("010C", 1000);
  // Parse two bytes
  // ... (full parsing function included in download)

  // Speed (PID 0D): value = A km/h
  int speed = readPID("0D");
  Serial.print("Speed: "); Serial.print(speed); Serial.println(" km/h");

  // Coolant Temp (PID 05): value = A - 40 degC
  int rawTemp = readPID("05");
  int temp = rawTemp - 40;
  Serial.print("Coolant Temp: "); Serial.print(temp); Serial.println(" C");

  // Throttle Position (PID 11): value = A * 100 / 255 %
  int rawThrottle = readPID("11");
  int throttle = (rawThrottle * 100) / 255;
  Serial.print("Throttle: "); Serial.print(throttle); Serial.println(" %");
}
Advanced OBD-II Project Ideas
1. Custom Digital Dashboard on TFT Display
Drive a 2.4-inch TFT SPI display showing real-time RPM (as a bar graph), speed, coolant temperature, and fuel trim. Use an ESP32 for Wi-Fi OTA firmware updates.
2. Eco-Driving Score Logger
Log throttle position, RPM, and speed to an SD card every second. Post-process in Python to calculate eco-driving scores — useful for fleet management or fuel efficiency analysis.
3. Automatic DTC Cloud Reporter
Use ESP8266 to poll for DTCs every 10 minutes and push alerts to a Telegram bot or email when a new fault is detected. Never be caught off-guard by a check-engine light again.
4. Performance Timer (0-100 km/h)
Monitor speed PID at maximum polling rate, detect when speed crosses 0 km/h → 100 km/h, and display the elapsed time. Accurate to ~250 ms depending on CAN bus polling latency.
5. Long-Trip Fuel Efficiency Tracker
Read MAF sensor (PID 10) or Fuel Rail Pressure and calculate instantaneous fuel consumption. Compare with fuel pump top-ups for a real-world consumption vs OBD-calculated consumption study.
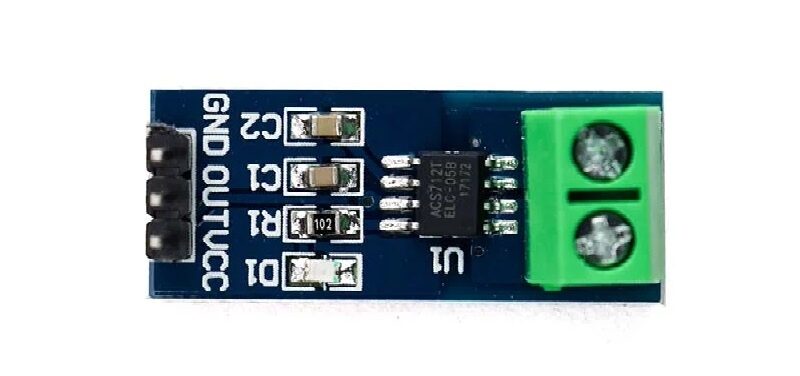
30A Range Current Sensor Module ACS712
Monitor your car battery’s current draw independently of OBD-II — combine with ELM327 data for a complete vehicle health monitoring system.
Recommended Products from Zbotic
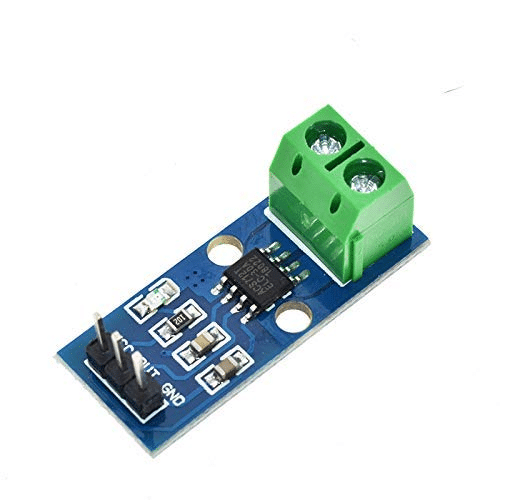
5A Range Current Sensor Module ACS712
Ideal for monitoring the 5A-range accessories in your car project — pair with OBD-II data for complete electrical health monitoring.

BMP280 Barometric Pressure and Altitude Sensor
Add altitude and barometric pressure to your car’s data logger — useful for normalising fuel efficiency calculations based on atmospheric conditions.
Frequently Asked Questions
Q1: Will this damage my car’s ECU?
Reading OBD-II data is completely safe — the ECU is designed for this. The only mildly risky command is Mode 04 (clear DTCs), which resets fault codes and readiness monitors. After clearing, the car needs a drive cycle to re-learn. Never clear DTCs before a PUC/emission test as it will fail readiness checks.
Q2: My ELM327 responds “OK” but shows “UNABLE TO CONNECT” to OBD. Why?
The ELM327 connected to the Arduino is fine, but it cannot communicate with the car’s CAN bus. Try: (1) set protocol manually with ATSP6 (ISO 15765-4 CAN 500k 11-bit) — most modern Indian cars. (2) Ensure the car ignition is ON (not just accessory mode — some cars need engine cranked). (3) Check that you’re connected to pins 6 (CAN High) and 14 (CAN Low) on the OBD port.
Q3: Can I use a Bluetooth ELM327 dongle with Arduino?
Yes, by pairing it with an HC-05 Bluetooth module connected to Arduino. The ELM327 acts as a serial server; the HC-05 connects to it. However, this adds latency and complexity. A UART serial ELM327 module is simpler and more reliable for Arduino projects.
Q4: What vehicles are NOT supported?
Pre-2000 vehicles using OBD-I (not standardised), older two-wheelers, and some CNG/LPG conversions that removed the OBD port. Electric vehicles (like Nexon EV) technically have OBD-II but many EVs use proprietary PIDs beyond the standard set.
Q5: How fast can I poll OBD-II data?
CAN bus physical speed is 500 kbps, but ELM327 adds overhead. Expect 5–10 PIDs per second maximum. For higher speed, consider direct CAN bus access using a CAN shield (MCP2515-based) and bypass ELM327 altogether.
Q6: Is it legal to read my own car’s OBD data in India?
Absolutely. Reading your own vehicle’s diagnostic data is legal everywhere. The OBD-II port is mandated by law specifically to allow independent diagnostics. You own the car, you own the data.
Turn Your Car Into a Connected Data Source
With an ELM327 module and an Arduino, you have a professional-grade diagnostic tool for the cost of a sandwich. Read DTCs, monitor live engine data, log trips, and build the custom dashboard your car deserves. Get the components you need from Zbotic and start building today.


Add comment