
The battery pack is the heart of every electric vehicle, and understanding the basics of an EV battery pack — including BMS and cell balancing for e-bikes — is essential before you build, upgrade, or troubleshoot one. In India’s rapidly growing e-bike market, thousands of DIY enthusiasts and small EV conversion shops are building custom lithium packs using 18650, 21700, or LFP prismatic cells. The difference between a pack that lasts five years and one that fails in six months often comes down to a single component: the Battery Management System (BMS) and how well it balances cells.
Why Every Lithium Pack Needs a BMS
A lithium-ion cell is a remarkably energy-dense but unforgiving chemistry. Overcharge it above 4.2V per cell and metallic lithium plates out on the anode — a fire hazard that gets worse with every cycle. Discharge it below 2.5V per cell and copper dendrites form inside the cell, permanently reducing capacity and eventually creating internal shorts. Allow it to deliver more current than its maximum continuous discharge rating and the cell heats up, accelerating degradation and risking thermal runaway.
A BMS prevents all three of these failure modes. It monitors the voltage of every cell group (or every individual cell in premium systems), the pack temperature, and the charge/discharge current. When any parameter exceeds safe limits, the BMS opens the charge or discharge MOSFET circuit, protecting both the cells and the user.
For an e-bike specifically, the BMS must handle high peak currents (20–80A depending on motor size) and operate reliably at the elevated temperatures typical of Indian road conditions. A well-chosen BMS with proper cell balancing will extend pack life from 300–500 cycles to 800–1000 cycles with less than 20% capacity fade.
Understanding Cell Imbalance and Why It’s Dangerous
Even cells from the same batch, bought on the same day from the same supplier, will have slightly different internal resistance and self-discharge rates. Over hundreds of charge-discharge cycles, these tiny differences compound. Some cells charge faster and reach 4.2V while others are still at 4.0V. Some discharge faster and drop to 3.0V while others sit at 3.4V.
Without balancing, the pack’s usable capacity is limited by the weakest cell. Worse, a severely unbalanced pack can overcharge some cells during charging (because the BMS cuts off when the highest cell reaches 4.2V) while other cells are still far from full — or overdischarge others during use while the BMS cuts off because the lowest cell dropped to the cutoff voltage while stronger cells still have charge left.
In extreme cases, cell imbalance leads to thermal runaway in the weakest, most stressed cell — a catastrophic failure that can destroy the pack, the e-bike, and cause fires. This is why BMS-integrated cell balancing is not optional; it is a fundamental safety requirement.
Passive vs Active Balancing Explained
Passive Balancing (Dissipative)
The most common method in consumer BMS boards for e-bikes. When a cell group reaches the balance threshold voltage (typically 4.18–4.20V), the BMS connects a resistor across that cell group to bleed off excess charge as heat, while other cell groups continue charging. This continues until all cells reach the threshold voltage.
Pros: Simple, inexpensive, reliable. Most common BMS boards available in India use this method.
Cons: Energy is wasted as heat. Balancing current is typically only 50–100mA, which is slow — balancing a severely imbalanced pack can take many charge cycles.
Best for: Standard e-bike builds with well-matched cells, where only minor drift correction is needed per cycle.
Active Balancing (Non-Dissipative)
Instead of burning off excess charge, the BMS transfers energy from high-voltage cells to low-voltage cells using inductors, capacitors, or flyback transformers. Balancing currents of 1–5A are achievable, allowing large imbalances to be corrected quickly.
Pros: Energy-efficient, fast, effective on significantly mismatched cells.
Cons: Expensive, complex, generates EMI that can affect BMS communication, requires careful thermal management.
Best for: Large e-bike packs (72V+), high-performance EVs, or packs using cells salvaged from different sources with significant initial mismatch.

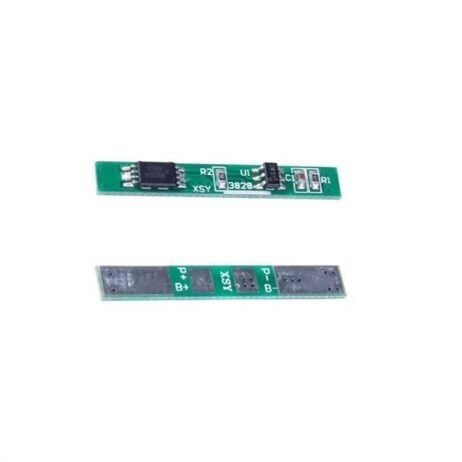
1S 18650 Li-ion Lithium Battery BMS Charger Protection Board
A compact single-cell BMS protection board for 18650 Li-ion cells. Perfect for protecting individual parallel groups within your e-bike pack before a multi-string BMS is installed. Over-charge, over-discharge, and short-circuit protection included.
Key BMS Features for E-Bike Packs
When selecting a BMS for your e-bike build in India, look for these essential features:
- Cell string support: For a 48V pack, you need a 13S BMS (13 groups of series-connected cells). 36V packs use 10S. 52V packs use 14S. Ensure the BMS explicitly states the correct string count.
- Continuous discharge current rating: Must exceed your motor controller’s peak current. A 1000W 48V motor draws ~21A continuous; size your BMS for 30–40A to have headroom. For a 2000W motor, use a 60–80A BMS.
- Charge current rating: Matches your charger output. Standard e-bike chargers output 2–5A. A 5A charger on a 13S pack means the BMS charge input sees ~65W — well within the specs of most 30A+ BMS boards.
- Temperature protection: A quality BMS includes NTC thermistor inputs for pack temperature monitoring. It should cut charge and discharge when temperature exceeds 60°C (charge) or 70°C (discharge). This is especially important in India’s summer months.
- Balance function and threshold: Confirm the BMS uses balancing (not all cheap boards balance). Check the balance start voltage (typically 4.18V per cell) and balance current (50–150mA for passive).
- Communication port: Advanced BMS boards have a UART or CAN bus port for reading cell voltages, temperatures, and cycle counts via a phone app or display. Worth the extra cost for a large, expensive pack.
- Separate charge and discharge ports vs common port: Separate port BMS allows your charger to be always connected without the motor controller current flowing through the charger circuit. Common port BMS is simpler but requires careful connector choice.
Designing a 48V 13S E-Bike Pack
Let’s walk through designing a practical 48V 13S4P e-bike pack using 18650 cells:
Cell Selection
For a 1000W e-bike, use cells with at least 10A continuous discharge rating per cell. Samsung 25R (2500mAh, 20A), LG HG2 (3000mAh, 20A), or Molicel P26A (2600mAh, 35A) are solid choices. Avoid generic unbranded cells — capacity and discharge ratings are often wildly exaggerated.
Pack Configuration
13S4P means 13 groups in series, 4 cells in parallel per group.
- Nominal voltage: 13 × 3.6V = 46.8V
- Fully charged: 13 × 4.2V = 54.6V
- Capacity: 4 × 2500mAh = 10Ah → ~470Wh
- Max continuous discharge: 4 × 20A = 80A (at pack level; your controller likely pulls 20–40A peak)
- Estimated range: 470Wh ÷ 15Wh/km (typical Indian road) ≈ 31km per charge
Physical Layout
The 52 cells (13×4) can be arranged in a flat layout (4 cells wide × 13 long) or a cylindrical bundle depending on your frame’s battery space. Use 18650 cell holders for spacing, or spot-weld the cells directly with PVC spacers between them. Wrap the finished pack in fiberglass tape, then Kapton tape for electrical insulation before the final shrink-wrap.
BMS Wiring
The BMS balance leads must connect to each cell group junction, in order from group 1 (most negative) to group 13 (most positive), plus the negative terminal. For a 13S BMS, that’s 14 wires in total. Use 24 AWG wire for balance leads — they carry only milliamps. Use 12 AWG (minimum) silicone wire for the main charge and discharge current paths.
1S 3.7V 2A 1MOS BMS Li-ion 18650 Battery Protection Board
An affordable single-cell BMS for 18650 cells. Useful for individual parallel group protection testing before assembling into a full multi-string pack with a dedicated 13S BMS.
Maintenance and Troubleshooting Tips
Regular Checks
- Monthly cell voltage check: After a full charge, use a multimeter to check the voltage at each balance lead connector. All groups should be within 20–30mV of each other. If any group differs by more than 100mV after balancing, that group has a weak or dead cell.
- Capacity check every 6 months: Fully charge the pack, then discharge it at a controlled current (C/5 rate) and measure total Ah delivered. Compare to the original rated capacity. If capacity has dropped more than 20%, investigate the weakest cell group.
- Keep pack at 50–70% charge for long-term storage: Never store a lithium pack fully charged or fully discharged. Storage voltage: 3.7–3.8V per cell.
Common Problems
- BMS cuts off during high current draw: Usually means the overcurrent protection has triggered. Check whether you’re drawing more than the BMS’s rated discharge current. Also check for a degraded cell group with elevated internal resistance causing the protection to trigger prematurely.
- Charger stops early: One cell group reached 4.2V while others are lower (imbalance). Leave the charger connected — the BMS will balance and then resume charging. If it never completes, the imbalance is too large for passive balancing and you need to manually top-balance individual groups.
- BMS overheating: The BMS MOSFETs dissipate heat proportional to current² × resistance. Mount the BMS on a heat sink or attach it to the aluminium frame if possible. In Indian summers, BMS thermal protection trips are common when the BMS is sealed inside a pack without adequate airflow.
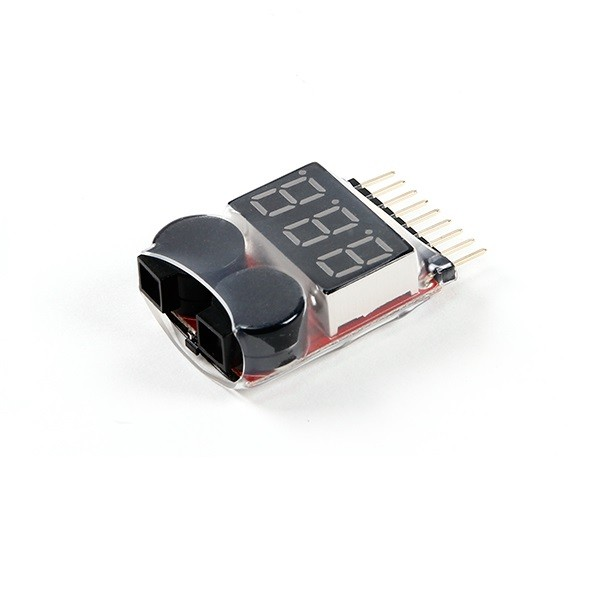
1-8S Lipo Battery Voltage Tester without alarm
Quickly check cell group voltages during your e-bike pack maintenance routine. Supports 1S to 8S configurations and displays per-cell voltage — an essential diagnostic tool for any e-bike pack builder.
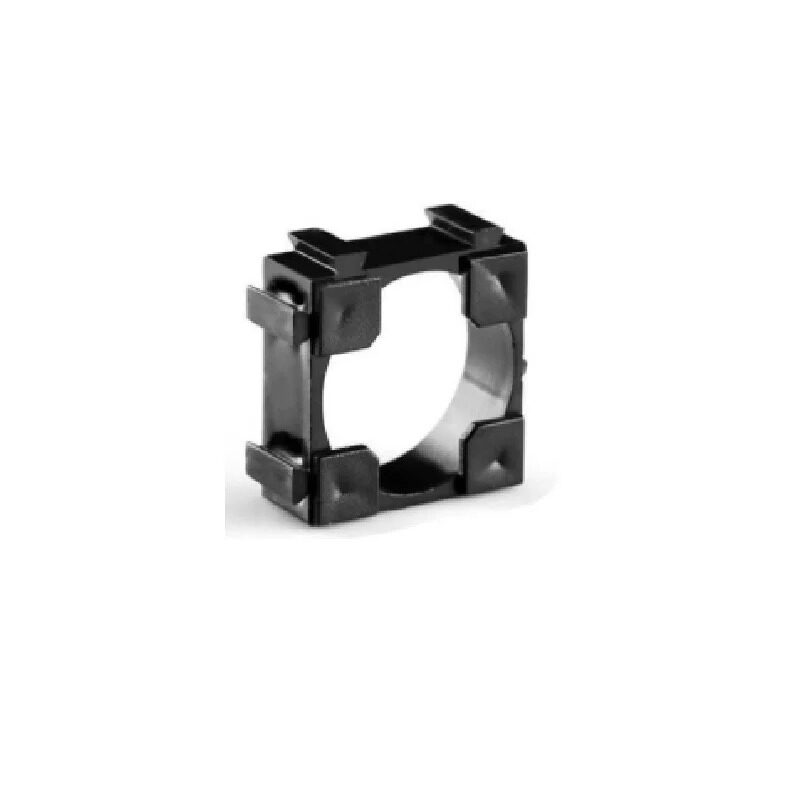
1 x 18650 Battery Holder (18.4mm Bore) – Pack of 4
Organise and space your 18650 cells correctly during pack assembly. These holders maintain consistent cell spacing for thermal management and make it easier to build a structurally sound pack before spot welding.
Frequently Asked Questions
Can I mix old and new 18650 cells in the same pack?
You should avoid mixing cells with significantly different capacities or internal resistances in the same parallel group. In a series-connected pack (each parallel group connected in series), different groups having different total capacities is acceptable. However, within a parallel group, all cells should be matched within 50–100mΩ of each other to prevent circulating currents between cells in the group.
What is top balancing vs bottom balancing?
Top balancing equalises cells at the fully charged voltage (4.2V per cell) — the standard approach for e-bikes. Bottom balancing equalises at the discharge cutoff (2.5–3.0V per cell) — historically preferred for packs without a BMS (like some early LiFePO4 EV packs) to prevent overdischarge of weak cells. For 18650 packs with a BMS, always top balance.
How long does passive balancing take on a heavily imbalanced pack?
With a typical 80mA balance current on a 10Ah pack with 500mAh imbalance, it would take 500mAh ÷ 0.08A = 6.25 hours of constant balancing. In practice, balancing only occurs at the top of the charge, so it may take 5–15 full charge cycles to resolve a large imbalance.
Do I need a BMS if I have a smart charger with cell balancing?
A smart charger with balancing only protects during charging. You still need a BMS during discharge to prevent overdischarge, overcurrent, and short-circuit events. Never use a multi-cell lithium pack without a BMS on the discharge path.
What certifications should I look for when buying a BMS in India?
Look for BMS boards that specify the protection IC used (DW01A, FS8205, HY2120, Seiko S-8241, etc.) — this allows you to verify specs independently. For commercial e-bike packs intended for road use, look for BIS certification. For DIY builds, verify specs through datasheets and community reviews rather than relying on marketplace listings.
Build Your E-Bike Pack with Confidence
A well-built e-bike battery pack with proper BMS and cell balancing is not just safer — it is more economical in the long run. The cost of replacing a failed pack far exceeds the cost of doing it right the first time. Start with quality cells, choose the right BMS for your current requirements, and check your pack’s balance regularly. Zbotic’s Batteries & Power section stocks all the BMS protection boards, charging modules, and battery hardware you need for your EV build.


Add comment