
Adding a visual interface to your ESP32 project transforms it from a headless sensor node into a complete embedded system. The ESP32 touch screen TFT ILI9341 2.8 inch guide you are about to read covers everything — from wiring and library setup to drawing graphics and building a real project with touch input. The 2.8-inch ILI9341 TFT display with XPT2046 resistive touch controller is one of the most popular display choices for ESP32 projects in India due to its low cost, 320×240 resolution, and excellent library support in the Arduino ecosystem.
ILI9341 Display Specs and Features
The ILI9341 is a 262K-color (18-bit) TFT LCD controller from Ilitek. The 2.8-inch variant is the most common form factor and offers an excellent balance between screen real estate and module size. Key specifications:
- Resolution: 320 x 240 pixels (QVGA)
- Color depth: 16-bit (65K colors) in normal mode, 18-bit (262K) in extended mode
- Interface: 4-wire SPI (up to 40MHz) — very fast for a microcontroller display
- Touch controller: XPT2046 (resistive) — also SPI, shares bus with display
- Operating voltage: 3.3V logic (5V tolerant on most modules with level shifters)
- Backlight: White LED, controlled via PWM for brightness adjustment
- Viewing angle: Good from front, limited off-axis (typical for TN-type TFT)
The 2.8-inch ILI9341 module typically has two SPI chip select pins — one for the display (DC/CS) and one for the touch controller (T_CS). Both share the same SPI MISO/MOSI/SCLK lines, which is efficient.
Compared to alternatives like the ST7735 (1.8-inch, lower resolution) and ILI9488 (3.5-inch, higher resolution), the ILI9341 2.8-inch hits the sweet spot for ESP32 projects — large enough for a useful UI, fast enough for smooth animations, and affordable enough for hobby projects.
Waveshare ESP32-S3 1.43inch AMOLED Display Development Board, 466×466
Looking for an ESP32 with an integrated high-quality display? This Waveshare ESP32-S3 board has a stunning 1.43-inch AMOLED screen with QSPI interface, perfect for wearables and compact IoT dashboards.
Wiring ESP32 to ILI9341 TFT Display
The ILI9341 module connects to ESP32 via SPI. While the ESP32 has hardware SPI on multiple pin sets, the most common wiring uses VSPI (SPI2). Here is the recommended pin mapping:
| ILI9341 Module Pin | ESP32 Pin | Notes |
|---|---|---|
| VCC | 3.3V | Do NOT use 5V directly |
| GND | GND | Common ground |
| CS (Chip Select) | GPIO 15 | Display CS |
| RESET | GPIO 4 | Or connect to 3.3V if not needed |
| DC/RS (Data/Command) | GPIO 2 | Command/Data select |
| MOSI (SDI) | GPIO 23 | VSPI MOSI |
| SCK (SCLK) | GPIO 18 | VSPI Clock |
| MISO (SDO) | GPIO 19 | VSPI MISO (needed for touch) |
| LED (Backlight) | GPIO 21 (or 3.3V) | PWM for brightness control |
| T_CS (Touch CS) | GPIO 5 | XPT2046 Chip Select |
| T_IRQ (Touch Interrupt) | GPIO 27 | Optional interrupt pin |
Note: GPIO 2 is the built-in LED on many ESP32 boards. If you see the LED flashing during display operation, that is why. You can use a different pin for DC if needed.
Library Setup: TFT_eSPI vs Adafruit ILI9341
There are two main library options for ILI9341 with ESP32:
TFT_eSPI (Recommended)
TFT_eSPI by Bodmer is the most popular and performant TFT library for ESP8266/ESP32. It uses DMA transfers for much faster rendering compared to Adafruit’s library. Install it from Arduino Library Manager (search “TFT_eSPI”).
After installation, you must configure the library for your specific display. Navigate to the TFT_eSPI library folder (typically in Arduino/libraries/TFT_eSPI/) and edit User_Setup.h:
// Uncomment the driver for your display
#define ILI9341_DRIVER

// Set your pins
#define TFT_CS   15
#define TFT_DC    2
#define TFT_RST   4
#define TFT_MOSI 23
#define TFT_SCLK 18
#define TFT_MISO 19

// Enable touch screen
#define TOUCH_CS 5

// SPI frequency
#define SPI_FREQUENCY  40000000
#define SPI_TOUCH_FREQUENCY  2500000
Then in your sketch:
#include <TFT_eSPI.h>

TFT_eSPI tft = TFT_eSPI();

void setup() {
  tft.init();
  tft.setRotation(1); // Landscape mode
  tft.fillScreen(TFT_BLACK);
  tft.setTextColor(TFT_WHITE, TFT_BLACK);
  tft.setTextSize(2);
  tft.drawString("Hello, India!", 50, 100);
}
Adafruit ILI9341
The Adafruit library is easier to configure (no header file editing needed) but slower for complex graphics. It is a good choice for beginners:
#include <Adafruit_GFX.h>
#include <Adafruit_ILI9341.h>

#define TFT_CS  15
#define TFT_DC   2
#define TFT_RST  4

Adafruit_ILI9341 tft = Adafruit_ILI9341(TFT_CS, TFT_DC, TFT_RST);

void setup() {
  tft.begin();
  tft.fillScreen(ILI9341_BLACK);
  tft.setTextColor(ILI9341_WHITE);
  tft.setTextSize(2);
  tft.println("Hello!");
}
Drawing Graphics: Text, Shapes, and Images
With TFT_eSPI, you have a rich set of drawing functions. Here are the most useful ones:
// Colors (16-bit RGB565 format)
// Common: TFT_BLACK, TFT_WHITE, TFT_RED, TFT_GREEN, TFT_BLUE, TFT_YELLOW
// Custom: tft.color565(r, g, b)

// Clear screen
tft.fillScreen(TFT_BLACK);

// Drawing shapes
tft.drawRect(10, 10, 100, 50, TFT_WHITE);   // Outline rectangle
tft.fillRect(10, 10, 100, 50, TFT_BLUE);    // Filled rectangle
tft.drawCircle(160, 120, 50, TFT_RED);      // Circle outline
tft.fillCircle(160, 120, 50, TFT_GREEN);    // Filled circle
tft.drawLine(0, 0, 319, 239, TFT_YELLOW);  // Line
tft.drawTriangle(160,10, 10,230, 310,230, TFT_WHITE); // Triangle

// Text rendering
tft.setTextColor(TFT_WHITE, TFT_BLACK); // Text color, background
tft.setTextSize(1);   // 6x8 pixels per char
tft.setTextSize(2);   // 12x16 pixels per char
tft.drawString("Temperature:", 10, 20);  // at x=10, y=20
tft.drawFloat(27.5, 1, 150, 20);         // Float with 1 decimal
tft.drawNumber(42, 10, 50);              // Integer

// Sprites (buffer off-screen, then display - avoids flicker)
TFT_eSprite sprite = TFT_eSprite(&tft);
sprite.createSprite(200, 50);  // 200x50 pixel buffer
sprite.fillSprite(TFT_BLACK);
sprite.drawString("No flicker!", 10, 15);
sprite.pushSprite(10, 100);    // Draw at screen position 10,100
sprite.deleteSprite();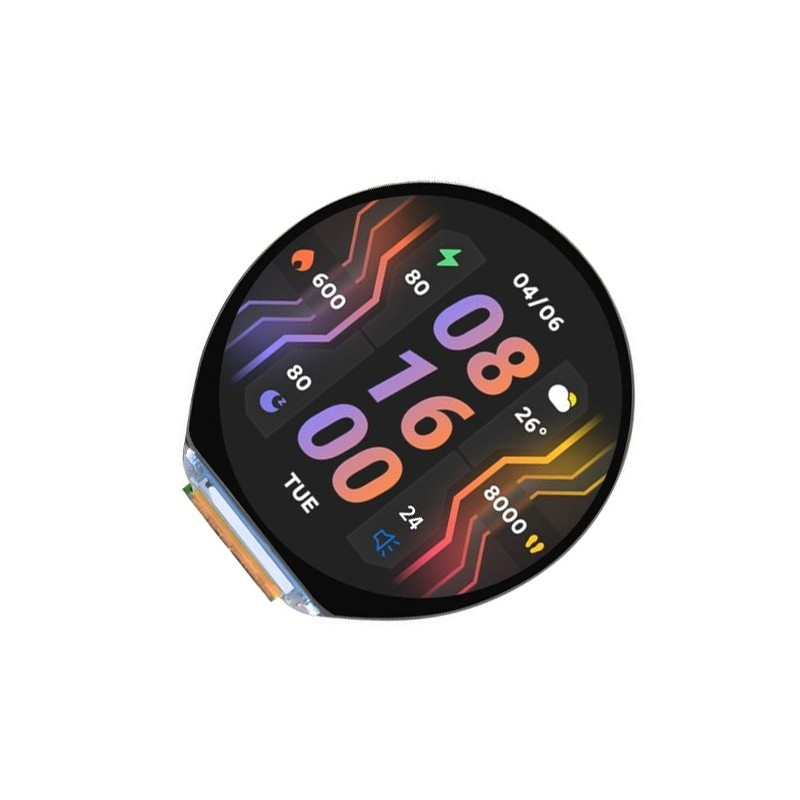
Waveshare ESP32-S3 1.46inch Round Display Development Board, 412×412
A premium all-in-one option: this Waveshare board integrates a beautiful 1.46-inch round display with ESP32-S3, WiFi, Bluetooth, accelerometer, gyroscope, speaker, and microphone — ideal for smartwatch and compact IoT projects.
Implementing Touch Input with XPT2046
The XPT2046 resistive touch controller communicates over SPI at a lower frequency than the display. The XPT2046_Touchscreen library by Paul Stoffregen works perfectly with TFT_eSPI:
#include <XPT2046_Touchscreen.h>

#define TOUCH_CS  5
#define TOUCH_IRQ 27 // Optional

XPT2046_Touchscreen ts(TOUCH_CS, TOUCH_IRQ);

void setup() {
  ts.begin();
  ts.setRotation(1); // Match display rotation
}

void loop() {
  if (ts.touched()) {
    TS_Point p = ts.getPoint();
    // Raw values are 0-4095, need mapping to screen coords
    int x = map(p.x, 200, 3900, 0, 320);
    int y = map(p.y, 300, 3800, 0, 240);
    Serial.printf("Touch at screen: %d, %dn", x, y);

    // Draw a dot where touched
    tft.fillCircle(x, y, 3, TFT_RED);
  }
}
Resistive touch calibration is important. The raw values (200-3900 in the example above) vary between modules. You need to calibrate by touching the corners and noting the raw XPT2046 readings, then adjusting the map() parameters accordingly. TFT_eSPI includes a calibration example sketch (Touch_calibrate) that generates the exact calibration values for your specific module.
Practical Project: WiFi Weather Display
Let us build a practical project: a WiFi-connected weather display that shows current temperature, humidity, and time on the ILI9341 screen with a touch button to refresh data.
The project architecture:
- ESP32 connects to WiFi and syncs time via NTP
- Fetches weather data from a free API (OpenWeatherMap has a free tier)
- Displays data on ILI9341 in a clean layout with icons
- Touch anywhere on screen to refresh data immediately
- Auto-refresh every 15 minutes
#include <WiFi.h>
#include <HTTPClient.h>
#include <ArduinoJson.h>
#include <TFT_eSPI.h>
#include <XPT2046_Touchscreen.h>

TFT_eSPI tft = TFT_eSPI();
XPT2046_Touchscreen ts(5, 27);

const char* ssid = "YOUR_WIFI";
const char* password = "YOUR_PASS";
const char* apiKey = "YOUR_OPENWEATHER_KEY";
const char* city = "Mumbai,IN";

void fetchWeather() {
  HTTPClient http;
  String url = "http://api.openweathermap.org/data/2.5/weather?q="
               + String(city) + "&appid=" + String(apiKey)
               + "&units=metric";
  http.begin(url);
  int httpCode = http.GET();
  if (httpCode == HTTP_CODE_OK) {
    String payload = http.getString();
    StaticJsonDocument<1024> doc;
    deserializeJson(doc, payload);
    float temp = doc["main"]["temp"];
    int humidity = doc["main"]["humidity"];
    String desc = doc["weather"][0]["description"];

    tft.fillScreen(TFT_BLACK);
    tft.setTextColor(TFT_YELLOW); tft.setTextSize(3);
    tft.drawString(city, 10, 10);
    tft.setTextColor(TFT_WHITE); tft.setTextSize(4);
    tft.drawFloat(temp, 1, 60, 80);
    tft.drawString("C", 220, 80);
    tft.setTextSize(2);
    tft.drawString("Humidity: " + String(humidity) + "%", 10, 170);
    tft.drawString(desc, 10, 200);
  }
  http.end();
}

void setup() {
  tft.init(); tft.setRotation(1);
  ts.begin(); ts.setRotation(1);
  tft.fillScreen(TFT_BLACK);
  tft.drawString("Connecting...", 80, 110);
  WiFi.begin(ssid, password);
  while (WiFi.status() != WL_CONNECTED) delay(500);
  fetchWeather();
}

void loop() {
  if (ts.touched()) {
    delay(50);
    if (ts.touched()) fetchWeather();
  }
  static unsigned long lastUpdate = 0;
  if (millis() - lastUpdate > 900000) { // 15 minutes
    fetchWeather();
    lastUpdate = millis();
  }
}
Advanced Tips: LVGL and Custom Fonts
For professional-looking interfaces, consider using LVGL (Light and Versatile Graphics Library). LVGL is a free, open-source graphics library designed for embedded systems that provides buttons, sliders, charts, meters, and other UI widgets. It works with TFT_eSPI as the display driver.
LVGL requires at least 32KB RAM for the frame buffer, which the ESP32 provides comfortably. The library is available as an Arduino library and has excellent documentation. For complex IoT dashboards, LVGL dramatically reduces development time compared to drawing everything manually.
For custom fonts in TFT_eSPI, use the online Font Converter at rop.nl/truetype2gfx to convert TrueType fonts to C header files. This lets you use Devanagari, custom icon fonts, or any TTF font in your ESP32 display projects.
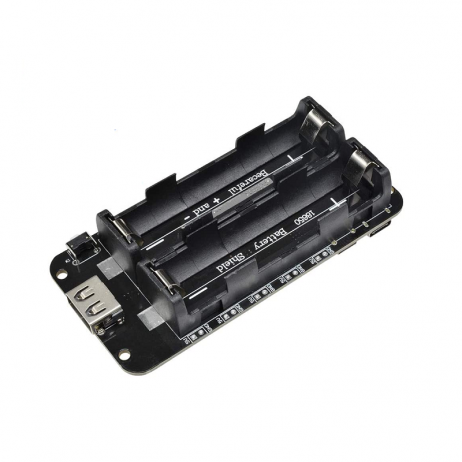
2 x 18650 Lithium Battery Shield for Arduino/ESP32/ESP8266
Power your ESP32 + ILI9341 display project portably with this dual 18650 battery shield. The TFT backlight draws significant current — the 5V/3A output from this shield ensures stable power for both the ESP32 and display.
Frequently Asked Questions
Why is my ILI9341 display showing only white or black screen?
This is almost always a wiring or configuration issue. Check: (1) VCC is connected to 3.3V not 5V, (2) CS and DC pins match what you defined in User_Setup.h (TFT_eSPI) or the constructor (Adafruit), (3) MOSI and SCLK are connected correctly, (4) The LED/backlight pin is connected to 3.3V or a PWM pin. Also ensure the User_Setup.h correctly sets #define ILI9341_DRIVER.
Can I use the ILI9341 display with the ESP32-CAM?
The ESP32-CAM has limited exposed GPIO pins, making it tricky but possible. The SD card and camera use most of the SPI pins. You would need to either use software SPI (slower) or disable the SD card. For display-heavy projects, use a regular ESP32 DevKit instead of ESP32-CAM.
How do I rotate the display orientation?
Use tft.setRotation(n) where n is 0-3 (0=portrait, 1=landscape, 2=portrait inverted, 3=landscape inverted). Also set the same rotation on the touch controller: ts.setRotation(n). The touch X/Y mapping may need to be swapped or inverted depending on the rotation.
What is the maximum SPI speed for ILI9341 with ESP32?
The ILI9341 datasheet specifies a maximum SPI write cycle of 100ns, which corresponds to 10MHz. However, many modules reliably work at 40MHz or even higher due to PCB quality and ESP32’s SPI implementation. Set SPI_FREQUENCY 40000000 in TFT_eSPI. If you get display corruption, reduce to 27MHz or 20MHz.
Is there a way to display JPG or PNG images on ILI9341?
Yes. TFT_eSPI includes a JPEG decoder (TJpgDec) that can decode JPEG images from SPIFFS, SD card, or program memory and render them directly to the display. PNG support requires the PNGdec library. Store images in SPIFFS (ESP32’s internal flash filesystem) for access without an SD card.
Build Your ESP32 Display Project Today
Get all the ESP32 modules, displays, and sensors you need from Zbotic. We offer a wide range of Waveshare display development boards and standard ESP32 modules with fast delivery across India.


Add comment