
ESP-NOW is one of the most underrated features of Espressif’s ESP32 and ESP8266 microcontrollers — a lightweight, connection-free wireless communication protocol that lets two or more ESP devices talk to each other directly, without needing a WiFi router or internet connection. If you have ever wanted to build a wireless sensor network in your home or factory, or create a multi-node weather station, ESP-NOW is the technology you should learn. This tutorial walks you through everything from the basics to a working multi-node example with Arduino code.
What Is ESP-NOW?
ESP-NOW is a proprietary communication protocol developed by Espressif that operates in the 2.4 GHz ISM band using the 802.11 WiFi radio hardware. Unlike standard WiFi, it does not require an access point, router or internet infrastructure of any kind. Instead, it enables direct device-to-device communication similar to a walkie-talkie — one device transmits, another receives, all in the same short-range radio spectrum.
The protocol was designed for low-power, low-latency use cases where setting up a full WiFi infrastructure is impractical. Each packet is small (up to 250 bytes of payload), transmission latency is as low as 1 millisecond, and multiple peer relationships can be maintained simultaneously (up to 20 peers in unicast and unlimited in broadcast mode).
ESP-NOW works on the ESP8266, ESP32, ESP32-S2, ESP32-S3 and ESP32-C3 — which means you can mix and match these devices in a single network. A master ESP32 can collect data from multiple ESP8266 sensor nodes, for example, which is a very common pattern in Indian smart home and agricultural IoT projects.
How ESP-NOW Works
At the protocol level, ESP-NOW works by registering “peers” identified by their MAC addresses. Once a peer is registered, you can send data packets to that MAC address directly. The receiving device must have a callback function registered to handle incoming data. Here is the flow:
- Initialise ESP-NOW using
esp_now_init() - Register callbacks for send status (
esp_now_register_send_cb()) and receive (esp_now_register_recv_cb()) - Register peers by adding their MAC addresses using
esp_now_add_peer() - Send data using
esp_now_send()— pass the peer’s MAC address and your data buffer - Receive data automatically in the receive callback whenever another device sends to your MAC
The WiFi radio handles acknowledgements at the hardware level, so you do not need to implement your own retry logic for basic reliability. Your send callback tells you whether the transmission was received by the peer.
An important detail: ESP-NOW and WiFi station mode can coexist on the same ESP32. This means a device can simultaneously be connected to a WiFi router for internet access AND communicate with other ESP-NOW peers. However, when WiFi station mode is active, all ESP-NOW devices in the network must operate on the same WiFi channel as the connected router.
Advantages Over WiFi and Bluetooth
| Feature | ESP-NOW | WiFi (MQTT/HTTP) | Bluetooth BLE |
|---|---|---|---|
| Requires Router | No | Yes | No |
| Connection Setup | None (connectionless) | Association + DHCP | Pairing required |
| Latency | ~1–10 ms | 50–500 ms+ | 10–100 ms |
| Range (indoor) | ~50–200 m | ~30–100 m (AP dependent) | ~10–40 m |
| Max Payload | 250 bytes | Unlimited | 20 bytes (MTU, extensible) |
| Power (active TX) | Very short bursts | Sustained high | Low |
| Max Peers | 20 unicast + broadcast | Unlimited (via MQTT) | 7 (piconet) |
| Works Without Internet | Yes | Local only (MQTT broker) | Yes |
Hardware You Need
For this tutorial, you need at least two ESP32 development boards. The code examples below use the Arduino ESP32 core and will work on any ESP32-based board including the NodeMCU-32S, ESP32 DevKit, or ESP32-CAM. For the multi-node sensor example, we will also use a DHT11 temperature sensor on the sender node.
Make sure you have the MAC address of each board’s WiFi interface. You can find this by running a simple sketch that calls WiFi.macAddress() before setting up ESP-NOW.

Ai Thinker NodeMCU-32S-ESP32 Development Board – IPEX Version
The ideal board for ESP-NOW experiments — buy two or more of these and you are ready to build a wireless sensor network. The IPEX antenna connector improves range.
Tutorial: One-Way Communication (Sender to Receiver)
Let’s start with the simplest ESP-NOW setup: one sender board transmitting data to one receiver board.
Step 1: Find the Receiver’s MAC Address
Upload this sketch to the receiver board and note the MAC address printed in the Serial Monitor:
#include <WiFi.h>
void setup() {
  Serial.begin(115200);
  WiFi.mode(WIFI_STA);
  Serial.print("Receiver MAC: ");
  Serial.println(WiFi.macAddress());
}
void loop() {}
Step 2: Sender Code
Replace the MAC address in the array below with your receiver’s actual MAC address:
#include <esp_now.h>
#include <WiFi.h>

// Replace with receiver's actual MAC address
uint8_t receiverMAC[] = {0xAA, 0xBB, 0xCC, 0xDD, 0xEE, 0xFF};

typedef struct SensorData {
  float temperature;
  float humidity;
  int   nodeID;
} SensorData;

SensorData myData;
esp_now_peer_info_t peerInfo;

void onSent(const uint8_t *mac, esp_now_send_status_t status) {
  Serial.print("Send status: ");
  Serial.println(status == ESP_NOW_SEND_SUCCESS ? "OK" : "FAIL");
}

void setup() {
  Serial.begin(115200);
  WiFi.mode(WIFI_STA);
  if (esp_now_init() != ESP_OK) { Serial.println("ESP-NOW init failed"); return; }
  esp_now_register_send_cb(onSent);
  memcpy(peerInfo.peer_addr, receiverMAC, 6);
  peerInfo.channel = 0;  // 0 = current channel
  peerInfo.encrypt = false;
  if (esp_now_add_peer(&peerInfo) != ESP_OK) { Serial.println("Add peer failed"); return; }
  Serial.println("ESP-NOW sender ready");
}

void loop() {
  myData.nodeID = 1;
  myData.temperature = 28.5 + random(-20, 20) / 10.0;  // simulate sensor
  myData.humidity    = 65.0 + random(-50, 50) / 10.0;
  esp_now_send(receiverMAC, (uint8_t*)&myData, sizeof(myData));
  delay(2000);
}
Step 3: Receiver Code
#include <esp_now.h>
#include <WiFi.h>

typedef struct SensorData {
  float temperature;
  float humidity;
  int   nodeID;
} SensorData;

SensorData incoming;

void onReceive(const esp_now_recv_info_t *info, const uint8_t *data, int len) {
  memcpy(&incoming, data, sizeof(incoming));
  Serial.printf("Node %d: Temp=%.1f°C  Humidity=%.1f%%n",
                incoming.nodeID, incoming.temperature, incoming.humidity);
}

void setup() {
  Serial.begin(115200);
  WiFi.mode(WIFI_STA);
  if (esp_now_init() != ESP_OK) { Serial.println("ESP-NOW init failed"); return; }
  esp_now_register_recv_cb(onReceive);
  Serial.println("ESP-NOW receiver ready");
}

void loop() {}
Upload the sender code to Board 1 and the receiver code to Board 2. Open the Serial Monitor on Board 2 and you should see temperature and humidity data arriving every 2 seconds — no WiFi router, no internet, no broker needed.
Tutorial: Bi-Directional Communication
For bi-directional communication (both boards send and receive), both devices must register each other as peers, and both must register send and receive callbacks. This is the basis for remote control applications where the controller sends commands and the receiver sends back acknowledgements or sensor readings.
The key insight is that a board can simultaneously be a sender and a receiver in ESP-NOW. You simply add both callbacks and both peer registrations in setup(), and the protocol handles the rest. In bidirectional mode, each board has the other’s MAC address registered as a peer, and both call esp_now_send() to transmit and have an active onReceive callback for incoming messages.
Multi-Node Sensor Network
A common pattern for Indian IoT projects is a “star” topology where one master ESP32 (connected to WiFi and optionally an MQTT broker) collects data from multiple sensor nodes. Each sensor node wakes from deep sleep, reads its sensor, transmits data via ESP-NOW to the master, and immediately goes back to deep sleep. The master stays always-on and forwards received data to the cloud.
This architecture is extremely power-efficient for the sensor nodes. An ESP32 in deep sleep draws only ~10 µA. If it wakes every 5 minutes, reads a sensor and transmits ~50 bytes of data via ESP-NOW (which takes under 50 ms of active radio time), the average current consumption over the full cycle can be under 100 µA — meaning a 2000 mAh 18650 battery can last over 2 years on a sensor node.
The master node simply receives from any registered peer (or broadcasts in promiscuous receive mode) and routes the data to MQTT or an HTTP API. In the receive callback, you can use the sender’s MAC address to identify which node the data came from.

DHT20 SIP Packaged Temperature and Humidity Sensor
An I2C temperature and humidity sensor with excellent accuracy — ideal for ESP-NOW sensor nodes that need to minimise wake time and power consumption.
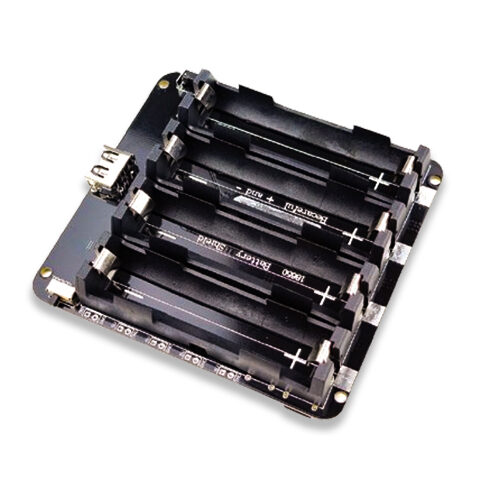
4 x 18650 Lithium Battery Shield V8/V9 for ESP32 with On-Off Button
Power your always-on ESP-NOW master node or multiple sensor nodes with this quad-cell battery shield — ideal for extended deployments without mains power.
Improving Range and Reliability
- Use IPEX antenna modules: The PCB antenna on standard WROOM modules has limited range (~50 m open field). Modules with an IPEX connector (like the NodeMCU-32S IPEX version) allow you to attach an external dipole antenna for 2–3x range improvement.
- Fix WiFi channel: If some nodes use WiFi station mode and others use ESP-NOW only, all devices must operate on the same channel. Check the channel your router uses and configure pure-ESP-NOW devices accordingly.
- Long Range (LR) mode: ESP32 (not ESP8266 or C3) supports a proprietary Long Range WiFi mode that extends ESP-NOW range to ~1 km in open field at the cost of reduced throughput. Enable with
esp_wifi_set_protocol(WIFI_IF_STA, WIFI_PROTOCOL_LR). - Power supply stability: Unreliable power (weak batteries, long thin wires) causes random radio resets that manifest as missed transmissions. Use quality 18650 cells or a filtered 3.3V regulator.
- Retransmission logic: ESP-NOW provides hardware-level acknowledgement, but your application should implement retries for critical data. On send failure callback, queue the data and retry after a short delay.

GY-BME280-3.3 Precision Altimeter Atmospheric Pressure Sensor Module
A BME280 module providing temperature, humidity and pressure readings over I2C. An excellent multi-parameter sensor for ESP-NOW weather station nodes.
Frequently Asked Questions
Does ESP-NOW work without a WiFi network or router?
Yes, that is its primary advantage. ESP-NOW is completely independent of any WiFi infrastructure. Devices communicate directly using their MAC addresses. You do not need a router, an internet connection, or any cloud service. This makes it ideal for offline sensor networks in rural India where internet connectivity may be unreliable or absent.
Can ESP-NOW work alongside WiFi on the same ESP32?
Yes. An ESP32 can simultaneously maintain a WiFi station connection (for internet access) and communicate via ESP-NOW with other devices. The constraint is that all ESP-NOW peers must operate on the same WiFi channel as the router. If the WiFi channel changes (some routers do this automatically), ESP-NOW communication will break until all nodes are updated to the new channel.
Is ESP-NOW secure? Can someone sniff my data?
ESP-NOW supports AES-128 CCM encryption for peer-to-peer communication. Broadcast messages cannot be encrypted. To enable encryption, set peerInfo.encrypt = true and provide a 16-byte PMK (Primary Master Key) and LMK (Local Master Key). Without encryption, anyone with a 2.4 GHz packet sniffer can read your ESP-NOW payload — so for sensitive data like security systems, always enable encryption.
How many ESP32 nodes can I have in one ESP-NOW network?
A single ESP32 can maintain up to 20 encrypted peers (unicast). If you use unencrypted communication, the limit is effectively much higher — devices can receive from any sender by using the promiscuous receive callback. For large networks (20+ nodes), a star topology with a central gateway that routes data to a cloud broker over WiFi is the recommended architecture.
Does ESP-NOW work between ESP32 and ESP8266?
Yes. ESP-NOW is compatible across the ESP32, ESP8266, ESP32-S3, ESP32-C3 and other Espressif chips. You can have an ESP32 master collecting data from cheaper ESP8266 nodes, which is a cost-effective strategy for large sensor deployments where the gateway needs the extra processing power and the nodes just need to read a sensor and transmit.
Conclusion
ESP-NOW is a powerful, underutilised tool in every ESP32 maker’s toolkit. It enables wireless communication with millisecond latency, no router dependency, and extremely low power consumption for battery-operated nodes. Whether you are building a multi-room temperature monitoring system for an Indian home, a field sensor network for an agricultural application, or a wireless remote control for a robot — ESP-NOW is often the best choice when simplicity, speed and offline operation matter.
The learning curve is gentle: if you can write basic Arduino code for the ESP32, you can have a working ESP-NOW link running in under an hour with the examples in this tutorial. Start with a simple one-way sender/receiver pair and work your way up to a multi-node star network as your confidence grows.
Get all the ESP32 boards, modules and sensors you need for your ESP-NOW projects from Zbotic’s IoT collection — fast shipping across India, competitive prices and genuine products from Ai Thinker, Waveshare and Espressif.


Add comment