
Table of Contents
- What is Betaflight?
- What Are PIDs and Why Do They Matter?
- Tools You Need Before You Start
- Step 1: Flying on Default PIDs First
- Step 2: Enable Blackbox Logging
- Step 3: Understanding P, I, and D Gains
- Step 4: Tuning the P Gain
- Step 5: Tuning the I Gain
- Step 6: Tuning the D Gain
- Step 7: RPM Filters and Gyro Filters
- Common Mistakes Indian Beginners Make
- Recommended Products from Zbotic
- FAQ
What is Betaflight?
Betaflight is the most popular open-source flight controller firmware used worldwide — and increasingly in India’s growing FPV drone community. If you have ever watched a freestyle drone pilot rip through the air with incredible precision, there’s a good chance that drone was running Betaflight. Originally a fork of Cleanflight, Betaflight has evolved into the go-to firmware for racing drones, freestyle quads, and even beginner builds.
Betaflight runs on a wide variety of flight controllers based on STM32 microcontrollers. It handles everything from reading gyroscope and accelerometer data to sending precise throttle commands to your ESCs. The magic that makes your drone fly smoothly lies inside Betaflight’s PID controller — and that’s exactly what this guide is about.
Whether you are building your first 5-inch freestyle quad or you have been flying for a year and want to stop the dreaded propwash oscillations, this beginner-friendly PID tuning guide will walk you through the entire process step-by-step, tailored for hobbyists in India where components sourced from Zbotic.in are becoming increasingly popular.
What Are PIDs and Why Do They Matter?
PID stands for Proportional, Integral, and Derivative. These three mathematical terms describe how a control system (in this case, your flight controller) responds to errors — the difference between what you want your drone to do and what it’s actually doing.
Imagine you command your drone to hold a 45-degree roll angle. The gyroscope measures the actual angle and feeds that data back to the PID controller. The PID then calculates how hard the motors need to work to achieve and maintain that angle. If the PID values are wrong, your drone will either overshoot (oscillate wildly), undershoot (feel sluggish and unresponsive), or wobble continuously.
Here’s a quick intuitive breakdown:
- P (Proportional): Responds to the current error. High P = fast, snappy response but can cause oscillations. Low P = sluggish, mushy feel.
- I (Integral): Responds to accumulated error over time. Fixes steady-state drift. Too high = slow oscillations. Too low = drone drifts or can’t hold a position in wind.
- D (Derivative): Responds to the rate of change of error. Acts as a dampener. High D = smooth, less overshoot but can cause motor heat. Too low = propwash after manoeuvres.
Good PID tuning results in a drone that feels locked-in, responsive, and smooth — exactly what you want for FPV racing or freestyle flying.
Tools You Need Before You Start
Before diving into PID tuning, make sure you have the following ready:
- Betaflight Configurator: Download the latest version from the official Betaflight GitHub page. It runs on Windows, Mac, and Linux.
- USB Cable: To connect your flight controller to your PC. A data cable is essential — many cheap phone cables are charge-only.
- Blackbox-capable FC: Most modern flight controllers have built-in flash memory or an SD card slot for Blackbox logging.
- Blackbox Explorer: Free software from the Betaflight team to analyse your flight logs.
- DVR or HD camera: To record flights and visually inspect oscillations.
- Props on and props off: You’ll do some testing with propellers removed for safety.
Also ensure your ESCs are properly calibrated and your motors are in good health before you start blaming PIDs for flight issues. A wobbly motor bearing or a bent propeller will make PID tuning impossible.
Step 1: Flying on Default PIDs First
Many beginners make the mistake of immediately changing PIDs before even taking a flight. Don’t do this. Betaflight’s default PID values are actually quite reasonable for a typical 5-inch quad. Your first job is to fly on defaults and assess what the problems are.
During your test flight, ask yourself:
- Does the drone oscillate on fast direction changes (propwash)?
- Is it bouncy on fast rolls and flips?
- Does it feel too sluggish when you push the sticks?
- Does it drift in a hover without any input?
- Do the motors get unusually hot after a 2-minute flight?
Each of these symptoms points to a different PID problem. Write down what you observe because this will guide your tuning session.
If you are flying a heavy agricultural or surveillance frame (like 6-inch or larger), the default PIDs may feel extremely sluggish and you’ll need to raise P gains early. Lighter racing frames on default PIDs usually fly acceptably out of the box.
Step 2: Enable Blackbox Logging
Blackbox logging is a game-changer for PID tuning. Without it, you are essentially guessing. The Blackbox records your gyroscope data, PID outputs, motor commands, RC inputs, and much more at very high sample rates (up to 4kHz).
To enable Blackbox in Betaflight Configurator:
- Go to the Blackbox tab.
- Select your logging device (Flash, SD Card, or Serial).
- Set the logging rate to 1/4 (250Hz) for starters — higher rates fill storage faster.
- Save and reboot.
After a flight, download the log file using the Blackbox tab (for flash) or directly from the SD card. Open it in Blackbox Explorer. You want to look at the gyro trace vs the setpoint trace:
- If the gyro trace is jagged and noisy = needs more D or filtering.
- If the gyro trace overshoots the setpoint = P is too high.
- If the gyro trace lags far behind the setpoint = P is too low.
- Low-frequency oscillations after manoeuvres = propwash = needs D tune.
Step 3: Understanding P, I, and D Gains in Betaflight
In Betaflight’s PID tab, you’ll find separate P, I, and D values for Roll, Pitch, and Yaw axes. You also have Feed Forward (FF) which helps the drone react to stick inputs faster, but we’ll focus on the core PIDs for this beginner guide.
Typical starting values for a 5-inch freestyle quad:
- Roll P: 42–48, I: 85, D: 36–42
- Pitch P: 46–52, I: 85, D: 38–44
- Yaw P: 35–45, I: 90, D: 0–10
Betaflight uses a unified PID controller where the same algorithm runs for all axes. The numbers themselves are unitless — they are multipliers that scale the response. Don’t get hung up on the specific values; focus on the direction (higher or lower) based on your observations.
One important tip for Indian hobbyists: the quality of your ESCs and motors significantly affects how PID tuning behaves. A 35A 4-in-1 ESC with Bidirectional DSHOT enabled and RPM filtering active will be much easier to tune than older ESCs without telemetry.

35A V2.1 2-5S 4-in-1 Brushless ESC for FPV Racing
A quality 4-in-1 ESC is the foundation of good PID tuning. This 35A ESC supports BLHeli_32 and Bidirectional DSHOT for RPM filtering in Betaflight.
Step 4: Tuning the P Gain
The P gain is your starting point. It’s the primary driver of response. Here’s how to tune it methodically:
Signs P is too high:
- High-frequency oscillations visible as a fast buzz in the video or felt in the sticks.
- Motors get hot quickly.
- The drone feels twitchy and nervous.
Signs P is too low:
- The drone feels sluggish and doesn’t respond quickly to inputs.
- It doesn’t hold its attitude in wind.
- Rolls and flips feel slow and loose.
Tuning procedure:
- Start with P at a medium value (Roll: 45, Pitch: 48).
- Do a series of sharp rolls and quick stops.
- Check Blackbox or video for oscillations.
- If oscillating: reduce P by 5 and repeat.
- If sluggish: raise P by 5 and repeat.
- Find the point just below where oscillations appear — that’s your P sweet spot.
A practical tip: always tune Roll and Pitch P separately. On most frames, Pitch P needs to be slightly higher than Roll P because the pitch axis is heavier and less responsive due to the battery placement.
Step 5: Tuning the I Gain
The I gain (Integral) is often misunderstood by beginners. It corrects for sustained errors that P alone cannot fix. The most common symptom of improper I is a wobble that occurs during sustained hard turns or when flying in wind.
Signs I is too high:
- Slow, low-frequency oscillations that build up over a few seconds.
- The drone oscillates when you hold a constant throttle and angle for a few seconds.
Signs I is too low:
- The drone drifts or wanders during a sustained roll or pitch.
- It can’t hold a consistent angle in wind.
- “I-term windup” on hard manoeuvres (though Betaflight has anti-windup built in).
For most builds, the default I values work well. You rarely need to dramatically change I. However, if you are flying in India’s windy conditions — especially coastal areas or open fields — you may want to increase I slightly (by 10–15 points) to help the drone fight wind drift.
Iterm Relax is a feature in Betaflight (under the PID tab) that prevents I windup during fast manoeuvres. Keep this enabled — it’s one of the best features added in recent Betaflight versions.
Step 6: Tuning the D Gain
D gain is the dampener. It smooths out the response after P has pushed the drone towards the setpoint. D is responsible for reducing propwash — the nasty oscillation you see when a drone exits a fast power move.
Signs D is too high:
- Motors run hot even without aggressive flying.
- High-frequency noise in the gyro trace (look at Blackbox).
- The drone feels “sticky” and doesn’t flow smoothly through manoeuvres.
Signs D is too low:
- Propwash oscillations after dives and fast direction changes.
- Overshoot at the end of rolls and flips.
- The drone bounces at the end of every move.
D tuning procedure:
- With P tuned, set D to around 35 for Roll and 38 for Pitch.
- Do a series of fast dives followed by hard pullouts — the classic propwash test.
- If you see wobble after the pullout, raise D by 5 and repeat.
- If motors are hot, reduce D by 5 and add more filtering instead.
In Betaflight 4.3+, the D_MAX feature allows D to ramp up during fast manoeuvres and then drop back for hover. Set D_MAX a bit higher than your base D value for best results.
Step 7: RPM Filters and Gyro Filters
No PID tuning guide is complete without talking about filters. Filters remove motor noise from the gyro signal before it gets fed into the PID controller. Without proper filtering, no amount of PID adjustment will fix oscillations caused by noisy motors or unbalanced props.
Betaflight uses two main filter systems:
- Gyro Lowpass Filter: A broad filter applied to the raw gyro signal. Keep this on but don’t set the cutoff too low — you’ll introduce latency.
- RPM Filter (Bidirectional DSHOT): The gold standard. Uses real-time motor RPM data from your ESCs to create notch filters precisely at the motor noise frequencies. This is far superior to fixed notch filters.
To enable RPM filtering:
- Flash BLHeli_32 or KISS firmware on your ESCs with Bidirectional DSHOT support.
- In Betaflight Configurator, go to the ESC/Motor tab and enable Bidirectional DSHOT.
- In the Filtering tab, enable RPM Filter and set the number of harmonics (usually 3).
- Reboot and test.
With RPM filtering active, you can often reduce D gain and still have smooth, clean flight — because you’re removing the noise at its source rather than dampening everything.
Indian note: high temperatures in India (40°C+ in summers) cause motors to run hotter. If you run high D values combined with high RPM filter harmonics, motor temperatures can spike quickly. Monitor motor heat after every tuning session.
Common Mistakes Indian Beginners Make
After helping dozens of hobbyists in India tune their builds, here are the most common pitfalls we’ve seen:
- Tuning with bent or damaged props: Always use fresh, balanced propellers for tuning. Even a small nick throws off the gyro data.
- Changing too many values at once: Change one axis, one term at a time. If you change P, I, and D simultaneously, you won’t know what fixed (or broke) the problem.
- Ignoring motor heat: Check your motors after every tuning flight. If they’re too hot to hold your finger on (above 60°C), your D is too high or your filtering is insufficient.
- Not using Blackbox: Visual inspection of video is good but Blackbox tells you exactly what’s happening inside the flight controller. Use it.
- Expecting perfection on the first tune: PID tuning is iterative. Plan for 5–10 flights to dial in a good tune.
- Buying cheap ESCs with outdated firmware: A quality ESC with modern BLHeli_32 firmware makes RPM filtering possible. Don’t skip on ESC quality.
Recommended Products from Zbotic
Whether you’re building your first FPV quad or upgrading an existing build for better performance, Zbotic stocks everything you need:
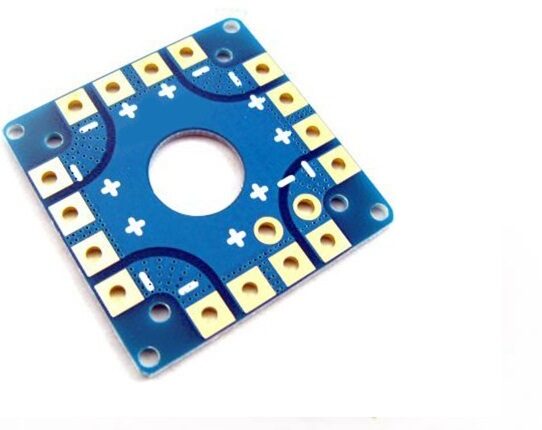
100A Multirotor ESC Power Distribution Battery Board
A solid power distribution board for quadcopter builds. Keeps wiring clean and delivers reliable power to all four ESCs simultaneously.
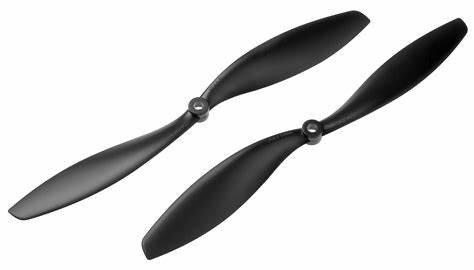
1045 2-Blade Carbon Fiber Propeller CW&CCW
High-quality carbon fibre propellers for tuning flights. Balanced and consistent — essential for getting clean gyro data during PID tuning.

2-6S 5V 5A BEC For Quadcopter Drone
A reliable BEC module to power your flight controller and VTX from the main battery. Clean regulated power reduces electrical noise that can affect PID performance.
Frequently Asked Questions
Q: Do I need to tune PIDs on every drone build?
A: Yes. Every frame, motor, and propeller combination has different characteristics. Default Betaflight PIDs are a good starting point, but a proper tune will significantly improve performance and efficiency. It’s especially important for larger or heavier builds.
Q: What Betaflight version should I use in 2026?
A: Use the latest stable release of Betaflight (4.5.x as of early 2026). Avoid release candidates for builds you fly regularly. Check the official Betaflight GitHub for the latest stable version.
Q: My drone oscillates immediately on takeoff. Is that a PID issue?
A: Not necessarily. Oscillations right on takeoff often indicate a mechanical issue — bent props, loose motor screws, or a FC not mounted flat. Fix mechanical issues first before adjusting PIDs.
Q: Can I use someone else’s PID tune for my drone?
A: You can use it as a starting point, but no two builds fly identically. Battery voltage sag, prop quality, motor wear, and frame stiffness all affect how a PID tune behaves. Always verify and adjust borrowed tunes with test flights.
Q: Why are my motors hot after tuning?
A: Hot motors are most commonly caused by D gain being too high or insufficient filtering. If RPM filtering is not enabled, add it. If it’s already enabled, reduce D gain by 5 increments and re-test.
Q: Is Betaflight PID tuning different for 3-inch vs 5-inch quads?
A: Yes. Smaller quads (3-inch) are lighter and more responsive — they typically need lower P and D values. Larger quads (5-inch and above) need higher values. Always start with the recommended defaults for your specific build size.
Ready to Build Your FPV Drone?
Zbotic stocks a wide range of FPV components including flight controllers, ESCs, motors, FPV cameras, and frames. Browse our drone parts collection and get everything you need to build and tune your perfect FPV quad in India.


Add comment