
Table of Contents
- Introduction
- Why Use Shields and Add-On Modules?
- 1. Power & Battery Shields
- 2. Sensor Modules
- 3. Relay & Output Modules
- 4. Display Add-Ons
- 5. Expansion & Prototyping Boards
- 6. Camera Modules for ESP32-CAM
- Buying Tips for India
- Featured Products from Zbotic
- FAQs
- Conclusion
Introduction
The ESP8266 NodeMCU changed Indian electronics hobby culture permanently. For the first time, a ₹200 microcontroller could connect to the internet, run a web server, publish MQTT messages, and control hardware — all without needing a separate Wi-Fi module. Millions of projects later, the ESP8266 and its big sibling the ESP32 are the backbone of DIY IoT in India.
But the bare ESP8266 NodeMCU board is just the beginning. The right shields, add-on modules, and sensor boards can take your project from prototype to polished product. This buying guide covers every major category of ESP8266/ESP32 shields available in India — what they do, when to use them, and what to watch out for when buying.
Whether you are a student working on a final year project in Hyderabad, a maker building a smart home in Delhi, or an engineer prototyping an industrial IoT device, this guide will help you pick the right add-ons for your specific need.
Why Use Shields and Add-On Modules?
The NodeMCU’s standard pin header exposes 11 digital GPIO pins, 1 ADC, I2C, SPI, and UART — but the 3.3V logic and limited current output means you cannot simply connect a relay, motor, or high-current LED directly. Shields and add-on modules solve this by:
- Level shifting: Converting 3.3V ESP8266 signals to 5V levels required by many sensors and actuators
- Current amplification: Relay modules use transistors to switch mains-level loads from the ESP8266’s GPIO
- Power management: Battery shields add LiPo/18650 charging, 5V boost, and protection circuits
- Sensor integration: Pre-built modules with proper pull-up resistors, decoupling capacitors, and connectors save hours of breadboard work
- Form factor: Stack-on shields keep the build compact and organised
1. Power & Battery Shields
Arguably the most important add-on for any field deployment, power shields let you run your NodeMCU/ESP32 project from rechargeable batteries instead of always needing a USB cable nearby.
18650 Lithium Battery Shields
The 18650 lithium-ion cell (named for its 18mm × 65mm dimensions) is the workhorse of portable electronics — used in laptop batteries, power banks, and electric scooters. A dedicated ESP32/ESP8266 battery shield handles:
- 18650 cell charging via Micro USB or Type-C at 1A
- 3.3V and 5V regulated output for the microcontroller
- Overcharge, over-discharge, and short-circuit protection
- Pass-through charging (charge the battery while the device runs)
Single vs Dual vs Quad 18650
- Single 18650 (~2500 mAh): Good for low-power sensor nodes in deep sleep. Runtime: weeks to months.
- Dual 18650 (~5000 mAh): Good for active Wi-Fi devices. An always-on ESP8266 (80 mA active) runs for ~60 hours continuously.
- Quad 18650 (~10000 mAh): For devices with additional loads — small motors, multiple relays, OLED displays. Runtime: several days continuous or months with deep sleep.
Key specs to check
- Output current: At least 1A at 5V (relay coils need 70–80 mA each)
- Charging current: 500 mA minimum for reasonable charge times
- Protection ICs: Look for TP4056 (charging) + DW01 (protection) or equivalent
- Passthrough operation: Can the device run while charging? Most V8 shields support this.
2. Sensor Modules
Sensors are what give your IoT project awareness of the real world. These are the most commonly used sensor modules with ESP8266/ESP32 in India:
Temperature & Humidity Sensors
- DHT11: Entry level, ±2°C accuracy, 1Hz sample rate. Good for beginners, limited for precision work. ~₹50–80.
- DHT22/AM2302: Better accuracy (±0.5°C), slower 0.5Hz sample rate. The go-to for serious projects. ~₹150–200.
- DHT20: The latest generation DHT with I2C interface and improved accuracy. ~₹120–180.
- BME280: Gold standard for weather sensing — temperature, humidity, and pressure in one chip. I2C or SPI. ~₹200–350.
- DS18B20: Waterproof 1-Wire temperature sensor. For water, soil, or outdoor temperature where the sensor must be exposed to the environment. ~₹80–150.
- LM35: Analog temperature IC. Simple, cheap, and reliable for basic temperature reading with the ESP8266’s single ADC pin. ~₹20–50.
Pressure & Altitude Sensors
- BMP280: Barometric pressure and temperature over I2C. Lower cost than BME280 (no humidity). Great for altitude tracking and weather. ~₹150–250.
- BME280: Adds humidity to the BMP280. Slightly more expensive but far more useful for weather station applications.
Distance & Proximity Sensors
- HC-SR04 (Ultrasonic): The classic 5V ultrasonic range sensor. Works with ESP8266 via a voltage divider on the Echo pin (5V → 3.3V). Range: 2cm – 400cm.
- JSN-SR04T (Waterproof Ultrasonic): Waterproof probe version of the HC-SR04. Ideal for tank water level monitoring — extremely popular in Indian homes and farms for borewell and tank monitoring.
- PIR Motion Sensor: Detects human body movement. For security systems, automatic lights, and presence detection.
3. Relay & Output Modules
Relay modules are the bridge between your 3.3V ESP8266 and real-world 230V AC appliances. They are the foundation of home automation projects.
Relay Module Specifications
- Input voltage: Most relay coils need 5V. The ESP8266’s GPIO is 3.3V. Good relay modules have a transistor driver stage (like ULN2003) that accepts 3.3V logic input — always verify before buying.
- Contact rating: For Indian 230V 50Hz AC, ensure the relay contacts are rated at least 10A/250V AC.
- Opto-isolation: Modules with optical isolation protect your ESP8266 from mains voltage spikes.
- Active LOW vs Active HIGH: Most common relay modules activate when the input is pulled LOW. Some are Active HIGH. Check your module’s datasheet before writing code.
Channel Counts
- 1-channel: For single appliance control (one light switch)
- 2-channel: Control two appliances from one NodeMCU
- 4-channel: Most popular for home automation (living room, bedroom, kitchen, bathroom)
- 8-channel: For comprehensive whole-room or floor control
The ESP8266 NodeMCU has 11 usable GPIO pins (some with restrictions). Realistically, 4–6 relay channels is the practical maximum while leaving GPIO for inputs (switches, sensors). For more channels, use an ESP32.
4. Display Add-Ons
A display transforms your sensor device from a headless data logger into a user-friendly gadget with immediate visual feedback.
OLED Displays
The 0.96-inch 128×64 OLED display is the most popular display choice for ESP8266/ESP32 projects. It runs at 3.3V, uses I2C (only 2 GPIO pins), has excellent contrast in any lighting (including direct sunlight), and draws only 20 mA — vital for battery projects. The Adafruit SSD1306 library makes it trivially easy to use with the Arduino IDE.
TFT Colour LCD
For projects needing colour graphics, icons, or images — like a smart watch face, a weather dashboard with icons, or a small control panel — 1.8-inch or 2.4-inch TFT LCDs running on SPI give you 65,536 colours and fast refresh rates.
ESP32 With Built-In Displays
The Waveshare ESP32-S3 display development boards integrate a high-resolution colour display directly on the board, eliminating wiring complexity. Options include round AMOLED displays (466×466), rectangular LCD (172×320), and even 1.46-inch round displays — all with the ESP32-S3’s full processing power.
5. Expansion & Prototyping Boards
Expansion boards simplify prototyping by breaking out all the ESP32/ESP8266 pins into easy-to-use headers with labelled pin names and often including pull-up resistors, onboard 5V/3.3V rails, and screw terminals.
ESP32 30-Pin Expansion Board
The 30-pin ESP32 expansion board is a popular choice for clean ESP32 prototyping. It accommodates the standard 30-pin ESP32 module and provides dual USB options (Type-C and Micro USB), all pins broken out with labels, and often 5V/3.3V power rails clearly marked. Makes relay and sensor wiring much neater than a raw breadboard.
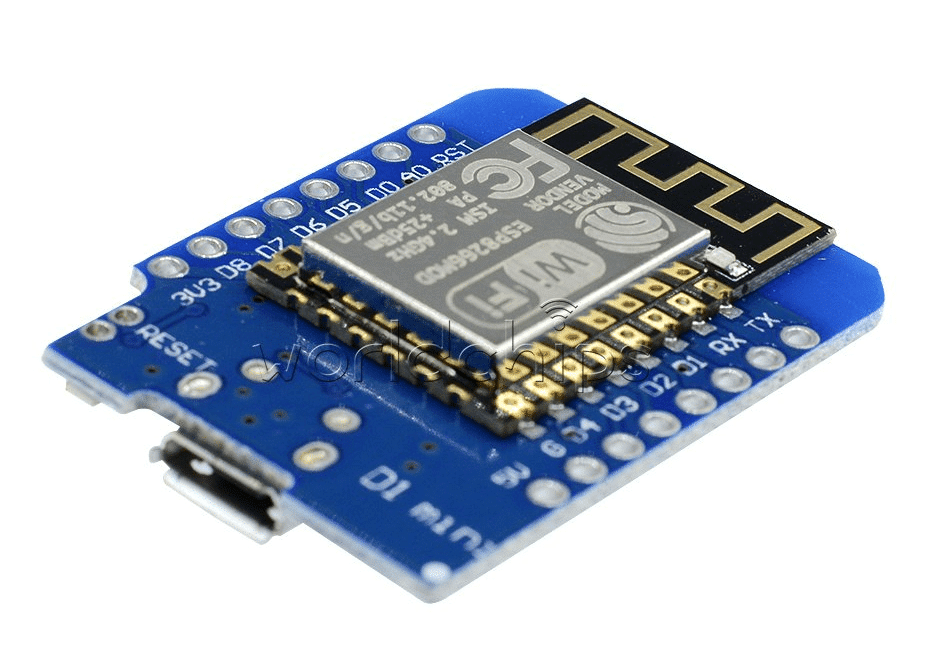
D1 Mini Shields
The D1 Mini (Wemos) ecosystem for the ESP8266 has dozens of purpose-built stacking shields:
- D1 Mini Motor Shield (TB6612FNG)
- D1 Mini OLED Shield (64×48 OLED)
- D1 Mini Battery Shield
- D1 Mini Relay Shield
- D1 Mini Micro SD Shield
- D1 Mini ProtoBoard Shield
Stacking shields directly on each other creates ultra-compact multi-function devices — the entire stack can fit inside a small project box.
6. Camera Modules for ESP32-CAM
The ESP32-CAM is a special variant of the ESP32 that includes a camera connector and is typically paired with OV2640 (2MP) or OV5640 (5MP) camera modules. Applications include:
- Face detection and recognition
- QR/barcode scanning
- Time-lapse photography
- Bird/wildlife monitoring cameras
- Entry-point security cameras with motion detection
- Video streaming over Wi-Fi
For the ESP32-CAM, the companion ESP32-CAM-MB programmer board is essential for the first firmware flash, as the ESP32-CAM itself lacks a USB-to-Serial chip. After the initial flash, OTA updates handle firmware wirelessly.
Buying Tips for India
Quality vs Price Trade-offs
- Sensor modules: For critical measurements (temperature in a food storage unit, water level in a tank), spend a little more on genuine modules. Fake BME280s reading as BMP280 are common on marketplaces — buy from trusted stores like Zbotic.
- Relay modules: Cheap relays with no isolation can be dangerous. Ensure the relay contacts are rated for 230V AC Indian mains. Verified relay modules from electronics stores are worth the small premium.
- Battery shields: Use reputable 18650 cells (Panasonic, Samsung, Sony). Cheap unbranded 18650s advertised as “10000 mAh” are typically 1000 mAh or less. Buy cells and shields separately from verified sellers.
Voltage Compatibility
The ESP8266 and ESP32 operate at 3.3V logic. Many older Arduino shields are designed for 5V Arduino. Always check:
- Does the sensor/shield accept 3.3V supply?
- Are the input/output pins 3.3V compatible?
- For 5V shields: use a logic level converter for the signal lines
ESP8266 ADC Limitation
The ESP8266 has only one ADC pin (A0) with a 0–1V input range (3.3V safe via onboard resistor divider on NodeMCU). This is a significant limitation for multi-sensor analog projects. For projects needing multiple analog sensors, upgrade to ESP32 with its 18-channel 12-bit ADC.
GPIO Current Limits
Each ESP8266/ESP32 GPIO can source/sink a maximum of 12 mA (ESP8266) or 40 mA (ESP32). Never connect a load directly to GPIO without a driver transistor. LEDs need a current-limiting resistor (minimum 220Ω for 3.3V systems). Relays, motors, and solenoids must use driver modules.
Featured Products from Zbotic
D1 Mini V2 NodeMCU 4M Bytes Lua Wi-Fi ESP8266 Development Board
The compact ESP8266 board with an ecosystem of stacking shields. 4MB flash, USB programming, and compatible with the entire D1 Mini shield library.

ESP8266 ESP-12F Witty Cloud Development Board + Mini NodeMCU
The Witty Cloud combo board includes an LDR, RGB LED, and push button pre-wired — great for learning ESP8266 features without additional components.
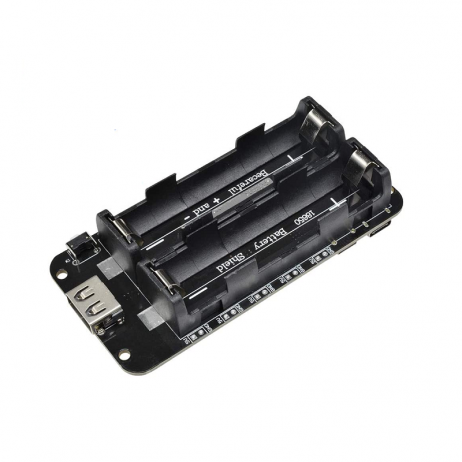
2 × 18650 Lithium Battery Shield for ESP8266/ESP32/Arduino
Dual 18650 battery shield with 5V output and pass-through charging. The essential power module for battery-powered NodeMCU and ESP32 projects in India.

BMP280 Barometric Pressure and Altitude Sensor I2C/SPI Module
Precision barometric pressure and altitude sensor. Works seamlessly with ESP8266 and ESP32 over I2C. Ideal for weather stations, drones, and altitude logging projects.
JSN-SR04T Waterproof Ultrasonic Rangefinder Module V3.0
Waterproof ultrasonic distance sensor — extremely popular in India for water tank level monitoring with NodeMCU/ESP32. Works outdoors and in wet environments.
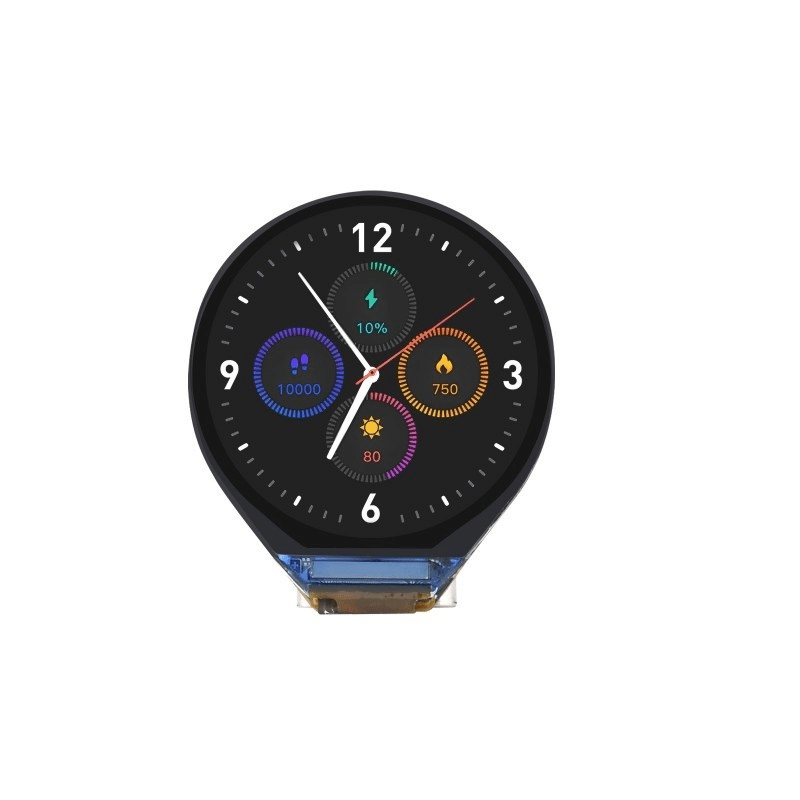
Waveshare ESP32-C3 0.71inch Round Display Development Board
Tiny ESP32-C3 board with built-in round display — the ultimate all-in-one IoT node with display. No external modules needed, minimal wiring, compact form factor.
Frequently Asked Questions
Can I use Arduino shields with the ESP8266 NodeMCU?
Not directly, for two reasons: (1) The NodeMCU does not have the same pin header layout as an Arduino Uno. (2) Many Arduino shields run at 5V while the ESP8266 is a 3.3V device. You can use Arduino shield modules by wiring them individually with level shifting where needed, but you cannot physically stack them. D1 Mini shields are purpose-built for the ESP8266 NodeMCU.
How many sensors can I connect to one ESP8266 NodeMCU?
The ESP8266 has 11 usable GPIO pins. With I2C, you can connect up to 127 sensors on just 2 pins (SDA + SCL), as long as each has a unique I2C address. With SPI, multiple devices share MOSI/MISO/SCK but need separate Chip Select (CS) pins per device. In practice, most ESP8266 projects use 3–6 sensors/modules comfortably. For more GPIO, use an I2C GPIO expander (PCF8574) or switch to an ESP32.
What is the difference between ESP8266 and ESP32 in terms of shields?
The ESP8266 has a mature, stable ecosystem with many purpose-built shields (especially in the D1 Mini format). The ESP32 is more capable (more GPIO, ADC, hardware peripherals) and supports all ESP8266-compatible sensors, but the “stacking shield” ecosystem is less developed. Most shields designed as modules (not stackable boards) work with both ESP8266 and ESP32 since they just connect via jumper wires or headers.
Can I power a relay module directly from the NodeMCU’s 3.3V pin?
No. Most relay coils need 5V and draw 70–90 mA each. The ESP8266’s 3.3V regulator on typical NodeMCU boards is rated for only 200–500 mA total. Power the relay module’s VCC from a dedicated 5V supply (or from the NodeMCU’s VIN/RAW pin if powered via USB) and share only the GND. The relay module’s signal input can be driven from 3.3V GPIO if the module has a transistor driver (most do).
Do ESP8266 modules need a logic level converter for 5V sensors?
Yes, if the sensor’s output pin drives higher than 3.3V into an ESP8266 GPIO. The HC-SR04 ultrasonic sensor’s ECHO pin outputs 5V — this can damage the ESP8266. Use a simple voltage divider (1kΩ + 2kΩ) or a bidirectional logic level converter module. Sensors that only receive data from the ESP8266 (relay signal inputs, LED drivers) typically work fine with 3.3V logic — check the datasheet for the minimum HIGH threshold of your specific module.
What is the best battery shield for a NodeMCU water tank monitor?
For a water tank level monitor (JSN-SR04T + NodeMCU + OLED), the dual 18650 V8 shield is the best choice. It provides 5V output (needed for the ultrasonic sensor and relay), has enough capacity for weeks of operation, and the Micro USB charging port is convenient. Use the ESP deep sleep feature to extend battery life: wake every 5 minutes, take a reading, send to phone via MQTT, go back to sleep.
Conclusion
The ESP8266 NodeMCU and ESP32 ecosystem is richest when you explore beyond the bare development board. The right combination of shields and modules — a battery shield for portable power, a relay module for appliance control, the right sensor for your measurements, and a display for local readout — transforms a simple microcontroller into a complete, professional-looking IoT device.
When buying shields and modules in India, prioritise genuine components from verified sellers. The difference between a ₹60 fake DHT11 that reads ±5°C and a genuine one that reads ±2°C is the difference between a project that works reliably and one that frustrates you constantly. Similarly, a relay module with proper isolation and 10A/250V contacts is worth the small premium over an unrated module.
At Zbotic, we stock a carefully curated range of genuine ESP8266 and ESP32 shields, sensors, and modules with fast delivery across India. Whether you are just starting out with a D1 Mini or building a sophisticated multi-node IoT system, you will find the right components at the right price.
Genuine modules, competitive pricing, and fast delivery to every corner of India.
Browse All IoT Modules →


Add comment