
Building a multi-cell lithium battery pack from 18650 cells without a Battery Management System (BMS) is one of the most dangerous mistakes a maker can make. A battery BMS 3S 4S balance charging circuit for 18650 packs does far more than simply charge cells — it monitors individual cell voltages, balances them during charging, and disconnects the pack the moment any cell goes out of safe range. Whether you’re building a 12V power station, an e-bike battery, or a portable lab supply, this guide covers everything you need to know about selecting and wiring a 3S or 4S BMS for your 18650 project.
Table of Contents
- What Is a BMS and Why Do You Need One?
- 3S vs 4S: Understanding Cell Configurations
- BMS Functions Explained
- How Balance Charging Works
- Key BMS Specifications to Compare
- Wiring a 3S BMS with 18650 Cells: Step by Step
- Wiring a 4S BMS with 18650 Cells
- Choosing the Right Charger for 3S/4S Packs
- Common Mistakes and How to Avoid Them
- Frequently Asked Questions
What Is a BMS and Why Do You Need One?
A Battery Management System (BMS) is a protection and management circuit that sits between your battery cells and the rest of the world. For multi-cell 18650 lithium packs, the BMS performs functions that are absolutely critical for safe operation — functions that individual cell protection circuits (like the DW01A on a TP4056 module) cannot provide for a series pack.
Here’s the core problem the BMS solves: in a series battery pack, cells are connected positive-to-negative in a chain. The pack charges and discharges as a unit. But each cell has slightly different capacity, internal resistance, and self-discharge rate. Over time — even after just a few cycles — cells drift apart in voltage. Without a BMS, the weakest cell reaches its over-discharge limit first, while the pack voltage still looks fine from the outside. The result: the weak cell gets repeatedly deep-discharged, causing irreversible damage and eventual failure — or worse, an internal short.
The BMS prevents all of this by monitoring each cell individually through the balance wires, cutting power when any individual cell goes out of range, and balancing cells during charging so they all finish at the same voltage.
3S vs 4S: Understanding Cell Configurations
The “3S” and “4S” designation tells you how many 18650 cells are connected in series:
| Config | Cells in Series | Nominal Voltage | Full Charge Voltage | Cutoff Voltage | Common Applications |
|---|---|---|---|---|---|
| 1S | 1 | 3.7V | 4.2V | 2.5V | Arduino, ESP32, sensors |
| 2S | 2 | 7.4V | 8.4V | 6.0V | Small RC cars, portable fans |
| 3S | 3 | 11.1V | 12.6V | 9.0V | 12V power stations, power tools, drones |
| 4S | 4 | 14.8V | 16.8V | 12.0V | 16V tools, high-power LED drivers |
Adding parallel groups (the “P” in configurations like 3S2P, 3S4P) increases capacity without changing voltage. A 3S4P pack uses 12 cells: 3 series groups, each made of 4 cells in parallel. The BMS still only needs to be a 3S — it monitors the voltage of each parallel group (which behaves electrically like a single cell).
In India, the 3S configuration is by far the most popular for maker projects because 12V is the standard voltage for automotive accessories, CCTV cameras, and most portable power tools. The 4S configuration (14.8V nominal) is common in drones and higher-power applications.
BMS Functions Explained
Overcharge Protection
The BMS monitors each cell’s voltage through the balance connector. When any cell reaches the overcharge threshold (typically 4.20–4.25V per cell), the BMS opens the charge MOSFET, disconnecting the charger from the pack. This is critical because even a standard CC/CV charger set correctly for total pack voltage can overcharge individual cells if they’re unbalanced.
Over-Discharge Protection
When any cell drops below the under-voltage threshold (typically 2.5–3.0V per cell under load), the BMS opens the discharge MOSFET, cutting power to the load. This protects the weakest cell from being driven into deep discharge territory where the lithium plating process causes permanent damage and safety risks.
Over-Current and Short-Circuit Protection
The BMS measures the current flowing through the pack. If it exceeds the rated maximum (e.g., 10A, 20A, or 30A depending on BMS rating), the MOSFETs open. Short-circuit protection acts in microseconds — essential when battery packs are being connected to loads or when connector accidents happen in the field.
Temperature Protection
Higher-end BMS boards include a temperature sensor (NTC thermistor) that can be mounted on the cell pack. If the pack temperature exceeds ~60–70°C, the BMS disconnects. This is especially important in Indian summer conditions and for packs installed in enclosed spaces like inverter boxes or vehicle trunks.
How Balance Charging Works
Balance charging addresses the cell voltage drift problem that accumulates over the pack’s life. There are two main balancing methods used in BMS boards:
Passive Balancing (most common in budget BMS boards)
When cells reach near-full charge, the BMS bleeds energy from the higher-voltage cells through a shunt resistor, allowing lower-voltage cells to “catch up.” The bleed current is typically small (30–100 mA), so balancing is slow — it’s most effective for mildly unbalanced packs. The energy bled is wasted as heat. Most BMS boards in the ₹50–300 range use passive balancing.
Active Balancing (premium BMS boards)
Active balancers transfer charge from higher-voltage cells to lower-voltage cells using inductors, capacitors, or transformers. This is more efficient (no energy wasted) and much faster, but the circuitry is more complex and expensive. Active balancing boards are available from ₹500 upwards and are preferred for e-bike and larger energy-storage applications.
For most Indian hobbyist 18650 packs of 10–15 cells, passive balancing is entirely adequate if you start with well-matched cells (within 0.05V of each other) and charge at 1C or below.
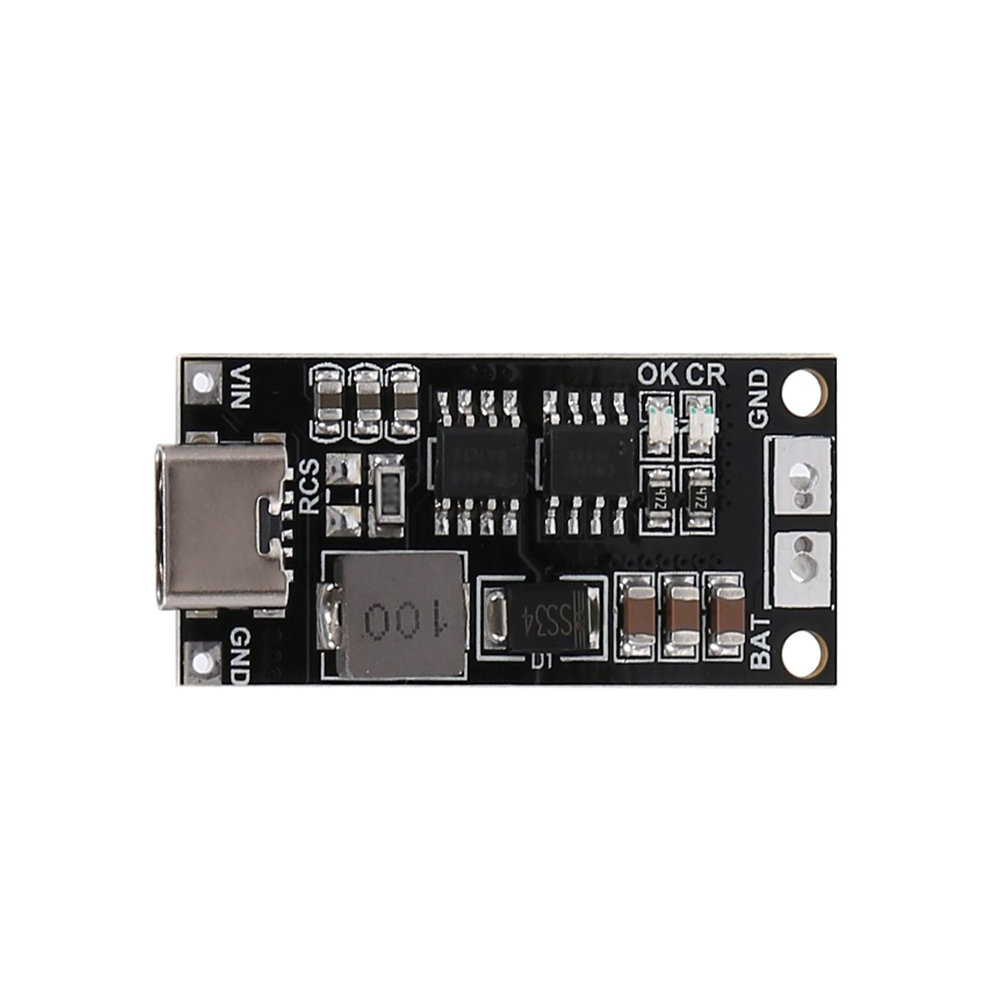
18650 Polymer Lithium Ion Charger Type-C to 3S 12.6V 2A Booster Module
A complete 3S charging solution — input USB Type-C, output 12.6V fully charged. Includes integrated balance charging for 3-cell 18650 packs. Ideal for DIY 12V power bank and solar storage builds.
Key BMS Specifications to Compare
When shopping for a 3S or 4S BMS board in India, compare these parameters:
Continuous Discharge Current Rating
This is the most important spec for your application. A 10A BMS can power a 12V/10A = 120W load. An e-bike motor drawing 20A needs a 20A or 30A BMS. Never run a BMS at its maximum rated current continuously — derate by 20–30% for long-term reliability. Common ratings available in India: 10A, 15A, 20A, 25A, 30A, 40A, 60A.
Balance Current
Higher balance current (e.g., 60–100 mA vs 20–30 mA) speeds up the balancing process, especially for packs with significant voltage drift. For small packs charged infrequently, 30 mA is fine. For daily-use e-bike packs, higher balance current is beneficial.
Overcharge Cutoff Voltage
For standard Li-ion/LiPo: 4.20V ±0.05V per cell. Verify this matches your cell chemistry — LiFePO4 cells need a 3.65V cutoff, not 4.20V.
Over-Discharge Cutoff Voltage
Typically 2.5V–3.0V per cell. For maximum battery longevity, choose a BMS that cuts off at 3.0V rather than 2.5V — this sacrifices a few percent capacity but significantly extends cycle life.
MOSFET Quality
Budget BMS boards use low-grade MOSFETs that run hot under high current. Look for boards using AO4407A, AO4606, or similar quality MOSFETs. An overheating BMS can trigger false protection events or fail outright in Indian summer conditions.
Wiring a 3S BMS with 18650 Cells: Step by Step
Let’s walk through wiring a standard 3S BMS board to a 3-cell 18650 pack. For this example, we’ll use a 3S 10A BMS board (common, available for ₹60–120).
Materials Needed
- 3 × 18650 cells (unprotected, matched within 0.05V)
- 3S BMS board
- Nickel strip (for spot welding) or flexible 18AWG silicone wire (for soldering)
- 12.6V CC/CV power supply or dedicated 3S balance charger
- Heat shrink tubing
Understanding BMS Connector Labels
A typical 3S BMS has these pads/connectors:
- B− (Battery Negative): Connect to the negative terminal of Cell 1 (bottom of the series chain)
- B+ (Battery Positive): Connect to the positive terminal of Cell 3 (top of the series chain)
- C− (Charge Negative): Negative terminal for the charger connection
- P− (Pack/Load Negative): Negative terminal for the load/output connection
- Balance pins B0–B3: Individual cell tap wires (B0=B−, B1=between Cell1 and Cell2, B2=between Cell2 and Cell3, B3=B+)
Note: Some BMS boards combine C− and P− into a single terminal. These “common port” BMS boards are simpler to wire but cannot independently disable charging vs. discharging.
Wiring Steps
- Connect cells in series: Connect Cell 1 negative to Cell 2 positive, then Cell 2 negative to Cell 3 positive. The chain runs: B− → Cell1 → junction1 → Cell2 → junction2 → Cell3 → B+.
- Connect balance wires: B0 wire to B− (Cell 1 negative). B1 wire to the junction between Cell 1 and Cell 2. B2 wire to the junction between Cell 2 and Cell 3. B3 wire to B+ (Cell 3 positive).
- Connect B− to BMS: Wire from Cell 1 negative to the B− pad on the BMS.
- Connect B+ to BMS: Wire from Cell 3 positive to the B+ pad on the BMS.
- Charger connects to C− and B+: The charging power supply positive goes to B+ (or the B+ terminal if the BMS has one), negative to C−.
- Load connects to P− and B+: Your load’s negative goes to P−, positive to B+.
Important: Never connect load and charger simultaneously unless the BMS explicitly supports it (“common port” BMS boards generally do not support simultaneous charge/discharge safely).
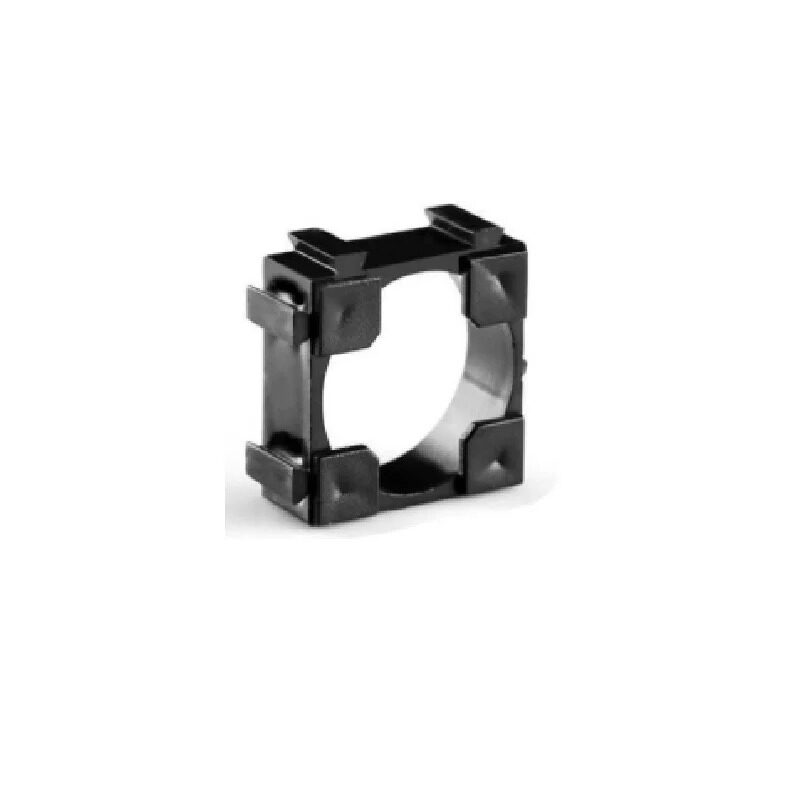
1 x 18650 Battery Holder with 18.4MM Bore Diameter – Pack of 4
Build your 3S or 4S 18650 pack without spot welding. These holders fit standard 18650 cells and allow easy cell replacement. Wire three holders in series for a solderless 3S pack — perfect for prototyping.
Wiring a 4S BMS with 18650 Cells
The 4S wiring process is identical to 3S with one additional cell in the chain:
- 4 cells connected in series: Cell1 → Cell2 → Cell3 → Cell4
- Balance wires: B0 (B−) → B1 (Cell1/Cell2 junction) → B2 (Cell2/Cell3 junction) → B3 (Cell3/Cell4 junction) → B4 (B+)
- Full charge voltage: 4 × 4.2V = 16.8V
- Charger required: 16.8V CC/CV (dedicated 4S balance charger or CC/CV supply set to 16.8V)
A common mistake with 4S builds in India is using a 12.6V (3S) charger on a 4S pack — this will only partially charge the pack and will leave one cell undercharged. Always verify your charger voltage matches your pack’s full-charge voltage exactly.
For parallel groups (e.g., 4S2P = 8 cells), the BMS is still 4S — you wire 2 cells in parallel for each series position. The BMS sees 4 “cells” regardless of how many are in parallel at each position.
Choosing the Right Charger for 3S/4S Packs
The charger must match your pack’s chemistry and full-charge voltage precisely:
- 3S Li-ion/LiPo pack: 12.6V CC/CV charger (dedicated 3S balance charger, or a CC/CV power supply set to 12.6V output)
- 4S Li-ion/LiPo pack: 16.8V CC/CV charger
- 3S LiFePO4 pack: 10.95V CC/CV charger (3 × 3.65V) — different chemistry, different voltage
Smart balance chargers like the ISDT range accept the pack’s balance connector and automatically apply the correct per-cell charge profile while monitoring individual cell voltages. These are the gold standard for quality and safety but cost more than simple CC/CV supplies.

ISDT A4 Air Smart Battery Charger – NiMH, NiCd, Li-Ion, LiFePO4 with Bluetooth
A versatile smart charger with Bluetooth app connectivity for 18650 packs and more. Supports Li-Ion and LiFePO4 chemistries — perfect for charging 3S/4S 18650 packs with balance charging and real-time cell monitoring.
Common Mistakes and How to Avoid Them
Mistake 1: Mixing Old and New Cells
Combining cells with different internal resistances (IR) causes the lower-IR cells to do most of the work during discharge, and the higher-IR cells to be stressed during charging. Always use cells from the same batch with matched capacity and IR. If you’re salvaging laptop cells, test each one individually and discard cells with IR above 80–100 mΩ or capacity below 70% of original.
Mistake 2: Skipping Cell Pre-Matching
Before assembling the pack, charge all cells to the same voltage (within 0.02V) using individual cell chargers. Connecting cells of widely different voltages in parallel causes a rapid current equalization surge that can damage weak cells. At the start of a new pack, spend the time to match cells properly — it pays dividends in pack longevity.
Mistake 3: Using the Wrong BMS for Load Current
A 10A BMS powering a load that draws 15A will heat up, trigger over-current protection, and eventually fail. Always calculate your peak load current and choose a BMS rated 25–30% above it. A 20A BMS for a 15A peak load is the safe choice.
Mistake 4: Connecting Balance Wires in the Wrong Order
Getting the balance wire order wrong is surprisingly easy and potentially dangerous. Double-check each balance wire connection with a multimeter before powering up: B0=0V (reference), B1 should read ~4.2V, B2 should read ~8.4V, B3 should read ~12.6V (for a fully charged 3S pack). If these readings are wrong, your balance connections are incorrect.
Mistake 5: Ignoring BMS Quality for High-Current Applications
Budget ₹20 BMS boards from anonymous sellers may use substandard MOSFETs or miscalibrated protection thresholds. For any pack above 10A or 100Wh, invest in a quality BMS from a reputable supplier. The cost difference is small; the consequences of a BMS failure in a high-current pack are not.
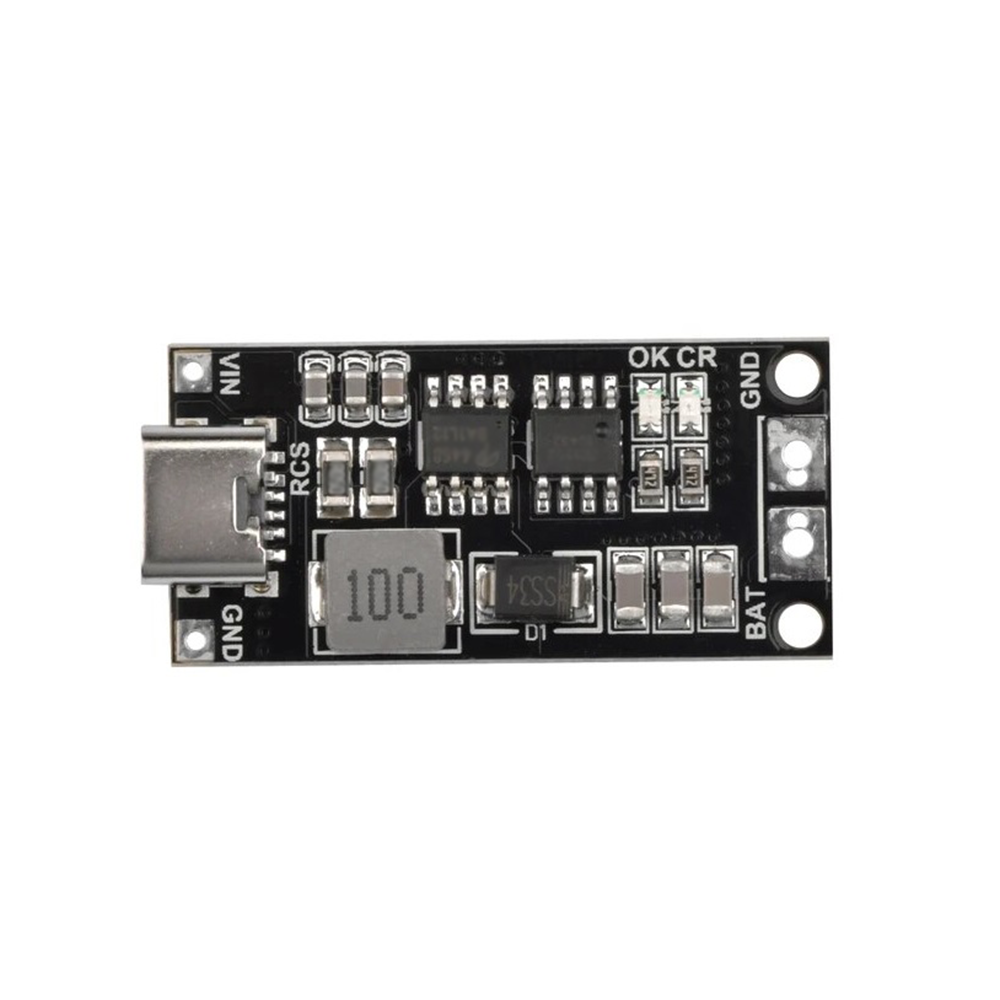
18650 Polymer Lithium Ion Charger Type-C to 3S 12.6V 4A Booster Module
High-speed 4A charging for your 3S 18650 pack via USB Type-C. Features integrated balance charging to keep all three cells equal — reduces build complexity when adding USB-C charging to your 12V battery project.
Frequently Asked Questions
Q1: Can I use a 3S BMS with LiFePO4 cells?
No, not without modification. LiFePO4 cells have different overcharge (3.65V) and over-discharge (2.5V) thresholds compared to Li-ion (4.2V / 2.5–3.0V). Using a Li-ion BMS on LiFePO4 cells means the overcharge protection won’t trigger until well above the safe level for LiFePO4 chemistry. Always use a BMS specifically rated for your cell chemistry.
Q2: My 3S pack shows 11.7V but the BMS has cut off the load. Why?
The BMS monitors individual cell voltages, not just total pack voltage. If one cell has dropped to 2.8V while the other two are still at 4.0V and 4.2V, the total pack voltage may be 10.9V+ but the BMS correctly protects the weak cell by cutting off. This is the BMS working as intended. Recharge the pack to balance cells, then investigate why one cell is draining faster than the others.
Q3: Do I need a BMS if my charger already has balancing built in?
A balance charger handles balancing during charging, but it doesn’t protect against over-discharge during use. You still need a BMS or individual cell protection for over-discharge protection. The two work together: balance charger for optimised charging, BMS for runtime protection.
Q4: What is the difference between a “common port” and “separate port” BMS?
A common-port BMS shares the same MOSFET path for both charging and discharging — there’s only one output terminal pair (B+ and B−). Charger and load both connect to the same terminals. A separate-port BMS has dedicated C− (charge negative) and P− (discharge/load negative) terminals. Separate-port boards allow independent control of charge and discharge paths and are preferred for applications where you need to charge and run a load simultaneously (with proper design).
Q5: How do I revive a 3S pack where the BMS has cut off due to under-voltage?
Connect the pack to a balance charger with a “recovery” or “trickle charge” mode, which can charge cells down to 1.5–2.5V at a very low current (50–100 mA) to bring them back above the BMS re-enable threshold. Never try to force charge a deeply discharged cell at full current — this can cause lithium plating, internal shorts, and fire. If any cell reads below 1.5V after extended discharge, the cell is likely permanently damaged and should be replaced.
Build Safer, Smarter Battery Packs
A properly designed 3S or 4S 18650 battery pack with a quality BMS is a safe, reliable, and cost-effective power source for a huge range of maker and engineering projects. The key is understanding what the BMS does, choosing the right current rating, matching your cells well, and wiring the balance connectors correctly.
Zbotic stocks BMS boards, 18650 holders, charging modules, and all the accessories needed to build your battery pack from scratch. Explore our Batteries, Power & Charging category today and start building with confidence!


Add comment