
Building an autonomous delivery bot with ROS and LiDAR is one of the most rewarding robotics projects you can tackle in 2024. Whether you’re a student, hobbyist, or engineer exploring last-mile automation, this guide walks you through every layer — from chassis selection to SLAM-based navigation — using components you can source right here in India. By the end, your bot will map its environment, plan collision-free paths, and deliver payloads without any human input.
What Is an Autonomous Delivery Bot?
An autonomous delivery bot is a ground vehicle that uses sensors, onboard compute, and software algorithms to navigate from point A to point B without human guidance. Commercial versions like Starship Technologies’ sidewalk robots and Amazon Scout use multi-layer sensor fusion. A DIY version built around the Robot Operating System (ROS) can achieve the same fundamental capability at a fraction of the cost.
The core pipeline is:
- Perception — LiDAR scans the environment and builds a 2D or 3D occupancy map.
- Localisation — The bot estimates its own position within that map using AMCL (Adaptive Monte Carlo Localisation).
- Planning — The
move_basestack generates a global path and local obstacle-avoidance trajectory. - Execution — Velocity commands flow to motor drivers, turning planned motion into physical movement.
For a typical indoor delivery scenario — think office corridors or college campus paths — a 2D LiDAR + differential-drive chassis is sufficient and cost-effective.
Hardware You Need
Here is a practical Bill of Materials (BOM) for a mid-range autonomous delivery bot build:
- Compute: Raspberry Pi 4B (4GB) or NVIDIA Jetson Nano
- LiDAR: RPLIDAR A1 or A2 (360° 2D scan, 6–10 m range)
- Chassis: 4-wheel or mecanum-wheel platform with enough payload area
- Motor Driver: L298N or TB6612FNG for differential drive
- Power: 3S LiPo (11.1 V) or 18650 Li-ion pack with 5V BEC
- IMU: MPU6050 for odometry fusion
- Camera (optional): Raspberry Pi Camera Module for object detection
- Encoder Motors: 12V DC motors with quadrature encoders for precise odometry
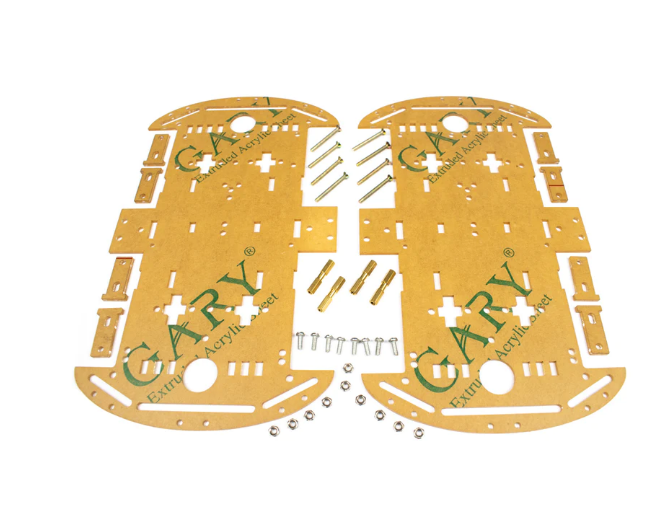
4 Wheels Car Chassis Acrylic Frame
Sturdy acrylic 4-wheel chassis — ideal base for your delivery bot with ample mounting space for LiDAR, Raspberry Pi, and payload compartment.
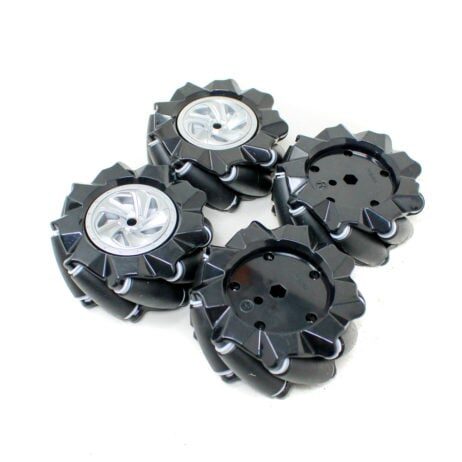
80mm-A Mecanum Wheel (Pack of 4) – Black
Mecanum wheels allow omnidirectional movement — perfect for tight indoor corridors where a delivery bot needs to navigate without turning in place.
Setting Up ROS on Raspberry Pi / Jetson Nano
For a Raspberry Pi 4, use ROS Noetic on Ubuntu 20.04 (64-bit). For Jetson Nano, JetPack 4.6 ships with Ubuntu 18.04, making ROS Melodic the natural choice. Here’s the condensed setup flow:
# On Ubuntu 20.04 (RPi 4)
sudo sh -c 'echo "deb http://packages.ros.org/ros/ubuntu focal main" > /etc/apt/sources.list.d/ros-latest.list'
sudo apt-key adv --keyserver hkp://ha.pool.sks-keyservers.net:80 --recv-key C1CF6E31E6BADE8868B172B4F42ED6FBAB17C654
sudo apt update && sudo apt install -y ros-noetic-desktop
echo "source /opt/ros/noetic/setup.bash" >> ~/.bashrc
sudo apt install -y python3-rosdep python3-rosinstall
sudo rosdep init && rosdep update
Create a catkin workspace and install the navigation stack:
mkdir -p ~/catkin_ws/src && cd ~/catkin_ws
catkin_make
sudo apt install -y ros-noetic-navigation ros-noetic-slam-gmapping ros-noetic-robot-localization
Your workspace is the home for all custom packages — robot description (URDF), launch files, and configuration YAML files for move_base.
Integrating LiDAR for Environment Mapping
The RPLIDAR A1 connects via USB and publishes /scan LaserScan messages at 5–10 Hz. Install the ROS driver:
sudo apt install -y ros-noetic-rplidar-ros
# Grant USB permission
sudo chmod 777 /dev/ttyUSB0
# Launch the driver
roslaunch rplidar_ros rplidar.launch
Verify the scan in RViz by adding a LaserScan display on topic /scan. You should see a 360° ring of distance readings. Mount the LiDAR at the highest point of your chassis, away from motor noise and metal interference, for the cleanest readings.
Coordinate Frames: Define a URDF with a base_link and laser frame, linked by a fixed transform. Publish this transform with a static transform publisher:
rosrun tf static_transform_publisher 0 0 0.1 0 0 0 base_link laser 100SLAM & Autonomous Navigation with move_base
SLAM (Simultaneous Localisation and Mapping) lets the bot build a map while figuring out where it is within that map — chicken-and-egg solved simultaneously. GMapping is the easiest SLAM algorithm to start with on a 2D LiDAR bot:
roslaunch slam_gmapping slam_gmapping.launch
# Save map after exploring
rosrun map_server map_saver -f ~/maps/my_map
Once the map is saved, switch to navigation mode with AMCL for localisation:
roslaunch my_bot navigation.launch map_file:=/home/pi/maps/my_map.yamlThe move_base node ties together the global planner (Dijkstra), local planner (DWA — Dynamic Window Approach), costmaps, and recovery behaviours. Key YAML parameters to tune:
inflation_radius: Set slightly larger than bot width for safe margins.max_vel_x: Keep at 0.3–0.5 m/s indoors to avoid overshooting.xy_goal_tolerance: 0.05 m for precise docking.sim_time(DWA): 2–3 s lookahead for smooth trajectories.
Send navigation goals via rviz (2D Nav Goal button) or programmatically through an actionlib client in Python.
Motor Control & Drive System
The ROS cmd_vel topic (geometry_msgs/Twist) carries linear and angular velocity commands. A microcontroller node (Arduino or ESP32 running rosserial) subscribes to cmd_vel and translates it to PWM signals for the motor driver.
// Arduino rosserial sketch snippet
#include <ros.h>
#include <geometry_msgs/Twist.h>
void cmd_velCB(const geometry_msgs::Twist& msg){
  float linear = msg.linear.x;
  float angular = msg.angular.z;
  int leftPWM  = constrain((linear - angular * WHEEL_BASE/2) * PWM_SCALE, -255, 255);
  int rightPWM = constrain((linear + angular * WHEEL_BASE/2) * PWM_SCALE, -255, 255);
  setMotors(leftPWM, rightPWM);
}
Encoder feedback is critical — without it, odometry drifts and localisation breaks down within metres. Connect encoder channels to interrupt pins on your microcontroller and publish /odom using nav_msgs/Odometry.
80mm-A Mecanum Wheel (Pack of 4) – Blue
Colour-coded mecanum wheels make assembly easier — blue for left, black for right — while providing omnidirectional motion for your autonomous bot.
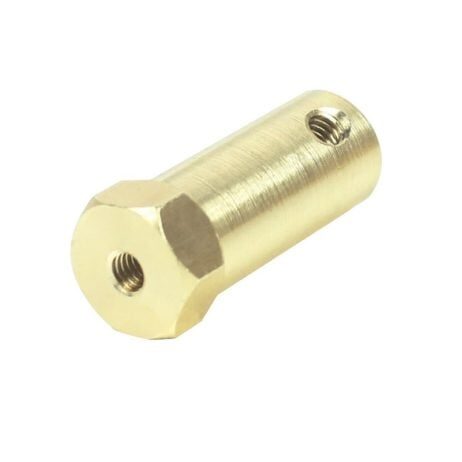
4mm Hex Coupling for Robot Smart Car Wheel (30mm)
Secure your wheels to motor shafts with precision hex couplings — essential for consistent odometry and reliable drive performance.
Payload Delivery Mechanism
The delivery mechanism is what differentiates a delivery bot from a regular autonomous rover. Common approaches include:
- Servo-actuated tray: An SG90 or MG996R servo tilts the payload tray to drop items at the destination.
- Electromagnet latch: Energise a 12V electromagnet to hold the payload; cut power at destination to release.
- Linear actuator: Push a drawer-style compartment open using a small linear actuator.
A ROS action server running on the Pi can trigger delivery upon reaching the goal:
if result.status == 3:  # SUCCEEDED
    servo_pub.publish(90)  # open tray
    rospy.sleep(3)
    servo_pub.publish(0)   # close tray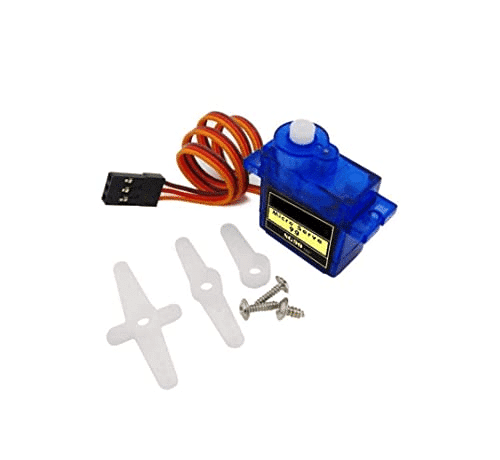
TowerPro SG90 180 Degree Rotation Servo Motor
Reliable, lightweight servo for actuating your delivery tray or latch mechanism — easy to control via Arduino or Raspberry Pi GPIO.
Frequently Asked Questions
Can I run ROS on an Arduino alone?
No. Arduino can run rosserial as a ROS node for motor control and sensor reading, but the full ROS navigation stack (GMapping, AMCL, move_base) requires a Linux SBC like Raspberry Pi or Jetson Nano.
What is the range of RPLIDAR A1?
The RPLIDAR A1 has a typical range of 6 m (up to 12 m in ideal conditions) and a 360° field of view at 5–10 Hz. For indoor delivery in corridors and rooms, this is more than adequate.
How accurate is GMapping SLAM?
GMapping achieves centimetre-level map accuracy in small to medium indoor environments (up to ~50m×50m). For larger spaces, consider Cartographer or RTAB-Map.
Do I need encoder motors?
Encoder feedback is strongly recommended. Without it, odometry is purely time/velocity-based and drifts significantly, making AMCL localisation unreliable after a few metres of travel.
What battery life can I expect?
A 3S 5000mAh LiPo typically gives 1–2 hours of autonomous operation depending on motor load, compute, and LiDAR power draw (~2.5W for RPLIDAR A1).
Ready to Build Your Autonomous Delivery Bot?
All the components you need — chassis, mecanum wheels, hex couplings, and servo motors — are available at Zbotic.in with fast shipping across India. Start with the chassis and wheels, get your ROS stack running in simulation first, then integrate hardware iteratively.


Add comment