
Whether you travel often, forget to water your plants, or simply want to automate your home garden, an automatic plant watering system with a servo-controlled valve and soil moisture sensor is a satisfying weekend project that genuinely makes life easier. Unlike simple timer-based irrigation, a sensor-driven system waters only when the soil actually needs it — saving water, protecting roots from over-watering, and keeping your plants healthier.
In this guide you will build a complete Arduino-based automatic plant watering system from scratch: soil moisture sensing, servo-actuated water valve, pump control, a status LED indicator, and optional LCD readout. Every component is available in India from Zbotic, and the total cost comes in well under ₹1,500.
How the System Works
The logic is elegantly simple. A resistive soil moisture sensor is buried in your plant pot. The Arduino reads the sensor every few minutes. If the moisture value falls below a preset threshold (meaning the soil is dry), the Arduino commands the servo to rotate 90° — opening a water valve or tilting a nozzle — and simultaneously activates a small submersible pump. After a set watering duration (say 5–10 seconds), the pump stops and the servo returns to 0° (closed position). The system waits for the next reading interval before checking again.
This prevents over-watering because once the soil is wet, the sensor reading rises above the threshold and the system stays dormant. A red LED lights when soil is dry, green when moist, giving at-a-glance status without needing a screen.
Components You Need
| Component | Specification | Quantity |
|---|---|---|
| Arduino Uno / Nano | ATmega328P | 1 |
| Servo Motor | SG90 (9g) or MG996R (13kg) | 1 |
| Soil Moisture Sensor | Resistive or capacitive module | 1 |
| Mini Submersible Pump | 3V–12V DC | 1 |
| NPN Transistor or Relay Module | 2N2222 / 5V relay | 1 |
| LEDs (red + green) | 5mm standard | 2 |
| Resistors 220Ω | For LEDs | 2 |
| Plastic water valve / nozzle | Servo-controlled arm | 1 |
| Jumper wires & breadboard | Standard | As needed |
| Power supply | 5V 2A USB or 12V adapter | 1 |
Understanding the Soil Moisture Sensor
The most common soil moisture sensor for Arduino projects is the resistive type — two exposed metal probes that measure electrical resistance through the soil. Wet soil has lower resistance (higher conductivity), dry soil has higher resistance. The module outputs both a digital pin (HIGH/LOW against a threshold set by a potentiometer) and an analogue pin (0–1023 on Arduino’s 10-bit ADC).
Use the analogue output for this project rather than digital — it gives you precise, graduated readings so you can set exact moisture thresholds in software rather than relying on a hardware potentiometer that can drift.
Probe placement: Insert the probes 3–5 cm into the soil, avoiding the root ball. Clean the probes with fine sandpaper occasionally as corrosion builds on resistive sensors. For longer-lasting sensors consider capacitive moisture sensors — they are more expensive but do not corrode.
Reading interpretation: On a 5V Arduino with a resistive sensor: values near 1023 = very dry, values near 200–300 = saturated/wet. The exact numbers depend on your specific soil mix, so calibrate as explained in the calibration section below.
Using a Servo Motor as a Water Valve
A servo motor makes an excellent valve actuator because it holds its commanded position precisely and returns to the same angle every time. For this project the servo does one of two things:
- Directly open/close a small ball valve: Attach the servo horn to a ball valve handle. A 90° rotation opens or closes the valve. Works best with 1/4-inch or 3/8-inch plastic valves from irrigation supply shops.
- Actuate a nozzle deflector: 3D-print or fabricate a simple pivoting deflector over a water nozzle. Servo rotates 90° to direct water into the pot, then returns to divert water away.
For small indoor pots, the SG90 9g servo provides adequate torque (1.8 kg-cm) to operate lightweight valves. For outdoor irrigation with higher water pressure (gravity-fed tanks), upgrade to the MG996R (13 kg-cm) for reliable valve operation.
Mount the servo using the included screws and a 3D-printed or purchased servo bracket. Ensure the mounting is rigid — a flexing mount causes the valve position to vary with torque load.
Circuit Diagram & Wiring
Here is the complete wiring for the system:
Arduino Uno Connections:

-- Soil Moisture Sensor --
VCC  → 5V
GND  → GND
AOUT → A0 (Analogue)

-- Servo Motor (SG90/MG996R) --
Red (VCC)    → 5V (or external 5V if using MG996R)
Brown (GND)  → GND
Orange (SIG) → D9 (PWM pin)

-- Pump via Transistor --
Base of 2N2222 → D7 (via 1kΩ resistor)
Collector      → Pump negative terminal
Emitter        → GND
Pump positive  → 12V (separate supply)
Flyback diode across pump terminals (1N4007)

-- Alternatively, use a 5V relay module --
IN  → D7
VCC → 5V
GND → GND
NO (Normally Open) → one pump terminal
COM → 12V supply positive

-- LEDs --
Green LED → D5 via 220Ω → GND
Red LED   → D6 via 220Ω → GND
Important: The MG996R servo draws up to 700mA at stall. Power it from a separate 5V 2A supply with a common ground to the Arduino. Powering a MG996R from the Arduino 5V pin risks browning out the microcontroller and causing erratic resets.
Arduino Code Walkthrough
Below is the complete annotated sketch:
#include <Servo.h>

Servo waterValve;

const int MOISTURE_PIN  = A0;
const int SERVO_PIN     = 9;
const int PUMP_PIN      = 7;
const int LED_GREEN     = 5;
const int LED_RED       = 6;

// Calibrate these values for your soil
const int DRY_THRESHOLD   = 600;  // Above this = dry soil
const int WATER_DURATION  = 8000; // Milliseconds pump runs
const long CHECK_INTERVAL = 30000;// Check soil every 30 seconds

unsigned long lastCheckTime = 0;

void setup() {
  waterValve.attach(SERVO_PIN);
  waterValve.write(0);           // Start closed
  pinMode(PUMP_PIN,  OUTPUT);
  pinMode(LED_GREEN, OUTPUT);
  pinMode(LED_RED,   OUTPUT);
  digitalWrite(PUMP_PIN, LOW);
  Serial.begin(9600);
  delay(1000);
}

void loop() {
  unsigned long now = millis();
  if (now - lastCheckTime >= CHECK_INTERVAL) {
    lastCheckTime = now;
    checkAndWater();
  }
}

void checkAndWater() {
  int moisture = analogRead(MOISTURE_PIN);
  Serial.print("Moisture reading: ");
  Serial.println(moisture);

  if (moisture > DRY_THRESHOLD) {
    // Soil is DRY — water the plant
    Serial.println("Soil dry — watering!");
    digitalWrite(LED_RED,   HIGH);
    digitalWrite(LED_GREEN, LOW);

    waterValve.write(90);          // Open valve
    delay(200);                    // Let valve open fully
    digitalWrite(PUMP_PIN, HIGH);  // Start pump
    delay(WATER_DURATION);         // Water for set duration
    digitalWrite(PUMP_PIN, LOW);   // Stop pump
    delay(200);
    waterValve.write(0);           // Close valve

  } else {
    // Soil is MOIST — do nothing
    Serial.println("Soil moist — OK");
    digitalWrite(LED_GREEN, HIGH);
    digitalWrite(LED_RED,   LOW);
    // Ensure pump is off and valve closed
    digitalWrite(PUMP_PIN, LOW);
    waterValve.write(0);
  }
}
Upload this sketch and open the Serial Monitor at 9600 baud. You will see moisture readings printed every 30 seconds. Insert the sensor probes into dry soil and wet soil alternately to verify the readings match your expectations before finalising the threshold value.
Adding a Water Pump
The Arduino digital output can only source/sink ~40mA — not enough to run even a small 3V pump directly. You need a driver stage:
Option 1 — NPN Transistor (2N2222/TIP120): Connect a 1kΩ resistor from D7 to the base of a 2N2222. Connect the collector to the pump’s negative terminal. Connect the pump’s positive terminal to your supply voltage. Add a 1N4007 flyback diode across the pump (cathode to positive). This works for 3V–12V pumps drawing up to 600mA (TIP120) or 150mA (2N2222).
Option 2 — Relay Module: A 5V single-channel relay module is the simplest approach. Connect IN to D7, and switch the pump power through the relay’s normally-open contacts. This handles any pump voltage and current rating, is electrically isolated, and is beginner-friendly.
For pots under 5 litres, a small 3V–5V USB submersible pump running for 5–8 seconds delivers about 50–100 mL — usually enough to saturate the top 10 cm of potting mix. For larger planters or outdoor raised beds, use a 12V pump and increase WATER_DURATION.
Calibrating the Moisture Threshold
Follow these steps to calibrate your specific sensor in your specific soil:
- Fill the pot with completely dry soil. Note the analogue reading (will be 700–1000). This is your DRY reference.
- Water the soil thoroughly until runoff appears. Wait 10 minutes. Note the analogue reading (will be 100–400). This is your WET reference.
- Set DRY_THRESHOLD to about 70% of the way from wet to dry. Example: wet=250, dry=850 → range=600, 70%=420, threshold=250+420=670.
- This threshold corresponds to moderately moist soil — neither saturated nor parched.
Repeat calibration if you change soil mix, pot size, or sensor brand. Resistive sensors are sensitive to the mineral content of water and soil, so readings can drift slightly over weeks. Re-calibrate monthly if precision matters.
Weatherproofing & Enclosure Tips
For indoor use, a small plastic project box is sufficient. Mount the Arduino inside, run wires through sealed grommets to the servo and sensor. Keep electronics away from water splashes.
For outdoor or balcony use:
- Use an IP65-rated junction box (available at hardware stores for ₹80–200)
- Apply conformal coating spray to the Arduino PCB and sensor module PCB to protect against humidity
- Use silicone sealant around all cable entry points
- Position the electronics box at least 30 cm above the water reservoir
- Use UV-resistant cable ties and waterproof connectors for outdoor wiring runs
Optional Upgrades
1. Multiple Plant Zones
Add a second sensor, second servo, and second pump control transistor for a different pot. Simply extend the code with a second checkAndWater() call using different pin numbers and thresholds.
2. LCD Display
A 16×2 I2C LCD shows real-time moisture percentage and last watering time — useful for monitoring without opening the Serial Monitor.
3. RTC (Real-Time Clock) for Timed Override
Add a DS3231 RTC module and code a scheduled watering at 6 AM daily regardless of sensor reading. Useful as a backup if the sensor probes corrode.
4. Bluetooth / Wi-Fi Monitoring
Replace Arduino Uno with an ESP8266 or ESP32. Add MQTT logging to a home automation system like Home Assistant or Node-RED. Monitor moisture levels remotely from your phone.
5. Capacitive Moisture Sensor
Switch from the resistive sensor to a capacitive type. It lasts indefinitely in soil without corrosion and gives more stable long-term readings. Highly recommended for any permanent installation.
Recommended Products from Zbotic
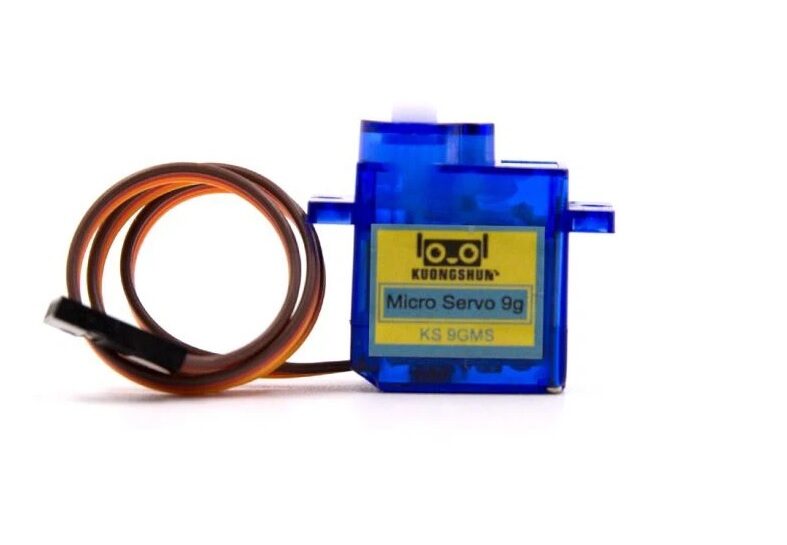
Servo SG90 9g 180 Degree
The standard beginner servo, lightweight and affordable — perfect for operating small irrigation valves or nozzle deflectors on indoor plant watering systems.
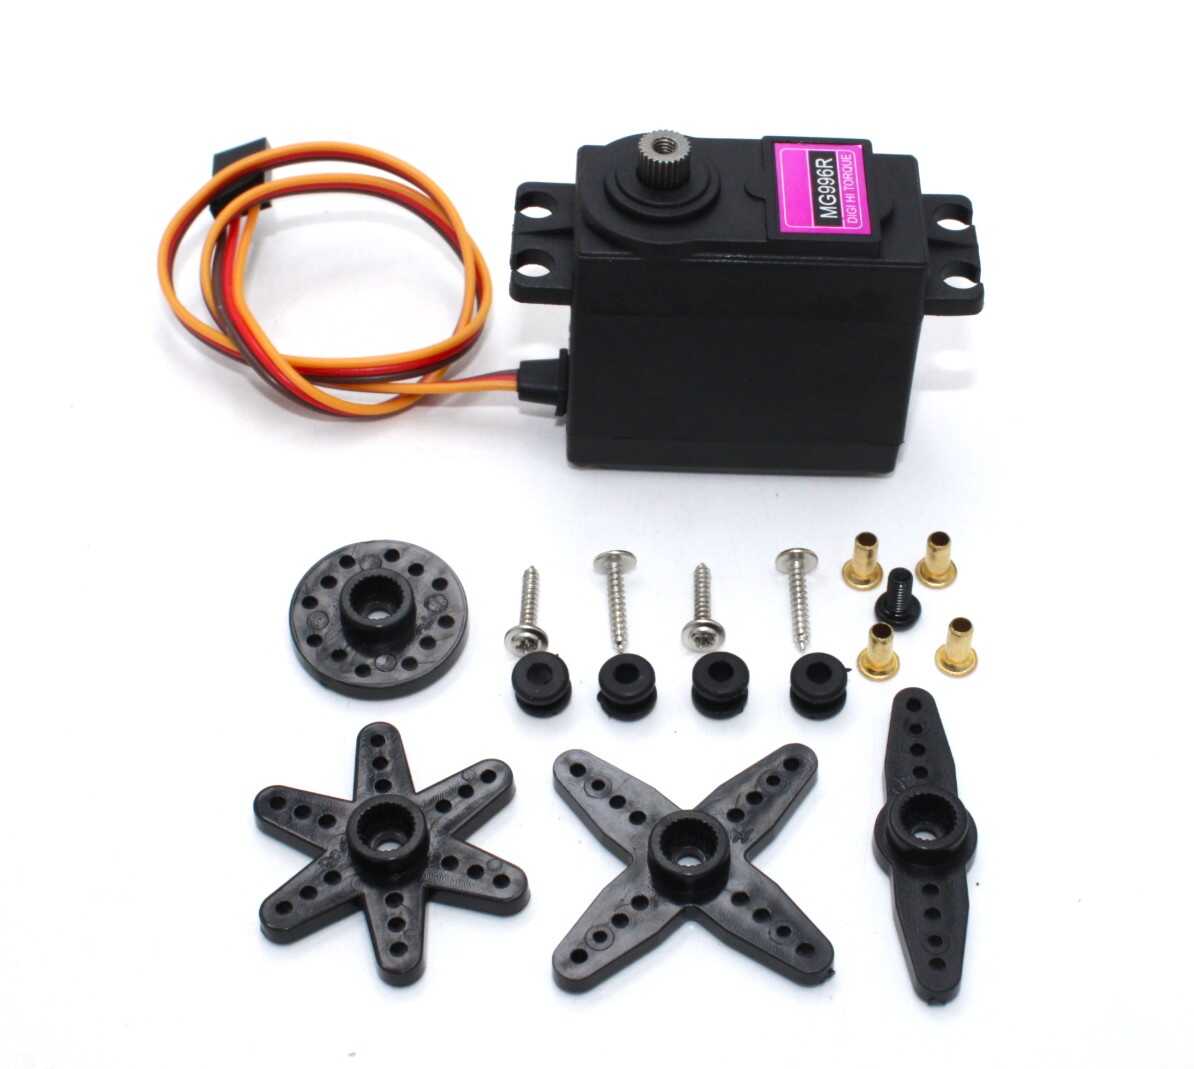
Servo MG996 13KG 180 Degree (High Quality)
Metal-geared, 13 kg-cm torque servo — the right choice for outdoor irrigation where higher water pressure demands a stronger valve actuator that won’t slip under load.
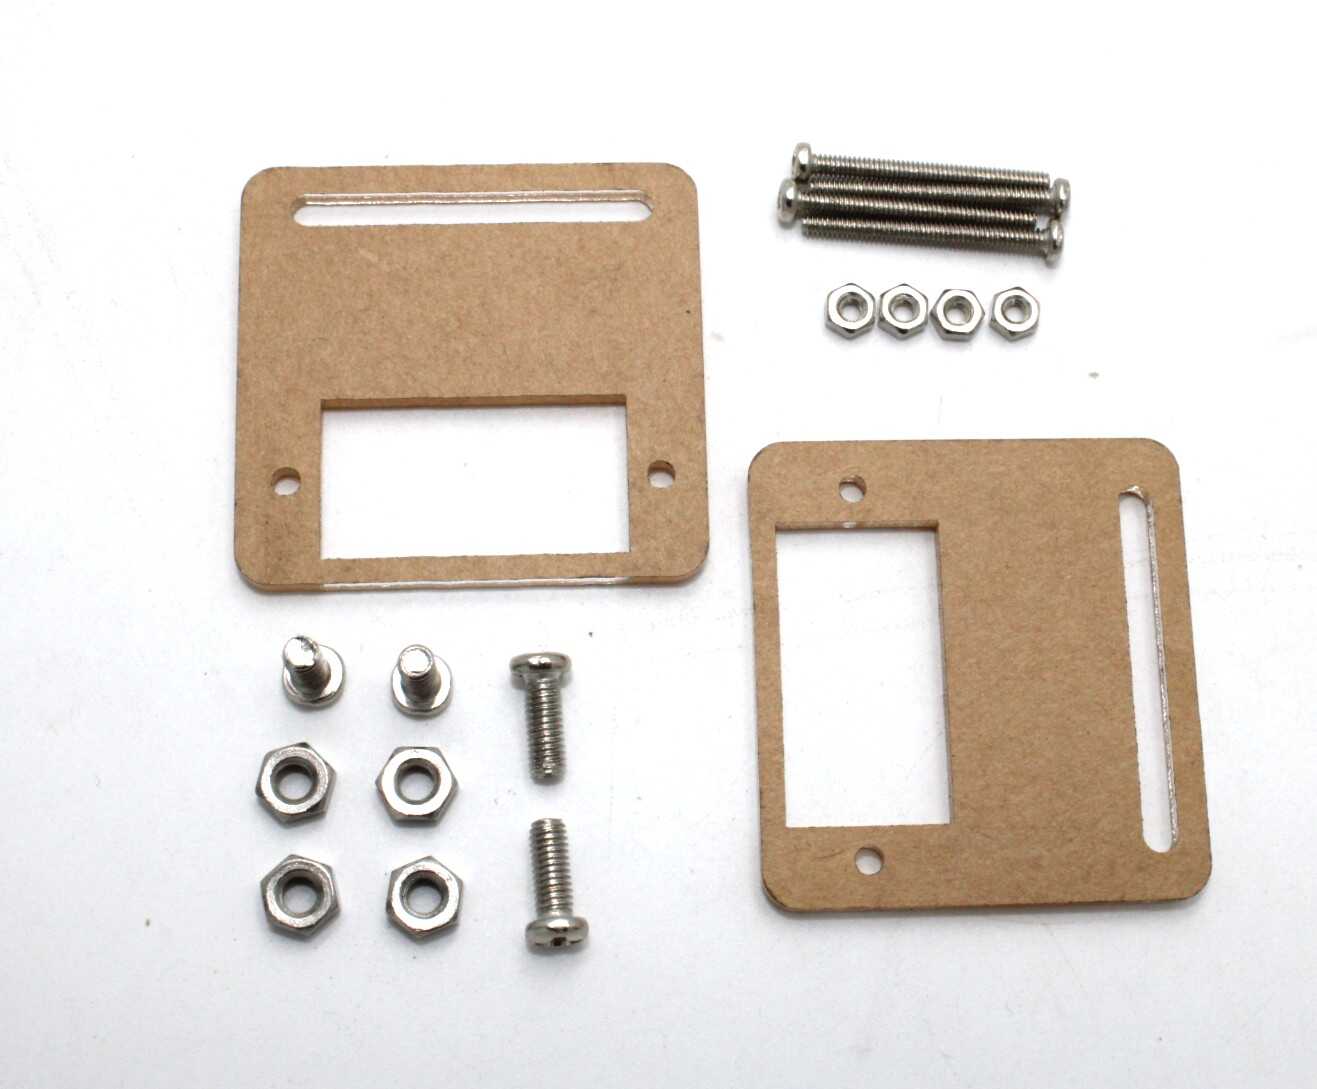
Servo Mount Holder Bracket for SG90/MG90 (Pack of 2)
Rigid plastic servo mounting brackets — essential for securing the servo firmly to your valve assembly so the valve position stays accurate over thousands of open/close cycles.

12V High Quality DC Mini Submersible Pump
Compact, quiet 12V submersible pump that fits inside a water reservoir bottle. Works perfectly with a relay module controlled from Arduino to deliver measured water to your plants.
Frequently Asked Questions
Can I use a solenoid valve instead of a servo?
Yes. A 12V solenoid valve gives faster, more reliable operation than a servo-actuated ball valve. Connect it through a relay module. The code change is minimal — replace servo.write() commands with digitalWrite(SOLENOID_PIN, HIGH/LOW). Solenoid valves require constant power to stay open, unlike servo ball valves which hold position without power.
How long will one water tank last?
A 1-litre reservoir with an 8-second pump cycle delivering ~80 mL per cycle lasts approximately 12 watering cycles. For a single small pot checking every 30 minutes, that is potentially several days between refills — longer in cool weather when plants use less water.
Why does my sensor reading fluctuate?
Resistive sensors pick up electrical noise. Add a 100nF capacitor between A0 and GND, and use analogRead() averaging (take 10 readings and average them) in code. Also keep sensor wires short and away from motor/pump cables to minimise EMI pickup.
Can the servo get damaged by water?
Standard SG90 and MG996R servos are not waterproof. Position the servo away from direct water spray. A simple 3D-printed enclosure or folded aluminium shield protects the servo body while allowing the horn/arm to move freely.
Can I run this from a solar panel?
Yes. A 5W 6V solar panel with a 3.7V LiPo battery and a TP4056 charger module powers this system indefinitely outdoors. Deep-sleep the Arduino between checks to keep average current under 5mA, giving weeks of runtime from a single 2,000mAh cell even with overcast days.
All components for this automatic plant watering project are available at Zbotic’s Motors & Actuators section. We stock SG90, MG996R servos, submersible pumps, and all accessories with fast delivery across India.


Add comment