Introduction:
Traffic light controller helps to manage the traffic and to maintain proper traffic management. These systems are placed at the intersections of the road or at the crossings to avoid congestions and accidents. The systems indicate to the driver by using different colors of light. Therefore, it is simple to avoid congestion at the intersections.
Component Required:
- Arduino Uno
- Uno Cable
- Small Breadboard
- LEDs(Red*3,Yellow*3,Green*3)
- Resistor(220ohm*3)
- Jumper Wires
- 9V battery
- Battery snapper connector
Circuit Diagram:

Connections:
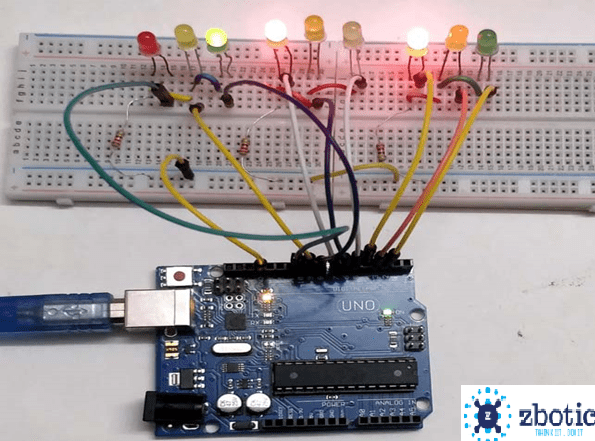
Connect all LED’s GND pin to GND through 220ohm resistors
Connect 1st Red LED +ve pin to Arduino pin 8
Connect 2nd Red LED +ve pin to Arduino pin 5
Connect 3rd Red LED +ve pin to Arduino pin 2
Connect 1st yellow LED +ve pin to Arduino pin 9
Connect 2nd yellow LED +ve pin to Arduino pin 6
Connect 3rd yellow LED +ve pin to Arduino pin 3
Connect 1st Green LED +ve pin to Arduino pin 10
Connect 2nd Green LED +ve pin to Arduino pin 7
Connect 3rd Green LED +ve pin to Arduino pin 4
Code for Traffic Light Controller by Using Arduino
void setup() {
// configure the output pins
pinMode(2,OUTPUT);
pinMode(3,OUTPUT);
pinMode(4,OUTPUT);
pinMode(5,OUTPUT);
pinMode(6,OUTPUT);
pinMode(7,OUTPUT);
pinMode(8,OUTPUT);
pinMode(9,OUTPUT);
pinMode(10,OUTPUT);
}
void loop()
{
digitalWrite(2,1); //enables the 1st set of signals
digitalWrite(7,1);
digitalWrite(10,1);
digitalWrite(4,0);
digitalWrite(3,0);
digitalWrite(6,0);
digitalWrite(8,0);
digitalWrite(9,0);
digitalWrite(5,0);
delay(5000);
digitalWrite(3,1); //enables the yellow lights
digitalWrite(6,1);
digitalWrite(2,0);
digitalWrite(7,0);
delay(1000);
digitalWrite(4,1); //enables the 2nd set of signals
digitalWrite(5,1);
digitalWrite(10,1);
digitalWrite(2,0);
digitalWrite(3,0);
digitalWrite(6,0);
digitalWrite(8,0);
digitalWrite(9,0);
digitalWrite(7,0);
delay(5000);
digitalWrite(9,1); //enables the yellow lights
digitalWrite(6,1);
digitalWrite(10,0);
digitalWrite(5,0);
digitalWrite(4,0);
delay(1000);
digitalWrite(8,1); //enables the 3rd set of signals
digitalWrite(4,1);
digitalWrite(7,1);
digitalWrite(2,0);
digitalWrite(3,0);
digitalWrite(5,0);
digitalWrite(6,0);
digitalWrite(9,0);
digitalWrite(10,0);
delay(5000);
digitalWrite(9,1); //enables the yellow lights
digitalWrite(3,1);
digitalWrite(7,0);
digitalWrite(8,0);
digitalWrite(4,0);
delay(1000);
}




2 comments on “Traffic Light Controller by Using Arduino”
Aditya Patil
Best
Aditya Patil
Best for students to learn