
Table of Contents
- What Is Soil EC and Why Does Salinity Matter?
- How Soil EC Conductivity Sensors Work
- Types of Soil EC Sensors
- Key Specifications and Reading EC Values
- Interfacing an EC Sensor with Arduino
- Calibration Procedure Step by Step
- Temperature Compensation
- Applications in Agriculture and Hydroponics
- Interpreting EC Results for Different Crops
- Frequently Asked Questions
What Is Soil EC and Why Does Salinity Matter?
Soil Electrical Conductivity (EC) is a measure of how well the soil conducts an electrical current. It is expressed in milliSiemens per centimetre (mS/cm) or microSiemens per centimetre (µS/cm). The electrical conductivity of soil is determined by the concentration and mobility of dissolved ions — primarily salts like sodium chloride (NaCl), calcium sulphate, magnesium sulphate, and potassium chloride.
Why does this matter for farming and plant science? Because soil salinity — the total dissolved salt concentration — directly affects plant health and crop yield. Soil that is too salty (high EC) creates osmotic stress: water is actually drawn out of plant roots rather than being absorbed, causing wilting and nutrient starvation even when the soil appears moist. This physiological drought effect can reduce yields by 20–80% depending on crop sensitivity and salinity level.
In India, salinity is a significant agricultural challenge. The Central Soil Salinity Research Institute (CSSRI) estimates that over 6.7 million hectares of agricultural land in India are affected by salt-affected soils (saline and sodic), particularly in Uttar Pradesh, Punjab, Haryana, Rajasthan, Gujarat, and coastal areas. Monitoring soil EC helps farmers:
- Identify salt-affected zones within a field and apply targeted remediation
- Optimise irrigation management to prevent secondary salinisation from poor-quality water
- Monitor fertigation nutrient levels in greenhouses and hydroponics
- Track seasonal EC changes and adjust crop variety selection
- Verify the effectiveness of leaching and gypsum amendment treatments
EC sensors make this monitoring affordable, continuous, and actionable — instead of sending soil samples to a lab every few months, farmers and growers can have real-time EC readings at their fingertips.
How Soil EC Conductivity Sensors Work
EC sensors work by applying an alternating electrical current between two or more electrodes inserted into the soil and measuring the resulting voltage. By Ohm’s law, resistance (and therefore conductivity) can be calculated from the current and voltage relationship. The sensor reports conductivity — the reciprocal of resistance — normalised to the electrode geometry (cell constant, K, expressed in cm⁻¹).
Alternating current (AC) is used instead of direct current (DC) for two critical reasons. First, DC current causes electrolysis of water, generating hydrogen and oxygen bubbles that interfere with measurements and corrode electrodes. Second, AC avoids electrode polarisation — the buildup of charge at the electrode surface that changes the effective resistance being measured.
Most modern soil EC sensors use frequencies between 1 kHz and 30 kHz. Higher frequencies reduce electrode polarisation effects. The electrode cell constant K must be known (or calibrated) to convert the raw conductance measurement into a conductivity value in mS/cm. Professional sensors come factory-calibrated; DIY sensors made from stainless steel probes require calibration against a known EC standard solution.
Electromagnetic Induction (EMI) EC Sensors
For field-scale EC mapping, electromagnetic induction instruments like the Geonics EM38 or the DualEM create an electromagnetic field that induces eddy currents in the soil. The magnitude of the secondary electromagnetic field generated by these eddy currents is proportional to EC. EMI instruments do not require electrode contact with the soil, allowing extremely fast measurements across large areas. However, they are expensive (₹2–₹10 lakhs) and primarily used for precision agriculture research and large-scale farm management.
Types of Soil EC Sensors
Two-Electrode Contact Sensors
The simplest design — two metal electrodes inserted into soil with a known separation. Good for laboratory and greenhouse use. Subject to electrode fouling and polarisation over time in field conditions. Many low-cost Arduino-compatible EC modules use this principle.
Four-Electrode (Wenner Array) Sensors
Two outer electrodes inject current; two inner electrodes measure voltage. This separates the current injection from the voltage measurement, eliminating electrode contact resistance effects. More accurate and stable than two-electrode designs. Common in professional-grade field sensors.
Toroidal (Inductive) Sensors
Uses two toroids (ferrite cores with wire windings) to inductively drive and sense current through a closed liquid path. Truly non-contact with the solution — excellent for corrosive or coating environments. Not suitable for soil insertion; used in liquid nutrient solutions and seawater.
TDR (Time Domain Reflectometry) Sensors
TDR sensors simultaneously measure both volumetric water content and EC by analysing the propagation of electromagnetic pulses along waveguide rods. The most scientifically rigorous approach, also the most expensive. Used in research stations and precision irrigation projects.

Capacitive Soil Moisture Sensor
Pair with an EC sensor to get complete soil health data. Capacitive design avoids electrolysis issues and corrosion, giving stable readings over extended field deployments.
Key Specifications and Reading EC Values
When evaluating an EC sensor, check these specifications:
- Measurement Range: Typical soil EC ranges from 0 to 4 mS/cm for agricultural soils. Saline soils can reach 8–16 mS/cm. Hydroponic nutrient solutions range from 0.5 to 5 mS/cm. Choose a sensor covering your expected range.
- Accuracy: ±2% full scale is acceptable for agriculture; ±0.5% for research and hydroponics.
- Resolution: 0.01 mS/cm resolution is sufficient for most applications.
- Temperature Compensation: EC readings change by approximately 2% per °C. Sensors with built-in temperature compensation (reporting EC at 25°C reference) give comparable readings across seasons.
- Electrode Material: Titanium or platinum electrodes last longest in field conditions. Stainless steel is adequate for most DIY applications. Graphite electrodes are low-cost but wear quickly.
- Output: Analogue voltage (0–3 V, 0–5 V), 4–20 mA, RS-485 Modbus, or digital I2C/UART.
- Waterproofing: IP68 for permanent soil burial; IP65 for occasional wet contact.
Interfacing an EC Sensor with Arduino
A popular and affordable approach is to build a simple EC meter using two stainless steel probes, a TL072 op-amp (or 555 timer oscillator), and an Arduino ADC. However, for reliable and reproducible results, commercial EC sensor modules with onboard signal conditioning are recommended.
Sample Code for Analogue EC Module
// Soil EC Sensor — Analogue output (0-3V range, 0-20 mS/cm)
// Assumes sensor outputs 0V at 0 mS/cm, 3V at 20 mS/cm

#define EC_PIN A0
#define TEMP_PIN A1        // Optional NTC/LM35 for temp compensation
#define VREF 5.0
#define EC_MAX 20.0        // mS/cm at 3V output
#define VOLTAGE_MAX 3.0

void setup() {
  Serial.begin(9600);
  analogReference(DEFAULT);  // 5V reference
  Serial.println("Soil EC Monitor Ready");
}

float readTemperature() {
  int raw = analogRead(TEMP_PIN);
  float voltage = raw * (VREF / 1023.0);
  return voltage * 100.0;  // LM35: 10mV/°C
}

float temperatureCompensate(float ec_raw, float temp) {
  // Compensate EC to 25°C reference
  return ec_raw / (1.0 + 0.02 * (temp - 25.0));
}

void loop() {
  int raw = analogRead(EC_PIN);
  float voltage = raw * (VREF / 1023.0);
  float ec_raw = (voltage / VOLTAGE_MAX) * EC_MAX;

  float temp = readTemperature();
  float ec_25 = temperatureCompensate(ec_raw, temp);

  Serial.print("Raw EC: ");
  Serial.print(ec_raw, 2);
  Serial.print(" mS/cm | Temp: ");
  Serial.print(temp, 1);
  Serial.print(" C | EC@25C: ");
  Serial.print(ec_25, 2);
  Serial.println(" mS/cm");

  delay(2000);
}
Calibration Procedure Step by Step
Calibration is essential for accurate EC readings. Use certified EC calibration solutions available from laboratory supply companies. Common standards are 1.413 mS/cm (KCl solution) and 12.88 mS/cm (high range standard).
Single-Point Calibration (for approximate readings)
- Prepare or purchase a 1.413 mS/cm calibration solution. Ensure it is at 25°C.
- Rinse the sensor probe with distilled water. Pat dry gently.
- Immerse the electrodes fully in the calibration solution. Wait 60 seconds for stabilisation.
- Record the raw ADC value or voltage from the Arduino.
- Calculate the calibration factor: K = Known_EC / Measured_EC.
- Apply K as a multiplier in your code:
ec_calibrated = ec_raw * K;
Two-Point Calibration (recommended for accuracy)
- Perform the first calibration point with 1.413 mS/cm solution — record raw value V1.
- Rinse with distilled water, then perform the second calibration point with 12.88 mS/cm — record raw value V2.
- Calculate slope:
slope = (EC2 - EC1) / (V2 - V1); - Calculate offset:
offset = EC1 - slope * V1; - Apply:
ec = slope * raw_voltage + offset;
Re-calibrate every 3–6 months in field deployments, and always after cleaning the electrodes.
Temperature Compensation
EC is strongly temperature-dependent. The conductivity of a solution increases by approximately 2% for every 1°C increase in temperature. Without temperature compensation, a soil that appears to have higher EC in summer than winter may actually have the same salt concentration — the difference is purely due to temperature.
The standard reference temperature for EC reporting is 25°C. The temperature compensation formula is:
EC₂₅ = EC_measured / (1 + 0.02 × (T – 25))
Where T is the soil temperature in °C. For accurate EC₂₅ values, pair your EC sensor with a DS18B20 temperature probe inserted at the same depth and location as the EC electrodes. This pairing also enables soil temperature monitoring — another valuable agronomic data point.
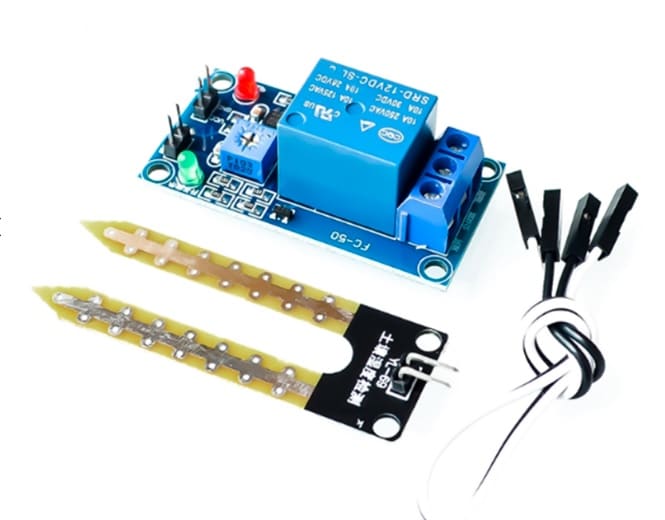
5V 12V Soil Moisture Sensor Relay Control Module
Use alongside your EC sensor for a complete soil monitoring and automatic irrigation control system. Relay output directly drives a pump or solenoid valve.
Applications in Agriculture and Hydroponics
Drip Irrigation Management
In fertigation systems where fertilisers are injected into the irrigation water, EC monitoring at the drip emitters confirms that the correct nutrient concentration is reaching the root zone. Sudden EC drops can indicate a clogged injector; sudden spikes can indicate over-fertilisation. Inline EC sensors at the irrigation head and at the field outlet allow calculation of nutrient uptake efficiency.
Greenhouse and Polyhouse Soil Management
In protected cultivation, salts accumulate over multiple growing seasons due to repeated fertilisation and limited rainfall leaching. Monthly EC mapping of the greenhouse floor helps identify hot spots that need leaching treatment. Many greenhouse operators in Maharashtra, Karnataka, and Tamil Nadu use portable EC meters for routine monitoring.
Hydroponics and NFT Systems
In hydroponic systems, EC is the primary indicator of nutrient solution strength. As plants absorb nutrients, EC drops. As water evaporates, EC rises. An automated EC controller measures EC continuously and adds concentrated nutrient solution or pure water to maintain the setpoint. EC sensors for hydroponics must be highly accurate (±0.5%) and are typically calibrated weekly.
Precision Agriculture Field Mapping
Tractor-mounted EC sensors survey entire fields while driving at normal field speed, recording EC values and GPS coordinates. The resulting EC maps reveal soil variability — areas of high clay content (high EC), sandy zones (low EC), and saline patches. These maps guide variable-rate fertiliser application, irrigation scheduling, and soil amendment strategies.
Soil Remediation Monitoring
After applying gypsum (calcium sulphate) to sodic soils or leaching saline soils with fresh water, EC monitoring tracks the progress of remediation. As salt concentration falls, EC drops — confirming the treatment is working and guiding decisions about when to stop leaching irrigation.
Interpreting EC Results for Different Crops
EC tolerance varies widely between crop species. Here are general guidelines (EC values at 25°C in root zone or irrigation water):
- 0–0.5 mS/cm: Very low salinity. Suitable for all crops. May indicate nutrient deficiency in intensively managed systems.
- 0.5–1.5 mS/cm: Low to medium salinity. Optimal for most field crops including wheat, rice, and vegetables.
- 1.5–3.0 mS/cm: Medium salinity. Tolerant crops (barley, cotton, sugar beet, tomato) perform well. Sensitive crops (beans, strawberry, most ornamentals) show stress.
- 3.0–6.0 mS/cm: High salinity. Only salt-tolerant crops like barley, date palm, and some grasses survive. Significant yield loss in most vegetables and cereals.
- Above 6.0 mS/cm: Extreme salinity. Most agricultural crops cannot grow. Requires intensive remediation before planting.
For hydroponics, optimal EC values differ by growth stage: seedlings 0.8–1.2 mS/cm, vegetative growth 1.2–2.0 mS/cm, flowering/fruiting 2.0–3.0 mS/cm (crop dependent).
Frequently Asked Questions
What is the difference between EC and TDS in soil measurement?
EC (Electrical Conductivity) is the primary measured quantity — it directly measures how well the solution conducts electricity. TDS (Total Dissolved Solids) is a secondary calculation: TDS (ppm or mg/L) ≈ EC (µS/cm) × 0.5 to 0.7 (the conversion factor varies by the ion composition of the solution). Soil scientists prefer EC because it is a direct measurement; hydroponics practitioners often prefer TDS for ease of interpretation.
Can I use the same EC sensor for soil and liquid measurement?
Sensors designed for soil insertion have a specific geometry (probe spacing) optimised for soil contact. Immersing them in liquid may give inaccurate readings because the cell constant is different in free liquid. Inline or submersible EC sensors designed for liquids have different geometries. For the most accurate readings, use sensors designed for the specific application.
How deep should I insert a soil EC sensor?
Insert sensors in the root zone — typically 15–30 cm depth for most annual crops, 30–60 cm for deep-rooted crops. For drip-irrigated crops, place the sensor near the drip emitter at the depth of maximum root density. Multiple sensors at different depths give a profile of salt distribution through the soil column.
Do I need to wet the soil before taking EC readings?
EC readings are strongly affected by moisture content — dry soil has much lower conductivity than moist soil even at the same salt concentration. Many professional EC sensors measure at a standardised moisture level (saturation extract, 1:1 soil-water, or 1:5 soil-water dilution). For in-situ sensors, always pair EC with soil moisture measurement to allow meaningful comparison between readings taken at different times or moisture conditions.
How often should I calibrate my EC sensor?
For field-deployed sensors: calibrate before each deployment season (every 6 months). For hydroponics: calibrate weekly. For soil labs and research: calibrate before each measurement batch. Always recalibrate after the sensor has been cleaned, dropped, or stored dry for an extended period.
What causes high EC in soil and how is it treated?
High soil EC is caused by: excessive fertiliser application (particularly potassium, sodium, and chloride salts), irrigation with high-EC water (saline groundwater or recycled water), seawater intrusion in coastal areas, and natural salt accumulation in arid regions. Treatment methods include: leaching with good-quality water to flush salts below the root zone, applying gypsum for sodic soils, improving drainage to allow leaching, and selecting salt-tolerant crops during the remediation period.
Soil EC conductivity sensing is a cornerstone of modern precision agriculture and smart greenhouse management. Whether you are a student building your first Arduino soil monitor, a farmer investigating a salinity problem in your field, or an agronomist deploying a multi-point wireless sensing network, understanding EC measurement gives you a powerful window into soil health. Start with a simple analogue EC module and an Arduino, calibrate carefully, and you will have a professional-quality tool for salinity monitoring at a fraction of the cost of commercial instruments.


Add comment