
When you are starting an Arduino project that needs to detect sound — a clap switch, a noise-triggered alarm, a basic decibel meter, or an audio visualiser — you are immediately confronted with a choice: use a simple KY-038 sound sensor module, or use a more capable analog microphone module such as the MAX4466, MAX9814, or INMP441?
At first glance both seem to do the same thing: detect sound and output a voltage. But they are designed for very different use cases, and choosing the wrong one can mean hours of frustration trying to make a project work that the sensor was never built for. This in-depth comparison will help you make the right call every time.
KY-038 Sound Sensor: Overview
The KY-038 is a small green breakout board containing a small electret microphone capsule, a single-supply dual comparator IC (typically the LM393), a potentiometer for threshold adjustment, and power/output indicator LEDs. It has four pins: VCC, GND, Digital Output (DO), and Analog Output (AO).
The KY-038 was designed primarily for presence/absence detection — the digital output goes HIGH when sound exceeds a threshold set by the potentiometer. It is optimised for simplicity, not fidelity. The microphone capsule is a basic, unglamorous electret element with no amplification circuitry beyond what the comparator provides.
The analog output does produce a voltage that varies with sound amplitude, but the output is not buffered, gain is minimal, and the usable dynamic range on the Arduino ADC is quite narrow. For most projects, makers use only the digital output.
Analog Microphone Modules: Overview
“Analog microphone module” covers a range of boards built around microphone amplifier ICs. The most common options in the Arduino ecosystem are:
- MAX4466: Fixed or adjustable gain electret microphone amplifier. Output: 0-VCC AC signal centred at VCC/2. Best for amplitude-level reading and audio visualisation.
- MAX9814: Auto-gain-controlled microphone amplifier. Automatically adjusts gain to keep output level consistent across quiet and loud environments. Excellent for voice detection.
- INMP441: MEMS I2S digital microphone. Output is a 24-bit digital stream over I2S. Requires a microcontroller with I2S peripheral (ESP32, STM32, Teensy). Exceptional audio quality but overkill for simple detection.
- Generic electret + op-amp boards: Low-cost boards with a simple non-inverting amplifier. Variable quality, often similar to KY-038 in performance.
All of these modules output a true audio-frequency AC signal with controlled gain, enabling you to read actual waveform data with the ADC rather than just a threshold crossing.
Technical Comparison
| Parameter | KY-038 | MAX4466 Analog Mic |
|---|---|---|
| Output Type | Digital (threshold) + weak analog | Analog (buffered, amplified) |
| Gain Control | Comparator threshold pot only | Adjustable gain (25–125×) |
| Frequency Response | Very limited (comparator, not flat) | Flat 20 Hz – 20 kHz |
| Noise Floor | High (poor SNR) | Low (good SNR ~62 dB) |
| Dynamic Range | Narrow | Wide (usable for dB measurement) |
| ADC Usability | Poor (output barely swings) | Excellent (full 0-5V swing) |
| Ease of Use | Very easy (digital out = HIGH/LOW) | Requires ADC sampling + peak detection |
| Supply Voltage | 3.3V – 5V | 2.4V – 5V |
| Price Range (India) | ₹30–60 | ₹150–350 |
| Best For | Clap switch, noise alarm | dB meter, audio viz, voice detect |
Wiring the KY-038 to Arduino
The KY-038 is as simple as it gets. Connect VCC to 5V, GND to GND, DO to any digital pin (e.g., D2), and optionally AO to A0.
KY-038 VCC → Arduino 5V
KY-038 GND → Arduino GND
KY-038 DO  → Arduino D2
KY-038 AO  → Arduino A0  (optional)
Turn the onboard potentiometer clockwise to increase the threshold (sensor triggers only on louder sounds). Turn counter-clockwise for maximum sensitivity. The onboard LED illuminates when the threshold is exceeded — use this to calibrate without needing a computer connected.
Wiring an Analog Microphone to Arduino
For the MAX4466:
MAX4466 VCC  → Arduino 5V (or 3.3V)
MAX4466 GND  → Arduino GND
MAX4466 OUT  → Arduino A0
The output is centred at VCC/2 (2.5V for 5V supply) and swings above and below that point with audio. No digital output — you read amplitude by sampling rapidly and computing the peak-to-peak voltage.
Code Comparison
KY-038: Clap Switch
const int DO_PIN = 2;
bool lightOn = false;

void setup() {
  pinMode(DO_PIN, INPUT);
  pinMode(LED_BUILTIN, OUTPUT);
}

void loop() {
  if (digitalRead(DO_PIN) == HIGH) {
    lightOn = !lightOn;
    digitalWrite(LED_BUILTIN, lightOn ? HIGH : LOW);
    delay(300);  // debounce
  }
}
Analog Microphone: dB-Level Meter
const int MIC_PIN = A0;

void setup() {
  Serial.begin(115200);
}

void loop() {
  // Sample for 50ms and find peak-to-peak amplitude
  unsigned long start = millis();
  int maxVal = 0, minVal = 1023;

  while (millis() - start < 50) {
    int reading = analogRead(MIC_PIN);
    if (reading > maxVal) maxVal = reading;
    if (reading < minVal) minVal = reading;
  }

  int peakToPeak = maxVal - minVal;

  // Convert to rough dB (not calibrated, just relative)
  float db = 20.0 * log10((float)peakToPeak / 1023.0 * 5.0 / 0.00631);

  Serial.print("Peak-to-peak: "); Serial.print(peakToPeak);
  Serial.print("  Approx dB: "); Serial.println(db, 1);
  delay(100);
}
Use Case Decision Guide
Choose the KY-038 when:
- You need a simple clap switch or noise-triggered relay.
- You want the project to be wired and working in under 10 minutes.
- You need a digital HIGH/LOW output and do not care about the actual sound level.
- Cost is the primary constraint (₹30-60 vs ₹150+).
- You are building a beginner demonstration project.
- The environment has a consistent background noise level so a fixed threshold works well.
Choose an analog microphone module when:
- You need to measure sound amplitude in decibels or relative units.
- You are building an audio visualiser, spectrum analyser, or voice-activated device.
- The environment has variable background noise (a fixed threshold would constantly false-trigger).
- You need to distinguish between different sounds by frequency content (with FFT).
- You want to record audio (use I2S digital mic for this specifically).
- You are building a product that needs consistent, calibratable performance.
The Hybrid Approach
For many projects, you can wire both AO from the KY-038 to an analog pin AND DO to a digital pin, giving you the simplicity of digital interrupt-driven detection with the analog pin available for occasional level reads. This is a pragmatic solution for projects where occasionally measuring amplitude is useful but not core.
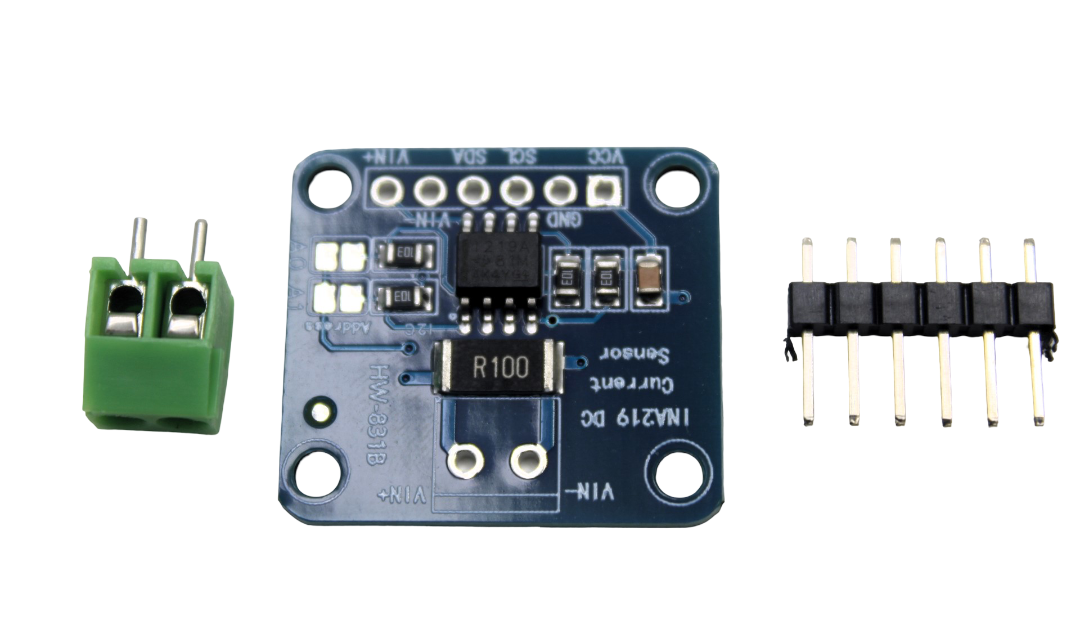
CJMCU-219 INA219 I2C Bidirectional Current / Power Supply Monitoring Module
Pair with your audio project to monitor the power drawn by speakers or amplifier circuits in real-time over I2C.
Pros and Cons Summary
KY-038
Pros:
- Extremely cheap and widely available
- No code required for basic threshold detection
- Onboard LED gives instant visual feedback during calibration
- Works at both 3.3V and 5V
Cons:
- Analog output is noisy and practically unusable for amplitude measurement
- Fixed threshold means false triggers in noisy environments
- No frequency response data — you cannot infer anything about the sound quality
- Potentiometer adjustment is fiddly and sensitive to vibration
MAX4466 / Analog Microphone Modules
Pros:
- Clean, amplified output with flat frequency response
- Full 0-VCC swing enables accurate peak-to-peak amplitude measurement
- Adjustable gain suits different acoustic environments
- Can be used for FFT-based frequency analysis
Cons:
- Higher cost
- Requires more code (sampling loop, peak detection or RMS calculation)
- No built-in digital threshold output — all threshold logic in software
- Arduino’s ADC (10-bit, 100 ksps) limits audio quality; dedicated audio hardware needed for true audio applications
Frequently Asked Questions
Q: Can I use the KY-038’s analog output for an audio visualiser?
In theory yes, but in practice the analog output of the KY-038 is barely usable. The output swing is very small and noisy. For an audio visualiser, use a MAX4466 or MAX9814 module — the difference in output quality is dramatic.
Q: Does the KY-038 work with a 3.3V Arduino (like Arduino Due or Zero)?
Yes. The KY-038 works at 3.3V though the digital output threshold range and analog swing will be proportionally reduced. The comparator still functions correctly.
Q: What is the best microphone module for voice command recognition on Arduino?
For simple loud-clap or noise detection, KY-038 is fine. For voice command recognition you need audio-quality capture — use a MAX9814 or an I2S MEMS microphone (like INMP441) with an ESP32 that can run a wake word detection library like ESP-SR or MicroSpeech (TensorFlow Lite).
Q: Why does my KY-038 constantly trigger even in a quiet room?
The potentiometer is set too sensitive (turned too far counter-clockwise). Slowly turn it clockwise until the trigger LED just goes off in silence. Also check that the sensor is not picking up vibrations through its PCB mounts — use rubber standoffs.
Q: Can I use both DO and AO simultaneously from the KY-038?
Yes, both outputs are independent. DO is the comparator output; AO comes directly from the microphone element through a simple voltage divider. Reading AO while also monitoring DO on an interrupt pin is perfectly valid.
Q: Is the KY-038 suitable for outdoor installations?
No. It has no weather protection. Wind noise alone will cause constant false triggers outdoors. For outdoor sound monitoring, use a directional microphone in a windshield enclosure with appropriate IP-rated housing.
Ready to add sound to your next Arduino project? Shop KY-038 sound sensors, analog microphone modules, and all the components you need at Zbotic — India’s trusted electronics store for makers and engineers.
Conclusion
The KY-038 and analog microphone modules are not competitors — they are tools for different jobs. The KY-038 wins on simplicity and cost when you just need to know “was there a loud sound?”. Analog microphone modules win when you need to know “how loud was it?” or “what did it sound like?”. Understanding this distinction before you buy saves you the frustration of discovering that a ₹40 module simply cannot do the job you designed your project around. For most beginner projects a KY-038 is the perfect starting point. As your projects grow in ambition, graduating to a proper amplified microphone module will open up a whole new range of audio-aware applications.


Add comment