
Haptic feedback is everywhere — your phone buzzes when you get a notification, your game controller rumbles during a crash, and your smartwatch taps your wrist with alerts. Behind all of this is a tiny but powerful component: the haptic vibration motor. In this guide, we’ll explore the two main types — ERM (Eccentric Rotating Mass) and LRA (Linear Resonant Actuator) — and walk you through how to integrate them into your Arduino projects for realistic, responsive vibration feedback.
What Is a Haptic Motor?
A haptic motor is a small electromechanical device that converts electrical signals into physical vibrations. Unlike regular DC motors that spin a shaft to do mechanical work, haptic motors are designed specifically to generate tactile feedback — vibrations you can feel.
They are used in consumer electronics (smartphones, wearables), medical devices, gaming controllers, and increasingly in DIY Arduino and robotics projects. The two dominant types used in maker electronics are ERM (Eccentric Rotating Mass) and LRA (Linear Resonant Actuator).
In the Indian maker community, vibration motors are increasingly affordable and accessible, making them an excellent component to add “feel” to your projects — from notification alerts in wearables to tactile confirmation buttons in custom keyboards.
ERM vs LRA: Key Differences
Before diving into the circuits, it’s important to understand what sets these two technologies apart:
| Feature | ERM Motor | LRA Motor |
|---|---|---|
| Working Principle | Spinning eccentric mass | Linear back-and-forth movement |
| Response Time | ~50–100 ms | ~5–20 ms |
| Power Consumption | Higher | Lower |
| Frequency Control | Via voltage/PWM | Resonant frequency (fixed) |
| Vibration Feel | Buzzy, wide frequency range | Crisp, precise “click” feel |
| Cost | Very low (₹20–₹80) | Moderate (₹150–₹400) |
| Best For | Notifications, alarms, simple buzz | Nuanced haptic effects, wearables |
Bottom line: For most Arduino beginners and intermediate makers, ERM motors are the go-to choice because of their simplicity and low cost. LRA motors are preferred when you need precise, nuanced feedback with lower power draw — like in smartwatches or advanced HMI devices.
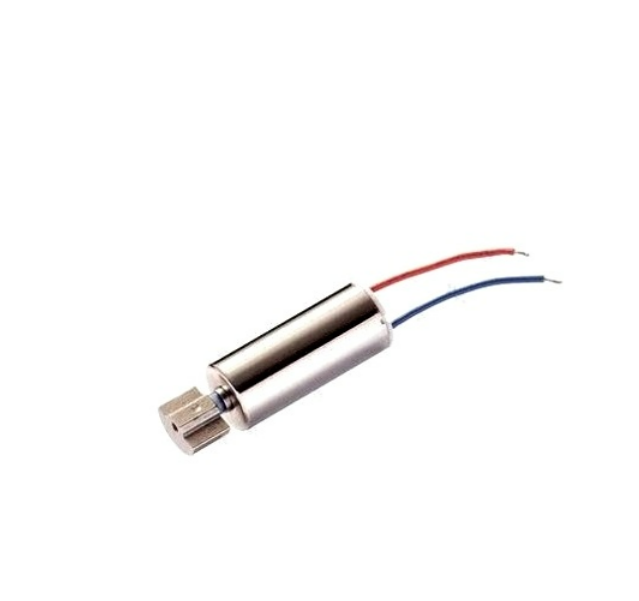
1.5-5V DC Vibration Motor with Wire
A classic ERM vibration motor perfect for Arduino projects. Wide voltage range (1.5–5V), comes pre-wired, and is ideal for basic haptic feedback in wearables, alarms, and DIY gadgets.
How ERM Motors Work
An ERM motor is essentially a tiny DC motor with an off-center (eccentric) weight attached to its shaft. When the motor spins, the unbalanced mass creates centrifugal force in rotating directions — and since the direction constantly changes as the shaft spins, the net result is a vibration that you can feel.
ERM motors come in two physical forms:
- Coin/Pancake ERM: Flat disc shape, common in smartphones. Low profile but harder to solder.
- Cylindrical/Barrel ERM: Cylinder shape with two wire leads. Easy to use with a breadboard or perfboard. This is the type most commonly sold for Arduino projects.
Key electrical characteristics of a typical ERM (like the 1.5–5V cylindrical type):
- Operating voltage: 1.5V – 5V DC
- Rated voltage: 3V (typical sweet spot)
- Rated current: 60–100 mA
- Vibration frequency: 90–200 Hz depending on voltage
- Start voltage: ~0.9V
Because the vibration frequency is directly related to the motor’s RPM, you can control the “intensity” (and slightly the frequency) of an ERM by varying the voltage or PWM duty cycle. Higher PWM = faster spin = stronger and slightly higher frequency vibration.
Important: An ERM motor draws 60–100 mA at full speed. Arduino GPIO pins are rated for only 40 mA maximum (20 mA recommended). Never drive a vibration motor directly from an Arduino pin without a transistor or motor driver.
How LRA Motors Work
An LRA motor works on a completely different principle. Instead of spinning, it contains a mass suspended on a spring. When driven at its resonant frequency with an AC signal, the mass oscillates linearly (back and forth), producing vibration.
Because an LRA must be driven at its resonant frequency (typically 150–200 Hz for vertical LRAs, or 175–230 Hz for some types), you cannot simply apply DC voltage. You need:
- A 50% duty cycle AC (square wave) signal at the resonant frequency, OR
- A dedicated haptic driver IC like the DRV2605L from Texas Instruments (which auto-detects resonance and handles all waveform generation)
LRAs are much more power-efficient than ERMs for the same perceived vibration strength, and they respond and stop much more quickly — giving a crisp “tap” feel instead of a buzzy rumble. This is why Apple’s Taptic Engine (used in iPhones and Apple Watch) is an LRA-based system.
Wiring Haptic Motors to Arduino
Method 1: Simple ERM with NPN Transistor (No Driver IC)
This is the most common and simplest approach for ERM motors in Arduino projects.
Components needed:
- Arduino Uno / Nano
- 1.5–5V ERM vibration motor
- NPN transistor (2N2222, BC547, or S8050)
- 1N4001 flyback diode
- 1 kΩ resistor (base resistor)
- Jumper wires
Wiring connections:
- Arduino digital pin (e.g., D9) → 1 kΩ resistor → Transistor Base
- Transistor Emitter → GND
- Transistor Collector → Motor negative wire (–)
- Motor positive wire (+) → 5V
- Flyback diode: Cathode (stripe) to 5V, Anode to Collector/Motor– junction
The flyback diode is essential. When you cut power to the motor, the collapsing magnetic field generates a reverse voltage spike that can destroy your transistor or Arduino. The diode clamps this spike safely.
Method 2: Using the DRV2605L Haptic Driver (for both ERM and LRA)
The DRV2605L is a dedicated haptic driver IC that makes driving both ERM and LRA motors extremely easy. It communicates over I2C, has a built-in library of 123 pre-programmed haptic effects, auto-detects motor type, auto-calibrates, and handles all the waveform complexity for LRA motors.
Wiring DRV2605L breakout to Arduino Uno:
- VIN → 5V
- GND → GND
- SDA → A4
- SCL → A5
- Motor OUT+ → Motor +
- Motor OUT– → Motor –
Arduino Code Examples
Basic ERM On/Off with Transistor
const int motorPin = 9; // PWM pin

void setup() {
  pinMode(motorPin, OUTPUT);
}

void loop() {
  // Vibrate for 500ms
  digitalWrite(motorPin, HIGH);
  delay(500);

  // Stop for 1 second
  digitalWrite(motorPin, LOW);
  delay(1000);
}
PWM Intensity Control for ERM
const int motorPin = 9; // Must be PWM pin (~)

void setup() {
  pinMode(motorPin, OUTPUT);
}

void loop() {
  // Ramp up vibration intensity
  for (int i = 0; i <= 255; i += 5) {
    analogWrite(motorPin, i);
    delay(20);
  }
  delay(500);

  // Short strong pulse pattern
  for (int i = 0; i < 3; i++) {
    analogWrite(motorPin, 200);
    delay(100);
    analogWrite(motorPin, 0);
    delay(100);
  }
  delay(1000);
}
DRV2605L with Pre-programmed Haptic Effects
// Install: Adafruit DRV2605 Library
#include <Wire.h>
#include <Adafruit_DRV2605.h>

Adafruit_DRV2605 drv;

void setup() {
  drv.begin();
  drv.selectLibrary(1); // ERM library (use 6 for LRA)
  drv.setMode(DRV2605_MODE_INTTRIG); // Internal trigger mode
}

void loop() {
  // Play effect #1: Strong Click
  drv.setWaveform(0, 1);  // Effect slot 0 = effect #1
  drv.setWaveform(1, 0);  // End of sequence
  drv.go();
  delay(500);

  // Play effect #14: Double Click
  drv.setWaveform(0, 14);
  drv.setWaveform(1, 0);
  drv.go();
  delay(1000);
}
The DRV2605L includes 123 pre-programmed effects — from single clicks and double taps to long buzzes, heartbeats, and ramp pulses. These are stored in ROM and numbered 1–123 in the datasheet’s effect library.
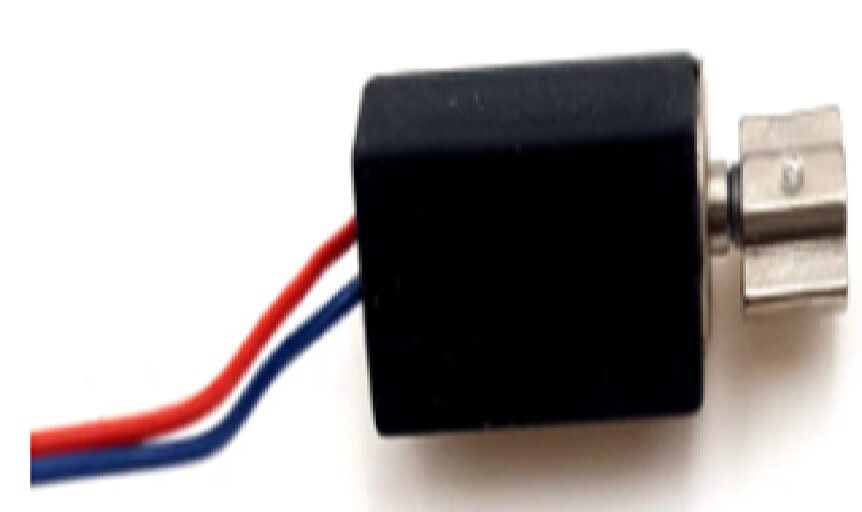
1.5V-3V 4x8MM Hollow Cup Micro DC Vibration Motor (10mm Wire)
An ultra-compact hollow cup ERM motor (just 4mm dia x 8mm long). Perfect for miniature wearables, smartwatch prototypes, and tight-space projects where a full-size motor won’t fit.
Using the DRV2605L Haptic Driver in Depth
The DRV2605L deserves a deeper look because it unlocks the full potential of haptic feedback — especially for LRA motors and advanced effects.
Key Features of DRV2605L
- Dual mode: Supports both ERM and LRA motors (software-switchable)
- 123 built-in effects: ROM library of haptic waveforms
- Auto-resonance tracking: For LRA motors, it auto-detects and locks to the resonant frequency
- Auto-calibration (OTP): One-time programmable calibration for your specific motor
- Audio-to-haptic mode: Can convert audio input to haptic vibration patterns
- I2C interface: Address 0x5A (fixed), easy integration
- Operating voltage: 2.0V – 5.2V supply
ERM vs LRA Mode Selection in Code
// For ERM motor:
drv.selectLibrary(1); // Libraries 1-5 are ERM
drv.setMode(DRV2605_MODE_INTTRIG);

// For LRA motor:
drv.selectLibrary(6); // Library 6 is LRA
drv.useERM(); // Switch to ERM
drv.useLRA(); // Switch to LRA
Creative Project Ideas Using Haptic Motors
1. Haptic Notification Bracelet
Build a simple wrist-worn alert band using an Arduino Nano, a small ERM motor, and a Bluetooth module (HC-05). When paired with your phone, it can buzz your wrist for incoming calls or messages. The compact 4x8mm hollow cup motors are perfect for this — they fit inside a watch-strap housing.
2. Tactile Feedback Button Panel
Add ERM motors behind physical push buttons. When a button is pressed, trigger a short 50ms vibration pulse to confirm the action. This is especially useful for control panels used in noisy environments where audible beeps are drowned out.
3. Navigation Aid for the Visually Impaired
Using an ultrasonic distance sensor (HC-SR04) and an ERM motor, build a haptic cane attachment that vibrates faster as obstacles get closer. Different pulse patterns can encode different distance ranges.
4. Game Controller Rumble
Add rumble feedback to a custom Arduino-based game controller. Use PWM to vary intensity based on in-game events — soft pulses for footsteps, strong buzzes for explosions.
5. Haptic Metronome for Musicians
Replace a beeping metronome with a wrist-worn haptic one. No sound disturbance during practice — just a precise tap on your wrist on every beat. An LRA with DRV2605L gives the crisp, clean tap feel needed here.
Troubleshooting Tips
Motor Not Vibrating at All
- Check if the transistor is correctly oriented (Base, Collector, Emitter order varies by transistor model — check datasheet)
- Verify the PWM pin is actually generating a signal with a multimeter or LED test
- Measure voltage across motor terminals — should be 2.5–5V when active
- ERM motors have a minimum start voltage (~0.9V) — don’t use very low PWM values
Arduino Resets When Motor Starts
This is a classic power supply issue. The motor’s inrush current causes a voltage dip on the 5V rail, resetting the Arduino. Solutions:
- Add a 100 µF electrolytic capacitor across the 5V and GND rails
- Power the motor from a separate supply (not Arduino’s 5V)
- Use a motor driver or driver IC with a separate power input
Vibration is Very Weak
- Check if the PWM duty cycle is too low (try increasing to 180–255)
- Verify 5V supply can deliver enough current (USB power from PC may be limited)
- For ERM motors, the rated voltage is usually 3V — running at 5V gives stronger vibration (within limits)
DRV2605L Not Detected on I2C
- Run an I2C scanner sketch to confirm it appears at address 0x5A
- Check SDA/SCL connections (on Uno: A4/A5; on Mega: 20/21; on Nano: A4/A5)
- Ensure 3.3V or 5V is supplied to VIN (check your breakout board’s regulator)
Frequently Asked Questions
Can I connect a vibration motor directly to an Arduino pin?
No. A vibration motor draws 60–100 mA, but Arduino GPIO pins can safely supply only 20–40 mA. Directly connecting the motor will overheat the pin driver and may permanently damage the microcontroller. Always use a transistor, MOSFET, or motor driver IC between the pin and motor.
What is the difference between ERM and LRA haptic motors?
ERM motors use a spinning eccentric mass and are controlled by DC voltage/PWM. They are cheap, simple, and widely available. LRA motors use linear resonant vibration at a fixed frequency — they are faster responding, more precise, and more power-efficient, but require an AC drive signal at the resonant frequency (typically handled by a dedicated driver IC like DRV2605L).
Can I use analogWrite() to control vibration intensity?
Yes — for ERM motors via a transistor, analogWrite(pin, value) sets the PWM duty cycle from 0 (off) to 255 (full). Higher values = faster spinning = stronger vibration. Use a PWM-capable pin (marked ~ on Arduino Uno: pins 3, 5, 6, 9, 10, 11).
Do I need a flyback diode for vibration motors?
Yes, always. Even small vibration motors generate a brief reverse voltage spike when switched off. This spike can exceed the transistor’s or driver IC’s voltage rating and cause failure. A simple 1N4001 or 1N4148 diode placed in reverse across the motor terminals (cathode to +, anode to –) suppresses this spike.
What voltage should I run my ERM vibration motor at?
Most cylindrical ERM vibration motors sold for Arduino projects are rated at 3V. At 5V, they spin faster and vibrate more strongly — this is usually fine for brief pulses. For continuous operation, stick closer to the rated voltage to avoid overheating. Always check the datasheet of your specific motor.
Can the 4x8mm micro vibration motor fit inside a wearable?
Yes — the 4mm diameter × 8mm length hollow cup motors are specifically designed for tight-space applications. They are used in real wearable devices, earbuds, and compact handheld gadgets. At 1.5V–3V, they draw minimal current, making them ideal for battery-powered wearable Arduino projects.
Conclusion
Haptic motors — both ERM and LRA — are a fantastic way to add a new sensory dimension to your Arduino projects. ERM motors are ideal for beginners: cheap, simple to wire with a transistor, and easy to control with basic PWM. LRA motors, when paired with a DRV2605L driver, offer precise, professional-grade haptic effects suitable for wearables and advanced HMI applications.
The key takeaways from this guide: always use a transistor or driver IC (never direct pin connection), always include a flyback diode, choose PWM-capable pins for intensity control, and consider the DRV2605L if you want access to the full library of 123 pre-programmed haptic effects.
Ready to get started? Pick up an ERM vibration motor from Zbotic and start adding tactile feedback to your next project today!


Add comment