
The ESP32-S3 AI camera with TinyML object detection running entirely on-device represents one of the most exciting developments in affordable electronics for Indian makers and engineers. Until recently, running a neural network on a microcontroller was considered impractical — inference was too slow and memory too limited. The ESP32-S3 changes this. With its dual Xtensa LX7 cores running at 240 MHz, the Processor Instruction Extension (PIE) for SIMD operations, support for up to 8 MB of PSRAM, and a native parallel camera interface, the ESP32-S3 can capture images, run a convolutional neural network, and make object detection decisions in under 200 milliseconds — all without sending data to the cloud. In this guide, we’ll build a complete ESP32-S3 AI camera system that detects people, faces, or custom objects using TinyML frameworks.
Why the ESP32-S3 is Ideal for Edge AI
The term “edge AI” refers to running machine learning inference directly on the device — at the edge of the network — rather than sending data to a cloud server. This approach offers three critical advantages: privacy (images or sensor data never leave the device), latency (decisions happen in milliseconds rather than seconds), and offline capability (the device works even without internet connectivity).
The ESP32-S3’s key hardware differentiators for edge AI are:
- PIE Vector Extension: Adds 32-bit and 128-bit SIMD (Single Instruction Multiple Data) operations. This dramatically accelerates the multiply-accumulate operations that dominate neural network inference. Espressif benchmarks show a 2–3x speedup over the original ESP32 for int8 neural network operations.
- PSRAM Support: The ESP32-S3 supports up to 8 MB of external PSRAM via the OPI interface. This is essential for storing neural network weights, frame buffers, and inference results simultaneously.
- Dual LX7 Cores at 240 MHz: One core can handle camera capture and display output while the other runs inference asynchronously, maximising throughput.
- DVP Camera Interface: The ESP32-S3 has a native parallel digital video port (DVP) supporting 8-bit camera sensors like the OV2640. This allows DMA-based frame capture without CPU intervention, freeing processing power for inference.
- Native USB OTG: Firmware deployment and serial logging can be done via native USB — no CH340 adapter chip needed, simplifying the hardware design.
Hardware: Camera Modules and Development Boards
For ESP32-S3 AI camera projects, you have several hardware options depending on your budget and use case.
Option 1: AI Thinker ESP32-CAM with OV2640
The most affordable entry point is the classic AI Thinker ESP32-CAM board. While it uses the original ESP32 (not S3), it’s an excellent board for learning the camera interface and running basic face detection. The OV2640 camera module provides 2 MP resolution and supports JPEG compression in hardware, reducing the bandwidth between camera and MCU.
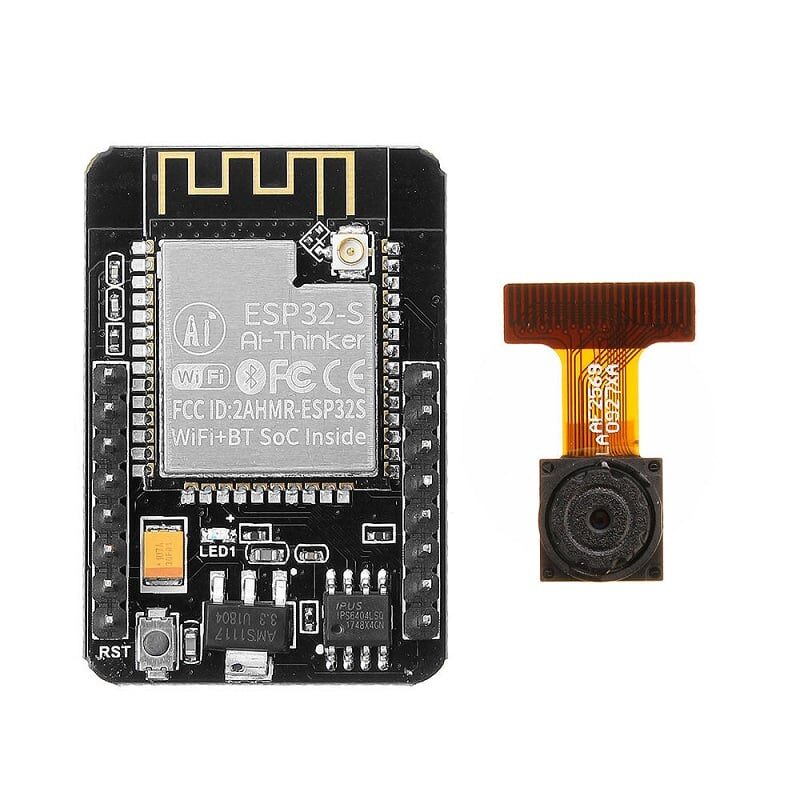
Ai Thinker ESP32 CAM Development Board WiFi+Bluetooth with AF2569 Camera Module
A complete ESP32 camera development board with AF2569 camera — an affordable starting point for learning ESP32 camera streaming and basic AI vision projects.

ESP32 CAM WiFi Module Bluetooth with OV2640 Camera Module 2MP – Face Recognition
The OV2640 2MP camera variant with face recognition support — run Espressif’s built-in face detection algorithms straight out of the box on this compact ESP32-CAM module.
Option 2: ESP32-CAM with USB Programming Board
The AI Thinker ESP32-CAM requires a separate USB-to-UART programmer for flashing. The ESP32-CAM-MB micro USB download module eliminates this by providing a dedicated programming board that snaps onto the ESP32-CAM.
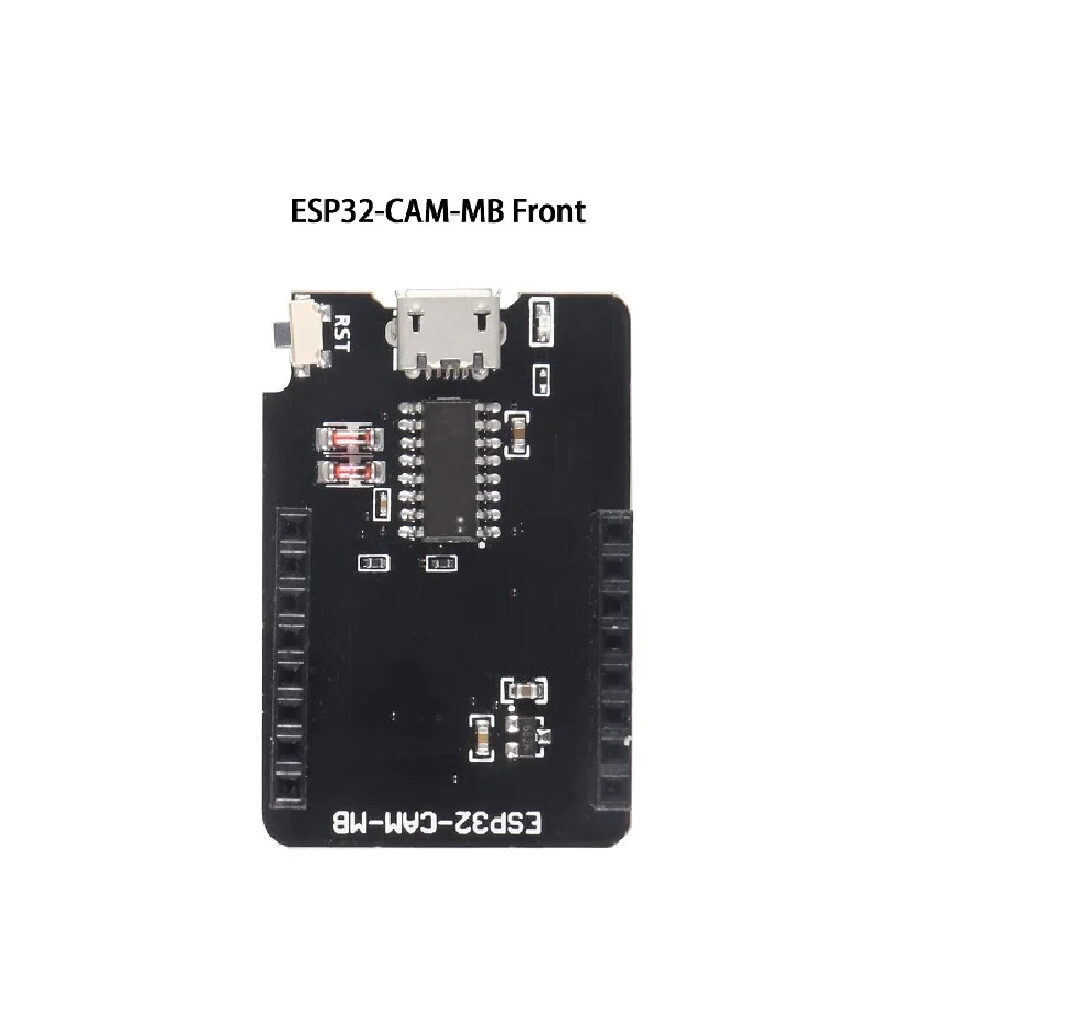
ESP32-CAM-MB Micro USB Download Module for ESP32 CAM Development Board
This programming shield makes flashing the ESP32-CAM effortless — plug in a Micro USB cable, press the button, and upload your TinyML firmware without any extra hardware.
Option 3: Waveshare ESP32-S3 Development Boards (Recommended for TinyML)
For serious TinyML work, the Waveshare ESP32-S3 development boards with built-in PSRAM and high-quality displays are the best choice. These boards come pre-equipped with 8 MB PSRAM and 16 MB flash, which is essential for storing neural network weights and frame buffers simultaneously.
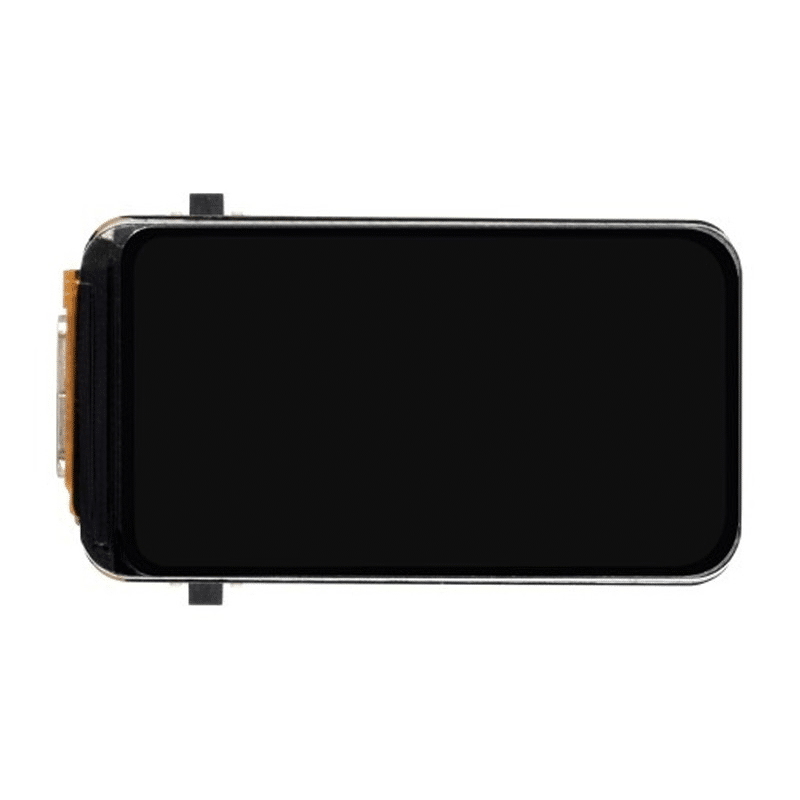
Waveshare ESP32-S3 1.47inch 172×320 LCD Display Development Board (262K Colors)
This compact ESP32-S3 board with a high-color LCD display is ideal for TinyML projects where you want to show detection results on-screen — people counter, object classifier, and more.
TinyML Frameworks: TFLite Micro vs ESP-DL
TensorFlow Lite for Microcontrollers (TFLite Micro)
TFLite Micro is Google’s framework for running TensorFlow models on microcontrollers. It supports the ESP32 and ESP32-S3 natively and integrates with the Arduino IDE via the tensorflow/tflite-micro-arduino-examples library. The main advantage is the vast ecosystem of pre-trained TensorFlow models that can be converted to TFLite format using the TFLite Converter, then further quantized to int8 for microcontroller deployment.
Workflow:
- Train a model in TensorFlow/Keras (on your PC or Google Colab)
- Convert to TFLite using
tf.lite.TFLiteConverterwith int8 quantization - Convert the TFLite file to a C byte array:
xxd -i model.tflite > model.h - Include the header in your ESP32-S3 Arduino sketch and run inference using TFLite Micro API
ESP-DL (Espressif Deep Learning Library)
ESP-DL is Espressif’s own neural network inference library specifically optimised for the ESP32-S3’s PIE vector extension. It supports convolutional layers, batch normalization, pooling, and fully connected layers. Pre-built models available in the ESP-DL repository include:
- Face detection (HumanFaceDetectMSR01, HumanFaceDetectMNP01)
- Face recognition (FaceRecognition)
- Cat face detection
- Human pose estimation (lightweight)
For most Indian makers, ESP-DL is the recommended starting point because Espressif’s pre-trained models are already optimised for their hardware and require no training. You can deploy face detection on an ESP32-S3 + OV2640 in under 30 minutes.
Building the Object Detection System
Setting Up the Development Environment
- Install ESP-IDF 5.x or use Arduino IDE with ESP32 core v3.x.
- Clone the ESP-WHO repository:
git clone --recursive https://github.com/espressif/esp-who.git - This repository contains ready-to-compile examples for face detection, face recognition, pedestrian detection, and more.
Face Detection Example (Arduino)
Here’s a simplified Arduino sketch demonstrating how to capture a frame and run face detection using ESP-DL:
#include "esp_camera.h"
#include "human_face_detect_msr01.hpp"
#include "human_face_detect_mnp01.hpp"

// Camera pin configuration for ESP32-S3 + OV2640
#define PWDN_GPIO_NUM  -1
#define RESET_GPIO_NUM -1
#define XCLK_GPIO_NUM  10
#define SIOD_GPIO_NUM  40
#define SIOC_GPIO_NUM  39
#define Y9_GPIO_NUM    48
#define Y8_GPIO_NUM    11
#define Y7_GPIO_NUM    12
#define Y6_GPIO_NUM    14
#define Y5_GPIO_NUM    16
#define Y4_GPIO_NUM    18
#define Y3_GPIO_NUM    17
#define Y2_GPIO_NUM    15
#define VSYNC_GPIO_NUM 38
#define HREF_GPIO_NUM  47
#define PCLK_GPIO_NUM  13

HumanFaceDetectMSR01 detector(0.3F, 0.3F, 10, 0.3F);

void setup() {
  Serial.begin(115200);

  camera_config_t config;
  config.ledc_channel = LEDC_CHANNEL_0;
  config.ledc_timer   = LEDC_TIMER_0;
  config.pin_d0       = Y2_GPIO_NUM;
  // ... (set all pin numbers)
  config.xclk_freq_hz = 20000000;
  config.pixel_format = PIXFORMAT_RGB565;
  config.frame_size   = FRAMESIZE_240X240;
  config.jpeg_quality = 12;
  config.fb_count     = 2;
  config.fb_location  = CAMERA_FB_IN_PSRAM;
  config.grab_mode    = CAMERA_GRAB_WHEN_EMPTY;

  esp_err_t err = esp_camera_init(&config);
  if (err != ESP_OK) {
    Serial.printf("Camera init failed: 0x%xn", err);
    return;
  }
}

void loop() {
  camera_fb_t *fb = esp_camera_fb_get();
  if (!fb) return;

  // Run face detection
  std::list<dl::detect::result_t> results =
    detector.infer((uint16_t *)fb->buf,
                   {(int)fb->height, (int)fb->width, 3});

  if (results.size() > 0) {
    Serial.printf("%d face(s) detected!n", results.size());
    // Publish to MQTT, trigger alarm, etc.
  }

  esp_camera_fb_return(fb);
  delay(100);
}
This sketch initialises the OV2640 camera, captures a 240×240 RGB565 frame into PSRAM, and runs the MSR01 face detector. On an ESP32-S3 at 240 MHz with PSRAM, this achieves approximately 10–15 frames per second of face detection — sufficient for security camera or people-counting applications.
Training and Deploying a Custom Model
Pre-built models are great for demos, but real-world Indian applications often need custom detection: spotting specific industrial defects, identifying local fruits and vegetables, or detecting cattle vs. humans in agricultural security systems. Here’s the workflow for training and deploying a custom model.
Step 1: Collect and Label Data
Use tools like Roboflow (free tier available) or CVAT to collect and annotate images. For an on-device classifier (rather than detector), you need at least 100–300 images per class. Use your smartphone to capture images in Indian lighting conditions — indoor fluorescent light, afternoon sunlight, and mixed shadows all affect model accuracy.
Step 2: Train on Google Colab (Free GPU)
Use Google Colab’s free T4 GPU to train a MobileNetV2 or EfficientNet-Lite model. TensorFlow’s Model Maker library simplifies this to just a few lines of code:
import tflite_model_maker as mm
from tflite_model_maker import image_classifier

data = image_classifier.DataLoader.from_folder('dataset/')
train_data, test_data = data.split(0.9)
model = image_classifier.create(train_data,
    model_spec='mobilenet_v2',
    epochs=20)
model.export(export_dir='./', export_format='TFLITE',
    quantization_config=mm.config.QuantizationConfig.for_int8(test_data))
Step 3: Convert to C Array and Deploy
After exporting the model.tflite file, convert it to a C array and include it in your ESP32-S3 Arduino project. The entire workflow from data collection to deployed model can be completed in one afternoon using free cloud tools — no paid cloud AI subscription needed.
Memory Requirements
A quantized MobileNetV2 model for 10-class classification requires approximately 3 MB of storage (flash) and 2–3 MB of runtime memory (PSRAM). With the ESP32-S3’s 16 MB flash and 8 MB PSRAM, you have ample headroom for the model plus camera frame buffer plus application code.
Real-World Applications in India
People Counter for Retail
Indian retail stores and malls need accurate footfall counting for analytics. An ESP32-S3 camera at the entrance running a people detection model can count entries and exits, transmit counts to a central server via Wi-Fi, and run for months without cloud dependency. Cost per node: under ₹2,000 including housing.
Agricultural Pest Detection
A camera node deployed in a greenhouse or field can be trained to detect common Indian agricultural pests (whiteflies, aphids, thrips) and alert farmers via SMS or WhatsApp when infestation levels are detected. Combined with a battery and solar panel, this creates a zero-maintenance field monitoring system.
Industrial Quality Control
Small manufacturing units in India often can’t afford expensive machine vision systems. An ESP32-S3 camera node on an assembly line, trained to detect defects in a specific product (e.g., missing components, cracked surfaces), provides affordable automated quality control that previously required industrial cameras costing ₹50,000+.
Smart Doorbell with Face Recognition
The classic application: an ESP32-S3 camera at the door running face detection. When a face is detected, the system captures an image, runs face recognition locally, and if the face is unknown, sends an alert with the image to your smartphone via Telegram bot. No cloud subscription, no monthly fees, complete privacy.
Frequently Asked Questions
What is the maximum resolution supported for TinyML inference on the ESP32-S3?
For real-time inference, practical input resolutions are 96×96 to 240×240 pixels. Higher resolutions require more memory and processing time. The OV2640 camera can capture at up to UXGA (1600×1200), but for inference, frames are typically downscaled to 96×96 or 128×128 before being fed to the model. The camera can simultaneously output full-resolution JPEG for storage/streaming while a downscaled version is used for inference.
How accurate is TinyML object detection on the ESP32-S3?
Accuracy depends heavily on the model architecture, training data quality, and the complexity of the detection task. Espressif’s pre-trained face detection models achieve over 95% accuracy in good lighting conditions. Custom models trained with 500+ images per class typically achieve 85–92% accuracy. TinyML on microcontrollers trades some accuracy for the enormous advantages of low cost, low power, and offline operation.
Can the ESP32-S3 run object detection and stream video simultaneously?
Yes, with careful task distribution. The ESP32-S3’s dual cores can be used independently: Core 0 handles camera capture and video streaming (MJPEG over HTTP), while Core 1 runs inference on every Nth frame. This allows you to stream video to a browser for monitoring while simultaneously performing local detection — with each function on a dedicated core using FreeRTOS task pinning.
What is the difference between the ESP32-CAM and an ESP32-S3 camera system?
The ESP32-CAM uses the original ESP32 (dual LX6 cores, no vector extension). It can run Espressif’s older MTMN face detection model but is too slow for modern TinyML frameworks. The ESP32-S3 with its PIE vector extension is approximately 2–3x faster at int8 inference, supports newer and more accurate models, and has a more capable camera interface. For any serious AI camera application, the ESP32-S3 is the correct choice.
Do I need an internet connection for ESP32-S3 TinyML inference?
No — this is the entire point of edge AI. The model runs locally on the ESP32-S3. Internet connectivity is only needed if you want to send detection alerts remotely (e.g., via MQTT to a cloud broker or via Telegram API). The detection itself happens entirely on-device, making the system fully functional even in areas with no connectivity.
Start Your ESP32-S3 AI Camera Project
Find ESP32-CAM modules, ESP32-S3 development boards, and all the components you need for TinyML edge AI projects at Zbotic — fast delivery across India.


Add comment