
Building an autonomous lawn mower robot DIY India project is one of the most rewarding outdoor robotics challenges you can tackle. Imagine a robot that navigates your garden on its own, avoids obstacles, and returns to its charging dock — all built by you, with locally available components. In this comprehensive guide, we cover everything from chassis selection and motor drivers to GPS boundary mapping and obstacle avoidance, so you can build a fully autonomous lawn mower from scratch at home.
Why Build Your Own Autonomous Lawn Mower Robot?
Commercial robot lawn mowers cost anywhere from ₹30,000 to ₹2,00,000 in India, and most are not designed for the irregular, stone-edged gardens common in Indian homes. A DIY autonomous lawn mower robot lets you customise the cutting width, boundary logic, power system, and even the grass disposal method for your specific garden. You also learn embedded systems, sensor fusion, and motor control — skills that are directly useful for engineering careers and competitive robotics. The total component cost for a functional autonomous mower in India typically runs between ₹5,000 and ₹15,000 depending on the quality of motors and the navigation approach you choose.
Essential Components and Parts List
Before you start assembling, gather all parts. Here is a practical bill of materials for an entry-level autonomous lawn mower robot:
- Chassis platform — a robust 4-wheel or 2-wheel-drive base with good ground clearance (at least 30 mm)
- Drive motors — high-torque DC gear motors (100–200 RPM) or brushless motors with encoders for odometry
- Blade motor — a brushless DC motor (2204/2805 series) spinning a custom blade disc at 3000–8000 RPM
- ESC (Electronic Speed Controller) — 30 A rating for the blade motor
- Microcontroller — Arduino Mega 2560 or ESP32 for Wi-Fi/Bluetooth telemetry
- Motor driver — L298N or L293D dual-H-bridge for drive motors
- Sensors — ultrasonic HC-SR04 (front, sides), IR cliff sensors (front edge), optional MPU-6050 IMU
- GPS module — NEO-6M or NEO-8M for outdoor boundary mapping
- Battery — 3S or 4S LiPo (3000–5000 mAh) or 12 V sealed lead-acid for budget builds
- Perimeter wire (optional) — 100 m of 1 mm enamelled copper wire for boundary detection
- Rain sensor — simple resistive sensor to pause mowing in rain
- Remote control module — Flysky FS-GT2 or FS-G7P for manual override

2WD Mini Round Double-Deck Smart Robot Car Chassis DIY Kit
A ready-to-modify double-deck chassis with 2WD drive motors and ample space for electronics mounting — ideal as a starter base for your autonomous mower project.

Flysky FS-GT2 Transmitter with FS-GR3E Receiver for RC Car/Boat
2.4 GHz reliable RC system for manual override capability — keep control in your hands while your mower autonomously navigates the garden.
Chassis, Wheels, and Motor Selection
The chassis must handle outdoor terrain — uneven ground, wet grass, and small stones. For Indian gardens a 4-wheel chassis with differential steering gives the best balance of traction and manoeuvrability. Use gear-reduced DC motors with at least 2 kg-cm torque per wheel. Mecanum wheels look cool in lab projects but provide poor grip on wet grass — stick to rubber pneumatic or solid rubber wheels for outdoor use.
Wheel diameter matters: 10–15 cm wheels provide adequate ground clearance and smooth rolling over minor bumps. For the blade assembly, mount a secondary deck below or between the main chassis rails at a fixed height. Cutting height adjustment can be achieved with a screw-adjustable mounting bracket.
4 Wheels Car Chassis Acrylic Frame
A sturdy 4-wheel acrylic chassis frame providing the structural foundation your autonomous mower needs — supports motor mounting and electronics payload.
Brain of the Robot: Microcontroller and Navigation
The ESP32 is the recommended microcontroller for 2026 autonomous mower builds in India. It offers dual-core processing (240 MHz), built-in Wi-Fi and Bluetooth, 34 GPIO pins, and costs under ₹400. You can stream telemetry over Wi-Fi to a mobile app while the robot mows autonomously.
For navigation, connect a NEO-6M GPS module via UART. The robot reads its GPS coordinates every 500 ms and compares them against a stored boundary polygon. A simple PID heading controller uses the IMU (MPU-6050) to maintain straight-line mowing rows. When the robot detects it is near a boundary coordinate, it triggers a 180° turn and starts the next mowing row — a classic boustrophedon (lawnmower-pattern) path.
Sample ESP32 pseudocode for boundary check:
if (isInsideBoundary(currentLat, currentLon, boundaryPolygon)) {
  motorLeft.setSpeed(baseSpeed + pidOutput);
  motorRight.setSpeed(baseSpeed - pidOutput);
} else {
  stopBladeMoror();
  performUTurn();
}
Obstacle Detection and Avoidance System
Mount three HC-SR04 ultrasonic sensors: one at the front centre and one each at 45° angles on the front-left and front-right. The robot halts the blade and reverses when any sensor reads below 20 cm. Use a simple finite state machine:
- MOWING state: Drive forward, blade spinning, GPS boundary check active.
- OBSTACLE state: Stop, back up 30 cm, rotate 90° or 180° based on which sensor triggered.
- RETURN_HOME state: Battery below 20% → navigate to docking station using GPS waypoint.
- RAIN state: Rain sensor wet → stop blade, cover sensor, return home.
For cliff detection (steps, pond edges), mount four downward-pointing IR sensors at the four corners of the chassis. When reflected infrared drops below threshold (indicating a drop), the robot immediately reverses regardless of the main FSM state.
Boundary Mapping: Wire vs GPS vs Vision
There are three boundary approaches for DIY autonomous mowers in India:
1. Perimeter Wire (Most Reliable)
Bury or lay a low-voltage wire around your garden perimeter. A signal generator (built from a 555 timer circuit at 5–10 kHz) drives the wire. The robot carries two coil sensors that detect the magnetic field. When both coils detect the wire, the robot is at the boundary. This is cheap (~₹500 for wire and oscillator), weather-proof, and GPS-free. Best for gardens under 200 m².
2. GPS Boundary (No Wire Installation)
Walk around your garden perimeter once with the robot in mapping mode, pressing a button at each corner. The ESP32 logs GPS coordinates into EEPROM. During autonomous mode, it uses these to define the mowing polygon. RTK-GPS would give 2 cm accuracy but costs ₹8,000+. Standard NEO-6M gives ±3 m accuracy — adequate for gardens with a safety buffer zone of 50 cm from boundaries.
3. Vision / LiDAR (Advanced)
A Raspberry Pi with a camera and OpenCV can detect coloured boundary markers (orange cones, painted stones). LiDAR (RPLiDAR A1 series) provides a 360° depth map. These approaches add ₹5,000–₹15,000 to the cost but are the most flexible.
Power System, Battery, and Charging
A 3S LiPo (11.1 V, 5000 mAh) provides about 45–60 minutes of autonomous mowing. The drive motors and blade motor should be on separate power rails: blade motor draws 5–15 A under load, which causes voltage dips that can reset the microcontroller. Use a DC-DC step-down (buck converter) to supply 5 V regulated power to the ESP32 and sensors.
For the blade ESC, the 30 A brushless ESC from Zbotic is ideal. Connect it to a 2204 or 2805 brushless gimbal motor running a 15 cm aluminium blade disc. Always fit a blade safety guard and a current-sensing relay that cuts power to the blade if the robot tilts more than 30° (detected by the IMU).
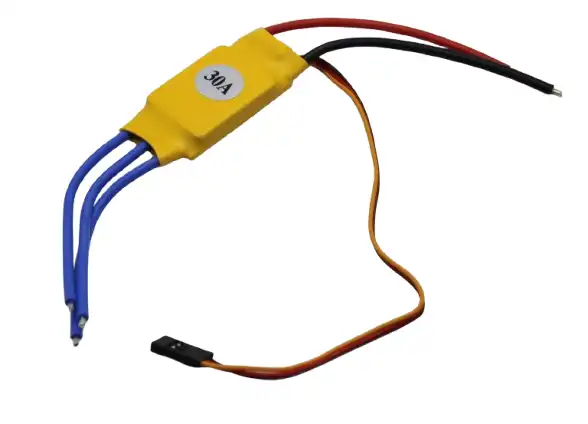
30A BLDC ESC Brushless Electronic Speed Controller
Handles up to 30 A continuous current — perfectly suited for driving the blade motor of your autonomous lawn mower robot safely and reliably.

2805 140KV Gimbal Brushless Motor
High-torque brushless motor perfect for spinning the cutting blade disc of your DIY autonomous lawn mower — smooth, quiet, and powerful.
Assembly and Arduino Sketch Overview
Follow this sequence for assembly:
- Mount drive motors to chassis, attach wheels, secure with hex couplings.
- Install blade motor centrally below the chassis on a height-adjustable bracket.
- Wire motor drivers to ESP32 GPIO pins (IN1–IN4 for each driver).
- Mount ultrasonic sensors at front with custom 3D-printed brackets.
- Install GPS module on top deck (clear sky view) using a short coax extension.
- Mount IMU flat on chassis deck with X-axis aligned to forward direction.
- Run all power cables with connectors; add main power cut-off switch.
- Flash firmware, calibrate sensors, run boundary walk to store GPS waypoints.
- Test at slow speed in manual RC mode before enabling autonomous mode.
A complete Arduino/ESP32 sketch with all states, GPS parsing, and PID heading control is approximately 600 lines. Start with individual module tests: motor test sketch → sensor test sketch → GPS parsing → combine into the full FSM. Libraries needed: TinyGPS++, MPU6050, NewPing.
Frequently Asked Questions
How much does it cost to build an autonomous lawn mower robot in India?
A basic perimeter-wire-based autonomous mower costs ₹4,000–₹8,000. Adding GPS navigation and brushless motors pushes the total to ₹10,000–₹15,000. This is still 80–90% cheaper than commercial robot mowers available in India.
Is it safe to build a DIY blade-equipped robot?
Yes, with proper safety precautions: always add blade guards, include a tilt-sensor kill switch, use a physical main power cut-off, and test at low blade speed first. Never run the robot in a garden where children or pets are present.
Can this robot handle Indian garden terrain?
Yes. Choose a chassis with at least 30 mm ground clearance and rubber tyres. Add cliff sensors for raised beds and steps. The perimeter wire approach works well with the irregular boundaries common in Indian gardens.
What is the best microcontroller for a DIY lawn mower robot?
The ESP32 is the best choice in 2026 for Indian DIY builders — Wi-Fi connectivity, dual core, plenty of GPIO, and available for under ₹400 from local electronics stores.
How long can the robot mow on a single charge?
A 3S 5000 mAh LiPo battery provides 45–60 minutes of continuous mowing. For larger gardens, use a 4S pack or add a second battery in parallel for 90+ minutes of runtime.
Ready to Start Your Autonomous Lawn Mower Build?
Get all the motors, chassis parts, ESCs, and sensors you need from Zbotic — India’s trusted robotics component store with fast shipping and genuine parts.


Add comment