
The rise of affordable FDM 3D printers in India has completely changed the way hobbyists and engineers prototype robots. 3D printed robot parts designs India searches have surged because makers can now print custom brackets, servo mounts, gear trains, and full robot arms at home for a fraction of machining costs. In this guide, we walk through the best part categories to 3D print, recommended materials, free STL resources, and how to combine printed parts with off-the-shelf hardware from Zbotic to build functional robots.
Why 3D Print Robot Parts in India?
Custom mechanical parts from machine shops in India cost ₹200–₹2,000 per piece with lead times of several days. A 3D-printed equivalent costs ₹30–₹300 in filament and prints overnight. More importantly, design iteration is free — if a bracket does not fit, tweak the CAD file and print again in hours. This iteration speed is what makes 3D printing indispensable for robotics prototyping.
Indian makers commonly print parts for:
- Custom servo brackets and horns for non-standard servo sizes
- Robot arm link segments with built-in cable routing channels
- Chassis side plates with exact motor mounting hole patterns
- Sensor housings that mount multiple sensors at precise angles
- Wheel hubs and adapters for mixing wheel types with motor shafts
- End-effectors (grippers, suction cups, tool changers) for robot arms
Choosing the Right Filament Material
Material selection is critical for functional robot parts. Here is a quick comparison relevant to Indian builders:
| Material | Strength | Heat Resistance | Best For |
|---|---|---|---|
| PLA | Medium | 50–60°C | Prototypes, indoor arms |
| PETG | High | 70–80°C | Chassis, outdoor parts |
| ASA/ABS | High | 90–100°C | Outdoor, UV-resistant |
| TPU | Flexible | 60–70°C | Gripper tips, wheels, bumpers |
| Carbon PETG | Very High | 80°C | Load-bearing arm links |
For Indian summers with temperatures reaching 40–45°C, avoid PLA for outdoor or near-motor parts. PETG or ASA are the practical choices. TPU is excellent for gripper fingertips and anti-slip wheel covers — it prints on most printers with a direct-drive extruder.
Best 3D Printed Chassis Designs
A fully 3D-printed chassis is practical for indoor robots up to about 1 kg total weight. For outdoor robots or higher loads, print side panels and motor mounts while using laser-cut acrylic or aluminium for the main structural rails.
Differential Drive Chassis
The simplest design: two driven wheels on a central axis, one or two caster wheels for balance. Print the motor mount pockets to match your DC motor body diameter precisely (measure with calipers). Add 2 mm wall thickness minimum around motor body for strength.
Mecanum/Omni Wheel Chassis
Print the main chassis plate flat with motor mounting holes at 90° intervals for 4-wheel mecanum configuration. These designs are available on Thingiverse and Printables configured for standard 60 mm and 80 mm mecanum wheels.
Tank/Tracked Chassis
3D-printed track segments linked by M3 rods work well for low-speed indoor robots. Print in TPU for the track pads and PETG for the main drive wheels and idler wheels. Track pitch should match your drive sprocket tooth pitch exactly — design these together in CAD.
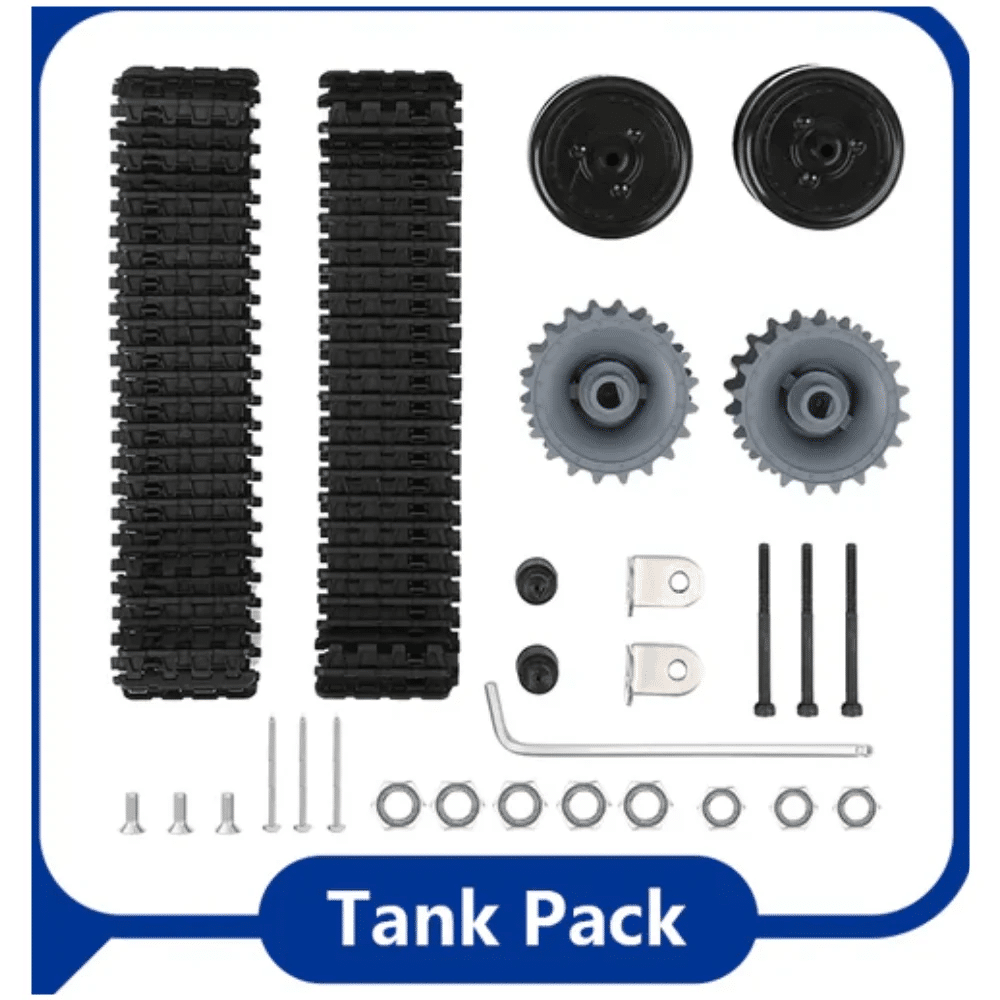
ACEBOTT ESP32 Tank Robot Car Expansion Pack for QD001–QD004
A complete tank robot expansion kit with ESP32 brain — perfect base to extend with custom 3D-printed accessories, sensor mounts, and add-on modules.
Robot Arm Designs: 3-DOF to 6-DOF
3D-printed robot arms are the most popular robotics print project in India. The key design principles are:
- Minimize cantilever length — keep joint-to-joint distances short to reduce torque requirements on servo motors.
- Route cables internally — design hollow link bodies with a 8–10 mm internal channel for servo and sensor cables.
- Use dual-bearing joints — single-bearing or horn-only joints flex and wear quickly. A bearing on each side of the joint doubles stiffness.
- Print links vertically or on their side — so layer lines run along the length of the link, maximising tensile strength in the load direction.
Popular Free Designs
- BCN3D Moveo — full 5-DOF industrial-style arm, uses stepper motors, Thingiverse: Thing #1752766
- Thor Robot Arm — 6-DOF open-source arm from Hackaday, uses servo and stepper mix
- EEZYbotARM MK2 — simple 3-DOF, great for beginners, servo-actuated, Thingiverse: Thing #1454048
- AR2/AR3 Arms — 6-DOF, NEMA17 steppers, full ROS compatible firmware available

DIY Acrylic Robot Manipulator Mechanical Arm Kit
A pre-engineered acrylic robot arm kit — use it as-is or as a reference structure while you design and print custom 3D-printed link replacements.
Servo Brackets, Mounts, and Holders
Servo mounts are arguably the most printed robotics part in India. The SG90 and MG90S servos have a 22.5 mm × 12 mm body — this is the standard to design around. Key things to include in a printed bracket design:
- 4× M2 screw holes matching the servo’s flange holes (2 mm dia, 27 mm apart on SG90)
- A slot or cutout for the servo cable to route cleanly
- A boss for a 623ZZ bearing if the bracket is the output-side support
- 2 mm minimum wall thickness around all screw holes
Print servo brackets in PETG at 40% infill with 3 perimeters for maximum strength at the mounting screws. PLA works for lighter loads but can creep over time if the servo generates heat.
Servo Mount Holder Bracket For SG90/MG90 (Pack of 2)
Ready-made servo brackets compatible with SG90 and MG90S servos — use alongside or instead of printed brackets for a rigid, reliable servo mounting solution.
Print Settings for Functional Mechanical Parts
General recommended settings for structural robot parts:
- Layer height: 0.2 mm for strength parts, 0.15 mm for fine details or thin-wall brackets
- Infill: 30–50% for most brackets, 60–80% for gear teeth and high-load joints
- Perimeters/walls: 3–4 perimeters minimum for any structural part
- Top/bottom layers: 5 layers minimum for flat load-bearing surfaces
- Print speed: 40–60 mm/s for structural parts (slower = stronger layers)
- Bridging: Design parts to avoid overhangs >45° without supports where possible
For gear parts, print at 0.15 mm layer height with 4 perimeters and 80% infill. Orient gears so the teeth point upward so layer lines run radially — this gives the strongest tooth geometry.
Free STL Resources for Robot Parts
These platforms have the best robotics STL collections available to Indian makers:
- Thingiverse.com — largest collection, search “robot arm”, “servo bracket”, “chassis mount”
- Printables.com — Prusa’s platform, higher curation quality
- GrabCAD.com — native CAD files (STEP, SolidWorks) for modification
- Hackaday.io — project-based, includes full documentation with STLs
- GitHub — search “robot arm 3d print stl” for open-source projects with full repos
Before downloading any STL, check: (1) Does the design specify which servo model it is designed for? (2) Are there assembly photos? (3) Has the designer noted required hardware (bearings, screws, nuts)?
Combining 3D Prints with Real Hardware
The best robot builds combine 3D-printed structural parts with real mechanical hardware for strength and precision:
- Bearings: Press-fit 623ZZ or 608ZZ bearings into printed housings (design hole 0.2 mm undersized for interference fit)
- Threaded inserts: Heat-set M3 brass inserts into printed holes for reusable threaded joints that do not strip
- Aluminium rods: Use 8 mm or 10 mm aluminium rods as joint axles — far stronger than printed axles
- Stepper motors: NEMA17 with printed L-brackets for arm joints that need precise position control

42HS48-1204A NEMA17 5.6 kg-cm Stepper Motor with Detachable Cable
A high-torque NEMA17 stepper motor ideal for robot arm joints on 3D-printed frames — provides the precision and holding torque needed for reliable arm positioning.
Frequently Asked Questions
What 3D printer is best for robot parts in India?
Creality Ender 3 V2 or Bambu Lab A1 Mini are popular choices in India. For PETG and ABS, you need a printer that can reach 240°C nozzle temperature and has an enclosure or heated chamber for warp-free prints.
Can 3D printed parts handle the load of a full robot arm?
Yes, if properly designed. Use PETG or carbon-fiber-filled PETG, 40%+ infill, 4 perimeters, and avoid sharp internal corners. Reinforce high-stress joints with aluminium inserts or metal hardware.
Where can I get robot part STL files for free in India?
Thingiverse, Printables, GrabCAD, and GitHub are the top sources. Many open-source robot projects also post full STL repos on GitHub — search by robot project name.
How long does it take to 3D print a robot arm?
A 4-DOF robot arm with 6–8 parts typically takes 12–20 hours of total print time. A 6-DOF arm can take 30–40 hours. Print parts in parallel on multiple printers if available to speed up the process.
Should I use screws or snap fits for assembly?
Use M2 or M3 screws with heat-set brass inserts for all structural joints. Snap fits work for panels and covers that need to be accessed regularly but are not appropriate for load-bearing robot joints.
Get the Hardware That Goes with Your 3D Prints
Zbotic stocks servos, stepper motors, robot arm kits, and all the electronics you need to bring your 3D-printed robot parts to life — shipped fast across India.


Add comment