
Building a truly autonomous robot requires knowing where it is in space. Encoder wheel odometry is the foundational technique that lets your Arduino-powered robot calculate its distance travelled, current speed, and estimated position — all using simple magnetic or optical wheel encoders. This tutorial on encoder wheel odometry for robot distance and position tracking with Arduino will take you from understanding the maths to wiring encoders and writing production-quality code that gives your robot spatial awareness without GPS or external infrastructure.
What Is Wheel Odometry?
Odometry is the use of data from motion sensors — in this case, wheel encoders — to estimate the change in position of a robot over time. The word derives from the Greek hodos (journey) and metron (measure). Every time a wheel encoder slot passes the sensor, the robot knows its wheel has turned by a known fraction of a revolution. Multiply pulses by circumference per revolution and you get distance.
While odometry accumulates error over time (wheel slip, imperfect calibration), it is excellent for short to medium navigation tasks — precisely what most Arduino and Raspberry Pi robots need. It is also the backbone of more sophisticated systems: ROS-based robots fuse odometry with IMU data and LiDAR for full SLAM (Simultaneous Localisation and Mapping).
For Indian college projects and competition robots, encoder odometry unlocks capabilities like:
- Driving exactly 1 metre forward and stopping
- Turning exactly 90° using differential steering
- Tracking a path and returning to start
- Closed-loop speed control for straight-line driving
Types of Wheel Encoders
Two main encoder types are used in hobby robotics:
Optical Encoders (Disc + IR Sensor)
A slotted disc (typically 20 slots) is attached to the motor shaft or wheel hub. An IR LED shines through the slots onto a phototransistor. Each slot break generates one pulse. These are cheap, accurate, and work well in clean indoor environments. Common options include the LM393-based slot sensor modules that mount directly to the motor bracket.
Magnetic Hall Effect Encoders
A small ring magnet is attached to the motor shaft; a Hall effect sensor (e.g., A3144) detects each pole passing. Magnetic encoders work in dusty environments, don’t require precise alignment, and are more vibration-resistant. Many quality gear motors sold in India come with built-in magnetic encoders on the back shaft.
For this tutorial, we’ll use optical disc encoders — the most affordable option and widely available at Zbotic.in.
Odometry Maths: Distance & Position
The core odometry formulae are straightforward. Let’s define the variables:
N= total encoder pulses countedPPR= pulses per revolution (e.g., 20 for a 20-slot disc)D= wheel diameter in metres (e.g., 0.065 m for a 65 mm wheel)C = π × D= wheel circumference
Distance per pulse:
dist_per_pulse = C / PPR = (π × D) / PPR
Total distance:
distance = N × dist_per_pulse
Instantaneous speed (m/s):
speed = (pulses_in_interval × dist_per_pulse) / interval_seconds
Position Tracking (Dead Reckoning)
For a differential-drive robot (two independent drive wheels), the robot’s X/Y position and heading θ can be estimated using the following update equations applied every time step:
dL = left_pulses × dist_per_pulse
dR = right_pulses × dist_per_pulse
d_center = (dL + dR) / 2
dθ = (dR – dL) / wheel_base
x += d_center × cos(θ)
y += d_center × sin(θ)
θ += dθ
wheel_base is the distance between the two drive wheels (measured centre to centre). For the 2WD round chassis, this is typically 130–150 mm.
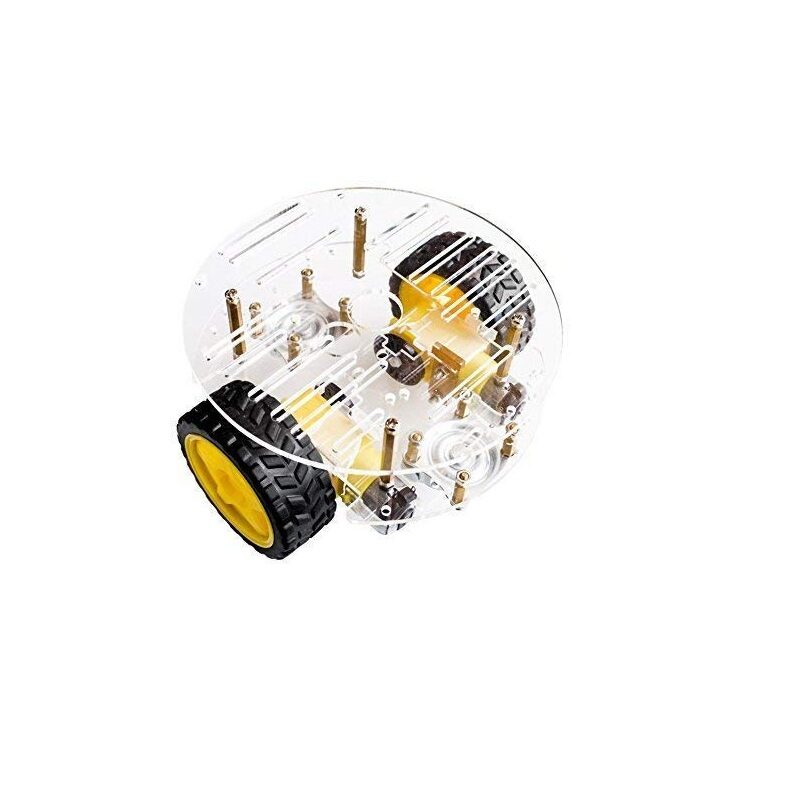
2WD Mini Round Double-Deck Smart Robot Car Chassis
Ideal differential-drive chassis for odometry projects. Precise wheel spacing and consistent gear ratio make encoder calibration straightforward. Fits Arduino Uno with room for encoder sensor mounts.
Hardware Setup & Wiring
Mount the encoder disc on the motor shaft (usually on the back shaft stub that protrudes from the motor gearbox). Align the LM393 slot sensor so the disc rotates cleanly through the sensor gap with 0.5–1 mm clearance on each side. Wire the sensor as follows:
| LM393 Encoder Sensor | Arduino Uno Pin | Notes |
|---|---|---|
| VCC | 5V | Both encoder sensors share 5V/GND |
| GND | GND | |
| DO (Left encoder) | D2 (INT0) | Must use hardware interrupt pin |
| DO (Right encoder) | D3 (INT1) | Must use hardware interrupt pin |
Critical: Encoder signals must connect to hardware interrupt pins (D2 and D3 on Arduino Uno). Using regular digital pins and polling will miss pulses at even moderate wheel speeds, causing severe counting errors.

4mm Hex Coupling for Robot Smart Car Wheel
Essential for mounting encoder discs and wheels on 4mm motor shafts. Hex coupling provides secure non-slip attachment — critical for odometry accuracy, as any shaft slippage directly corrupts pulse counts.
Arduino Code: Interrupts & Counting
The key to accurate odometry is using hardware interrupts to count every encoder pulse, even when the main loop is busy with other tasks.
// Encoder Odometry — Zbotic.in
// Encoder pins: Left=D2 (INT0), Right=D3 (INT1)

#define ENC_L 2
#define ENC_R 3

volatile long countL = 0;
volatile long countR = 0;

void ISR_left()  { countL++; }
void ISR_right() { countR++; }

// Robot parameters
const float WHEEL_DIAM_M = 0.065;   // 65mm wheel
const float WHEEL_BASE_M = 0.135;   // 135mm between wheels
const int   PPR          = 20;      // 20 pulses per revolution
const float DIST_PER_PULSE = (PI * WHEEL_DIAM_M) / PPR;

// Odometry state
float x = 0.0, y = 0.0, theta = 0.0;
long lastL = 0, lastR = 0;

void setup() {
  attachInterrupt(digitalPinToInterrupt(ENC_L), ISR_left,  CHANGE);
  attachInterrupt(digitalPinToInterrupt(ENC_R), ISR_right, CHANGE);
  Serial.begin(115200);
}

void updateOdometry() {
  noInterrupts();
  long cL = countL;
  long cR = countR;
  interrupts();

  long dL_pulses = cL - lastL;
  long dR_pulses = cR - lastR;
  lastL = cL;
  lastR = cR;

  float dL = dL_pulses * DIST_PER_PULSE;
  float dR = dR_pulses * DIST_PER_PULSE;
  float d  = (dL + dR) / 2.0;
  float dT = (dR - dL) / WHEEL_BASE_M;

  x     += d * cos(theta);
  y     += d * sin(theta);
  theta += dT;
}

void loop() {
  updateOdometry();
  Serial.print("X:"); Serial.print(x, 3);
  Serial.print(" Y:"); Serial.print(y, 3);
  Serial.print(" Theta:"); Serial.println(degrees(theta), 1);
  delay(100); // Update at 10 Hz
}
Using CHANGE mode for attachInterrupt doubles your effective resolution — you get a pulse on both the rising and falling edge of each slot, effectively doubling the PPR to 40 for a 20-slot disc. Set your DIST_PER_PULSE accordingly.
Position Tracking with Dead Reckoning
Dead reckoning is the process of estimating current position based on a previously known position plus estimates of speed and direction. With encoder odometry, the process is:
- Reset odometry variables at a known starting point (x=0, y=0, θ=0).
- Call
updateOdometry()at regular intervals (every 20–100 ms). - Use the resulting x, y, θ values in your navigation logic.
To drive to a target position (tx, ty):
float angle_to_target = atan2(ty - y, tx - x);
float angle_error = angle_to_target - theta;
// Normalise to [-PI, PI]
while (angle_error >  PI) angle_error -= 2*PI;
while (angle_error  0.1) {
  // Turn toward target
  turnTowardsAngle(angle_error);
} else {
  float dist_to_target = sqrt(pow(tx-x,2) + pow(ty-y,2));
  if (dist_to_target > 0.05) moveForward();
  else stopMotors(); // Arrived!
}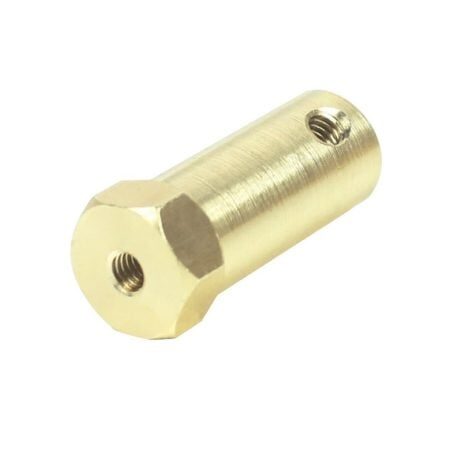
5mm Hex Coupling for Robot Smart Car Wheel
For robots using 5mm shaft gear motors. Securely mounts wheels for accurate, slip-free odometry. Compatible with standard robot chassis wheels; 30mm length suits most DC motor mount depths.
PID Speed Control Using Encoders
One of the most valuable uses of encoder feedback is closed-loop speed control. Without it, your robot drifts left or right because the two DC motors spin at slightly different speeds. PID control corrects this automatically.
Calculate the actual RPM from encoder pulses:
// Called every 100ms
float rpm_L = (dL_pulses * 600.0) / PPR;  // pulses/100ms * 600 = RPM
float rpm_R = (dR_pulses * 600.0) / PPR;

// PID for left motor
float error_L = target_rpm - rpm_L;
integral_L += error_L;
float output_L = Kp*error_L + Ki*integral_L + Kd*(error_L - prev_error_L);
prev_error_L = error_L;
setMotorPWM_L(constrain(base_pwm + output_L, 0, 255));
Typical PID gains for a 2WD hobby robot at 150 RPM: Kp=0.8, Ki=0.2, Kd=0.05. Tune using Ziegler–Nichols or simply by hand — increase Kp until the speed oscillates, then halve it and add Ki to eliminate steady-state error.
Error Sources & Mitigation
Odometry is never perfect. Here are the main error sources and how to reduce them:
- Wheel slip: The biggest error source. Reduce by using a surface with good traction (avoid tile floors if possible). Keep the robot lightweight relative to motor torque.
- Encoder disc eccentricity: If the encoder disc is not centred on the shaft, pulse spacing is irregular. Use a hex coupling for rigid, centred mounting.
- Unequal wheel diameters: Measure both wheels with calipers and use the actual measured diameters in your
DIST_PER_PULSEconstants. - Accumulated heading error: Even small heading errors grow linearly with distance. Fuse encoder odometry with an MPU6050 gyroscope for much better heading accuracy.
- Interrupt latency: At high RPM, the Arduino may miss pulses if the ISR is slow. Keep ISRs as short as possible — just increment a counter.
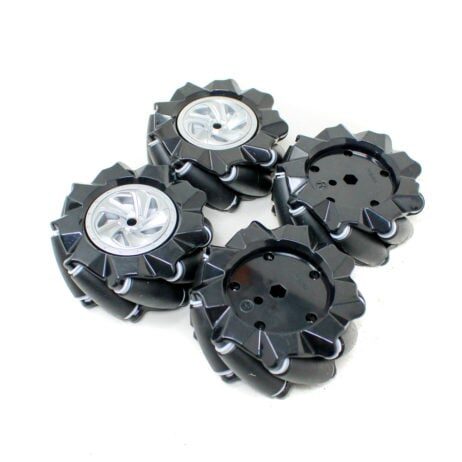
80mm Mecanum Wheels – Black (Pack of 4)
Upgrade your odometry robot to omnidirectional movement with 80mm mecanum wheels. Note: mecanum robots require 4-encoder odometry for accurate position tracking — one encoder per wheel.
Frequently Asked Questions
How many pulses per revolution do I need for good odometry?
20 pulses per revolution (PPR) is the minimum for useful odometry. With CHANGE mode interrupts this becomes 40 effective PPR. For better resolution, use a 40-slot encoder disc or a motor with a built-in high-resolution encoder (300–1000 PPR gear motor encoders are available). Higher PPR means smaller dist_per_pulse and finer position resolution.
Can I use the same encoder code on a Raspberry Pi or ESP32?
Yes. On Raspberry Pi, use the pigpio library for low-latency GPIO interrupts — do not use RPi.GPIO for encoders as its interrupt handling is too slow. On ESP32, hardware interrupts are available on all GPIO pins; the code logic is identical, just replace Arduino-specific syntax with ESP32/Arduino-framework equivalents.
Why does my robot drift to one side even with encoder feedback?
If PID speed control is active but the robot still drifts, the issue is usually wheel diameter difference or chassis geometry. Measure both wheel diameters precisely and update constants. If one wheel has a smaller effective diameter (e.g., due to a worn tyre), it travels less distance per pulse and PID can’t fully compensate this without calibrated per-wheel diameter values.
What is the maximum distance I can track with odometry before errors become significant?
On a well-calibrated robot on a flat hard surface, odometry position error grows roughly as 1–3% of total distance. For a 1-metre trip, expect ±1–3 cm error. For a 5-metre navigation task, errors can be ±5–15 cm without gyro fusion. Use sensor fusion (encoder + gyroscope + optionally ultrasonic wall tracking) for longer-range accuracy.
Can I use encoder odometry for a mecanum wheel robot?
Yes, but mecanum odometry requires all four wheel encoders and a different kinematic model. The lateral velocity component from the mecanum rollers must be included in the dead reckoning equations. Libraries like MecanumDrive for Arduino implement this, or you can derive the 4-encoder odometry equations from the mecanum wheel kinematics.
Build your precision odometry robot with parts from Zbotic! We stock hex couplings, mecanum wheels, robot chassis kits, and all the electronics needed for encoder-based autonomous navigation — shipped fast across India. Shop Robotics & DIY →


Add comment