
Few things are more frustrating for an FPV pilot or RC hobbyist than a LiPo charger not charging when you need to fix it quickly before the next flying session. The good news is that the vast majority of LiPo charging failures have one of a small number of root causes, and most can be diagnosed at home with basic tools. This step-by-step troubleshooting guide walks you through every common failure mode — from a dead battery that the charger refuses to accept, to a charger that throws error codes, to hardware faults in the charger itself. Whether you are in Hyderabad, Jaipur, or a small town in Punjab, this guide will help you get back in the air without spending money on unnecessary replacements.
Quick Checks First: The 5-Minute Triage
Before diving into complex diagnostics, run through this rapid checklist. A surprising number of “charger broken” reports turn out to be one of these simple issues:
- Is the charger powered? Check that the AC adapter or DC power supply is correctly connected and the charger’s power LED is on. For AC chargers, verify the mains outlet is live (plug in another appliance).
- Are the connectors fully seated? XT60 and XT30 connectors require firm pressure to fully engage. A half-connected plug creates a high-resistance connection that may prevent charging or cause sparks.
- Is the balance lead connected? Many chargers in balance mode will refuse to start if the balance connector is absent or not detected — it expects to see all cells via the balance lead.
- Is the cell count set correctly? A 3S pack connected to a charger set to 4S will either error out immediately or attempt to charge to a wrong voltage.
- Is the pack severely under-voltage? A pack below approximately 2.5 V/cell (or below 3.0 V/cell total for most chargers) will be refused. This is the single most common cause of “charger won’t start.”
If any of these is the culprit, the fix is straightforward. If all five check out, continue reading for deeper diagnosis.
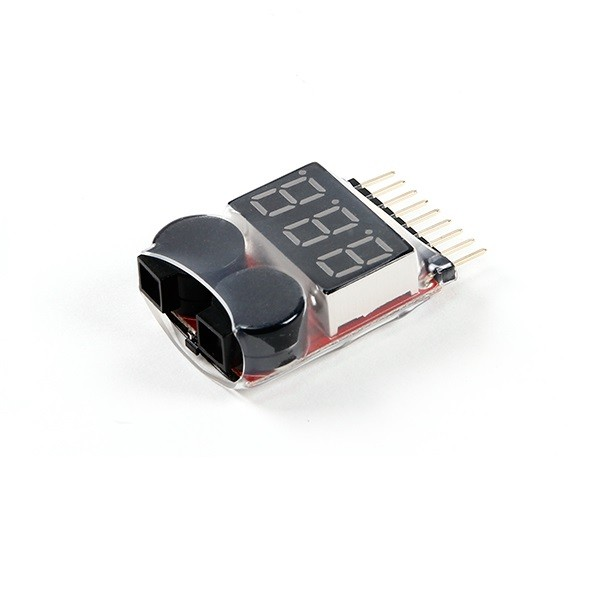
1–8S LiPo Battery Voltage Tester (Without Alarm)
The first tool to reach for when troubleshooting a charging problem. This simple tester shows individual cell voltages and total pack voltage via the balance connector in seconds, letting you identify under-voltage cells immediately.
Problem: Pack Voltage Too Low (Charger Won’t Start)
This is the most common cause of a LiPo charger refusing to begin charging. Most quality chargers have a minimum input voltage threshold — typically 2.5–3.0 V/cell — below which they will not attempt to charge. This protection exists because severely over-discharged cells may have internal shorts or lithium plating that make charging them dangerous.
How to Diagnose
Connect the pack’s balance lead to your voltage tester. Read the individual cell voltages. If any cell reads below 3.0 V, the pack is severely discharged. Below 2.0 V, the cell is almost certainly permanently damaged.
Recovery Attempts (3.0–3.5 V/cell)
For cells in the 3.0–3.5 V range (moderately discharged but above the protection threshold), your charger should accept the pack normally. If it still refuses:
- Check that your charger is in LiPo Balance mode, not LiHv or another chemistry.
- Try connecting via the main discharge connector AND the balance lead simultaneously.
- Some chargers have a Regenerate or Recovery mode for low-voltage packs — consult your charger’s manual.
Recovery for Cells Below 3.0 V (Risky — Proceed with Caution)
Some experienced pilots attempt to “boost” an over-discharged pack by briefly connecting a healthy, fully charged pack of the same voltage in parallel for 30–60 seconds to bring the depleted pack above the minimum threshold voltage. This is an advanced technique with real risks — if a cell has an internal short, connecting a charged pack can cause fire. Never do this unattended, always have a fire extinguisher nearby, and only attempt outdoors or in a fireproof area.
Our recommendation: If a cell reads below 2.5 V, retire the pack. The cost and safety risk of recovery are not worth it when a replacement pack costs ₹500–2000 in the Indian market.
Problem: Wrong Charger Settings
Modern chargers have sophisticated menus, and an incorrect setting is a very common cause of charging failure — especially after updating firmware or accidentally resetting to defaults.
Settings to Verify
- Chemistry: Ensure LiPo is selected, not LiHv (4.35 V/cell), LiFe (3.6 V/cell), NiMH, or NiCd. The wrong chemistry means the charger charges to the wrong voltage and may alarm or error out.
- Cell count: Must match the physical pack. A 4S pack connected while the charger is set to 3S will error when total voltage exceeds the expected range.
- Charge current: Set to 1C maximum (pack capacity in Ah = charge current in A). Some chargers default to very low currents (0.1 A) that make charging appear to not work because it is just very slow.
- Mode: Ensure you are in Balance Charge mode, not Storage, Discharge, or Check mode.
Auto-Detect vs Manual Cell Count
Most ISDT chargers auto-detect cell count from the balance lead. If the auto-detection reads the wrong count (can happen with a marginal balance connector), override it manually. Always verify the displayed cell count matches your physical pack before pressing Start.
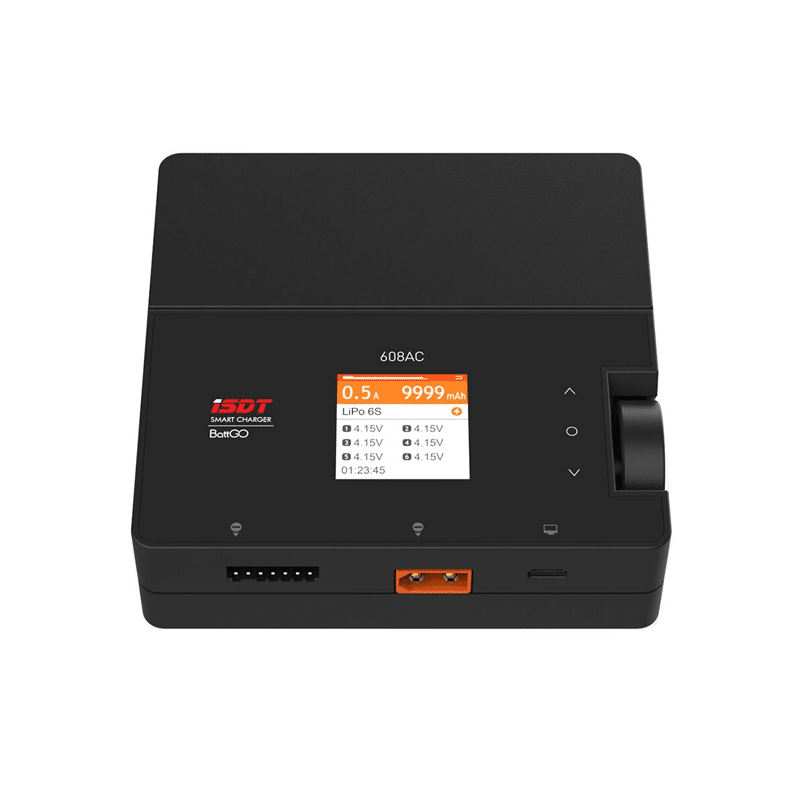
ISDT 608 AC LiPo Charger – AC 50W / DC 200W with Full Balance Mode
The ISDT 608 auto-detects cell count and chemistry, reducing setup errors. Its clear display shows per-cell voltage during charging, making it easy to spot any imbalanced or failing cells during the charge cycle itself.
Problem: Faulty Balance Lead or Connector
The JST-XH balance connector is mechanically delicate and sees repeated connection/disconnection stress. A damaged balance lead is a surprisingly common cause of charging failures, particularly the symptom of “charger detects wrong cell count” or “cell detection error.”
Diagnosing Balance Lead Problems
- Visually inspect the balance plug for bent or pushed-back pins. Even one pin 0.5 mm out of place can cause intermittent contact.
- With the balance lead connected to your voltage tester, gently wiggle the lead near the plug while watching the voltage reading. A reading that jumps or disappears indicates a broken wire at the connector.
- Check the balance connector on the pack itself — the solder joints on the PCB inside some packs can crack after repeated use or physical stress.
Fixing Balance Lead Issues
- Bent pin: Use a fine-tipped tool (jeweller’s screwdriver tip) to carefully push the pin back to the correct position. Test with voltage tester before charging.
- Broken wire: Cut the wire cleanly 2–3 cm from the connector, strip 5 mm of insulation, tin with solder, and re-solder to a replacement JST-XH connector. Note the colour order carefully — incorrect balance lead polarity can cause immediate damage.
- Corroded connector: Clean with isopropyl alcohol and a soft brush. Very corroded connectors should be replaced.
Problem: Charger Power Supply Issues
Chargers require a stable input voltage and adequate current. Problems here cause symptoms like charger shutting down mid-charge, failing to start, or displaying low-input-voltage errors.
For AC-Input Chargers (ISDT 405AC, etc.)
- Indian mains voltage should be 220–240 V AC. Verify with a voltmeter or socket tester.
- Check the power cable and AC socket for damage. In high-humidity coastal areas (Mumbai, Kochi, Chennai), sockets corrode — a corroded socket can add resistance that causes voltage drop.
- If the charger trips immediately after pressing Start, the AC input fuse may have blown. Most chargers have a user-replaceable 3.15 A glass fuse accessible via the bottom panel.
For DC-Input Chargers (Powered by Car Battery or Lab Supply)
- Chargers typically require 11–15 V DC input at sufficient current. A 200 W charger at 12 V draws nearly 17 A — thin input cables (many field power setups use 18 AWG) cause voltage sag under load.
- Measure DC input voltage at the charger terminals while charging. If it drops below 11 V, your power source (car battery, power supply) or cables are inadequate.
- Car batteries with poor charge states will sag badly under 17 A load. Use only a fully charged car battery or a dedicated DC lab supply with at least 20 A capacity at 12 V for high-power chargers.
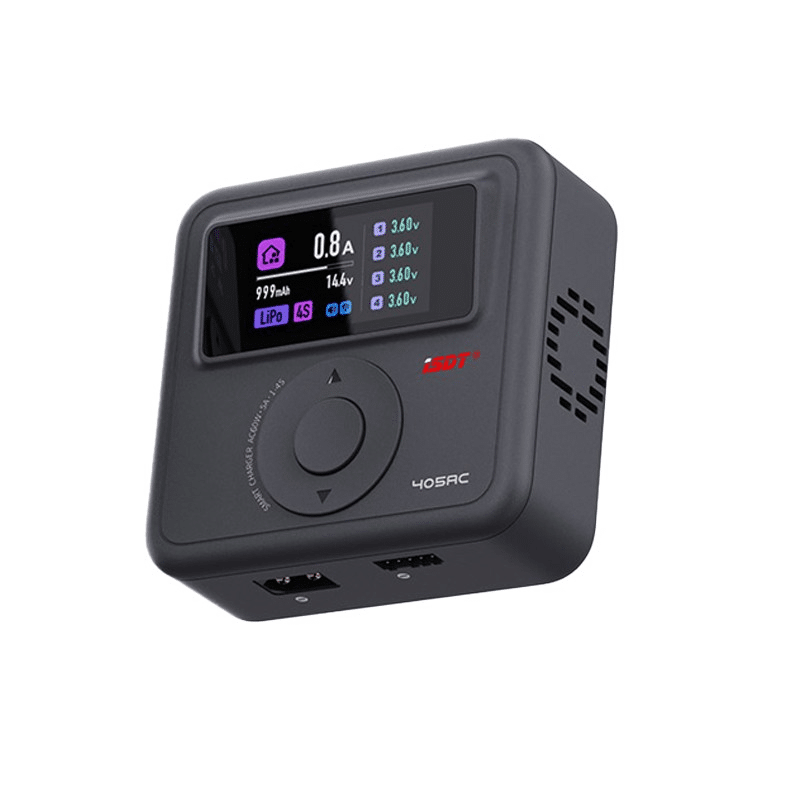
ISDT 405AC 60W GaN Smart Charger – Mains-Powered, No DC Supply Needed
The ISDT 405AC includes its own AC-DC conversion using GaN technology. No separate DC power supply required — just plug into Indian mains and charge up to 4S LiPo at 60W. Eliminates DC power supply issues entirely.
Decoding Common Charger Error Codes
Most digital chargers display error codes when something is wrong. Here are the most common codes and their solutions (terminology varies by brand but the underlying meaning is consistent):
| Error / Message | Meaning | Fix |
|---|---|---|
| Connection Break / No Battery | Charger cannot read battery voltage | Check main connector seating; inspect for burned or loose terminals |
| Cell Detect Error | Balance lead cell count doesn’t match expected | Check balance connector pins; manually set cell count; try different balance port |
| Capacity Limit / Time Limit | Charger stopped at preset capacity or time limit | Increase limits in charger settings, or re-start — pack may actually be full |
| Input Low Voltage | DC input is below charger’s minimum (typically 10–11 V) | Check DC power source, cables, and connectors; charge car battery first |
| Temp Error / Over Temp | Internal charger temperature too high | Reduce charge current; improve ventilation; allow charger to cool before restarting |
| Safety Timer / Timeout | Charge took longer than the safety time limit (often 120–240 min) | Increase safety timer or charge current; check if pack has abnormally high IR |
| Delta Peak / Full | NiMH/NiCd charging complete (peak detection) — or LiPo full | Normal completion — not an error |
Problem: Charger Hardware Fault
If all the above checks pass and the charger still refuses to work, a hardware fault in the charger itself is possible. Signs include:
- Charger powers on (display works) but gives errors immediately with any pack.
- Charger shows a current that is clearly incorrect (claiming 5 A when set to 0.5 A).
- Charger starts charging but current drops to zero after a few seconds with no error code.
- Burning smell or visible scorch marks near the output stage.
DIY Repair (Experienced Builders Only)
Simple chargers (imax B6 clones, generic balance chargers) have well-documented failure points. The two most common hardware failures are:
- Blown output MOSFET: The switching MOSFET in the output stage fails from reverse voltage spikes (connecting a pack with reverse polarity, even briefly). Symptoms: charger powers on, shows voltage on display, but zero current flows. Replacement is straightforward for those comfortable with surface-mount soldering — the MOSFET is typically marked and can be sourced from Lamington Road or SP Road markets.
- Failed filter capacitor: Bulged or leaking capacitors on the input or output stage. Visible on inspection. Replacement with equivalent-rated capacitors restores function.
When to Send for Service
Quality chargers (ISDT, iCharger, Junsi) have 1–2 year warranties in India. Contact the authorised service point or the distributor. ISDT chargers purchased from authorised Indian distributors typically include in-country warranty service.

ISDT A4 Air Smart Battery Charger with Bluetooth (NiMH, NiCd, Li-Ion, LiFePO4)
A multi-chemistry smart charger with Bluetooth monitoring via ISDT’s mobile app. Monitor per-cell voltages, internal resistance, and charge progress in real time — invaluable for diagnosing whether a problem is the charger or the pack.
When to Replace Instead of Repair
Sometimes the honest answer is to replace, not repair. Here is a clear framework for the decision:
Replace the Pack (not the charger) When:
- Any cell reads below 2.5 V and the pack is visibly puffed.
- Internal resistance of any cell is more than 3× the original value.
- The pack has taken physical damage (crash, puncture, severe deformation).
- Pack capacity has fallen below 70% of rated capacity.
- Charger works fine with other packs but consistently errors on this specific pack.
Replace the Charger When:
- The charger errors on all packs including packs known to be healthy.
- Visible burn damage, component failure, or the cost of repair approaches replacement cost.
- The charger is a generic/clone unit without manufacturer support — the cost of diagnosis and repair often exceeds the ₹400–800 cost of a replacement basic charger.
- The charger is more than 4–5 years old and has been used frequently — capacitors degrade over time regardless of apparent function.
Frequently Asked Questions
My charger shows current flowing but the pack voltage isn’t increasing. What’s wrong?
This usually indicates a severely unbalanced pack where one or more cells are so low that the pack voltage remains depressed despite current flowing in. Check per-cell voltage with a tester during charging. If one cell is at 2.8 V while others are at 3.6 V, the charger is fighting the imbalance. In severe cases, the charger may be delivering current but it is all going to the weak cell without raising pack voltage measurably. Allow balance charging to run for a full cycle — the weak cell should recover if it is not permanently damaged.
Can I use a mobile phone charger to charge my LiPo drone battery?
No. A phone charger outputs 5 V (or up to 20 V for USB-PD fast charging), while a 3S LiPo needs 12.6 V and a 4S needs 16.8 V. Additionally, a phone charger has no balance circuitry, no chemistry-specific voltage control, and no automatic cutoff at the correct LiPo voltage. Attempting this would either not charge the pack (wrong voltage) or could severely overcharge and ignite it (if you attempted to adapt a higher voltage output). Always use a dedicated LiPo balance charger.
My charger starts but stops after 30 seconds with no error. What causes this?
This is often the Safety Timer or a capacity limit set in charger memory from a previous session. Check your charger’s settings for: (1) Capacity Limit — set to 0 (unlimited) or to the rated capacity + 20%, (2) Safety Time — increase to 120–180 minutes, (3) Delta Peak Sensitivity on NiMH mode if you accidentally switched chemistry. Also check if the input voltage drops significantly under load — a poor DC supply that sags may trigger the charger’s low-input-voltage protection after the initial inrush settles.
After a crash, my charger shows a different cell count than before. Why?
A crash can damage the balance lead connector inside the pack, causing one or more balance wires to lose connection. The charger detects fewer cells than the actual pack count. Carefully open the pack’s outer wrap (if safe to do so) and inspect the balance tap PCB inside. Look for broken solder joints on the balance connector. If a wire has detached, re-solder carefully — this is a delicate repair that requires good soldering skills and must be done with the pack fully discharged.
Is it safe to charge a LiPo with a TP4056 module if my balance charger breaks?
A TP4056 module is designed for a single 3.7 V Li-ion cell — it outputs exactly 4.2 V. This is safe only for a 1S (single cell) LiPo pack. It absolutely cannot be used for 2S, 3S, or higher packs — it would charge only one cell while leaving others untouched, creating dangerous cell imbalance. Even for 1S packs, the TP4056 has no balance connector and is intended for Li-ion cylinder cells, not high-discharge LiPo pouches — the 1 A charge rate may be too low for large capacity drone packs to complete in reasonable time but it is electrically safe for a 1S pack.
Upgrade to a Reliable Smart Charger
Stop fighting with problematic budget chargers. Zbotic stocks ISDT smart chargers with clear error reporting, auto cell detection, and Bluetooth monitoring — plus LiPo voltage testers and accessories for complete battery management. Fast shipping across India.


Add comment