
Table of Contents
- Why the Ender 3 is India’s Most Popular Budget 3D Printer
- What’s in the Box
- Step-by-Step Assembly Guide
- Manual Bed Levelling the Right Way
- Loading Filament and First Extrusion
- Slicer Settings for Your First Print
- Running Your First Print
- Common Problems and Fixes for Indian Conditions
- Essential Upgrades to Do Right Away
- Frequently Asked Questions
Why the Ender 3 is India’s Most Popular Budget 3D Printer
The Creality Ender 3 has become the go-to entry-level 3D printer for hobbyists, students, and engineers across India — and for very good reason. It offers a 220×220×250 mm build volume, an all-metal frame, a heated bed that can reach 110 °C, and a community so large that almost every problem you encounter has already been solved and documented online.
In India, where maker culture is growing rapidly through college electronics clubs, drone racing communities, and small-batch product startups, the Ender 3 sits at a price point that makes experimentation genuinely affordable. Whether you are printing replacement parts for household appliances, prototyping a PCB enclosure, or creating miniatures for tabletop games, the Ender 3 can handle it all once it is properly set up.
But here is the honest truth: the Ender 3 ships partially disassembled, and the included instructions are notoriously sparse. Many first-time buyers in India get frustrated within the first hour because the assembly steps, bed levelling procedure, and initial slicer settings are not clearly explained anywhere in the box. This guide fixes that problem completely.
By the end of this walkthrough you will have your Ender 3 assembled, levelled, sliced, and printing its first successful object — even if you have never touched a 3D printer before.
What’s in the Box
Before you begin, lay all components out on a clean table and cross-reference against this list. Indian customers occasionally report missing or damaged parts, and it is far easier to raise a replacement claim before you start assembly.
- Gantry frame (pre-assembled vertical section)
- Base frame with Y-axis carriage and heated bed
- Extruder and hot-end assembly
- LCD display controller
- Power supply unit (PSU) — note: India uses 230 V, ensure the PSU voltage selector switch is set to 230 V before plugging in
- Filament spool holder
- Tool kit: hex keys, side cutters, spatula/scraper, spare nozzle, PTFE tube cutter
- Sample PLA filament (usually 200–300 g)
- MicroSD card with test files and Cura installer
- Wiring harness set
Critical India-specific check: Open the PSU and confirm the 115/230 V switch. Creality sometimes ships units defaulted to 115 V. Plugging a 115 V-set PSU into a 230 V Indian socket will instantly blow the fuse or damage the PSU. The switch is visible through a small opening on the side of the PSU — slide it to 230 V before connecting power.
Step-by-Step Assembly Guide
Assembly takes roughly 45 minutes to an hour if you work carefully. Do not rush — a crooked frame will cause print quality problems that are surprisingly difficult to diagnose later.
Step 1 — Mount the Gantry to the Base
Slide the vertical gantry frame into the two slots at the rear of the base frame. Insert the four M5 bolts from the bottom of the base into the gantry uprights. Tighten by hand first to ensure alignment, then use the included hex key to snug them down. Check squareness by measuring diagonally across the frame — both diagonals should be equal.
Step 2 — Install the Z-Axis Lead Screw
The lead screw connects the Z-motor to the X-axis carriage. Thread it through the brass anti-backlash nut on the carriage and couple it to the motor shaft with the flexible coupler. Do not over-tighten the coupler grub screws — finger-tight plus a quarter turn is enough. A rigidly jammed coupler will cause Z-banding artefacts on your prints.
Step 3 — Install the X-Axis and Extruder
Slide the extruder/hot-end assembly onto the X-axis rail. The eccentric nut on the bottom V-slot wheel adjusts tension — it should feel like resistance without binding when you push the carriage along the rail by hand.
Step 4 — Mount the LCD Screen
Attach the LCD bracket to the base frame using the two M4 bolts, then connect the ribbon cable. The connector is keyed and will only go in one direction.
Step 5 — Wire Everything Up
Connect each labelled cable to its matching port on the control board. Route the wiring harness along the frame channels and secure with the included zip ties. Keep wiring away from the heated bed, which moves back and forth during printing.
Step 6 — Install the Filament Spool Holder
Mount the spool holder to the top of the frame using the two M4 bolts. Indian humidity can cause PLA to absorb moisture if spools sit uncovered, so keep this in mind for long-term filament storage.
Bambu Lab PLA Filament Grey — 1.75mm with Reusable Spool
Premium PLA with consistent diameter tolerance — ideal for your Ender 3’s first rolls. Runs reliably at 200–210 °C with minimal stringing.
Manual Bed Levelling the Right Way
Bed levelling is the single most important calibration step on the Ender 3 and the root cause of 80% of first-print failures. The goal is to set the nozzle height so that it is exactly 0.1–0.2 mm above the build surface at every corner and in the centre.
The Paper Method
Take a standard A4 sheet of paper (approximately 0.1 mm thick). Home all axes using the printer’s control menu (Prepare → Auto Home). Then disable the steppers (Prepare → Disable Steppers) so you can manually move the print head.
Move the hot-end to the front-left corner and slide the paper under the nozzle. Adjust the bed spring thumb wheel until you feel light resistance when sliding the paper — it should drag slightly but not tear or jam. Repeat at the front-right, rear-right, and rear-left corners, then once in the centre. Go around the circuit twice, as adjusting one corner affects the others slightly.
Why Indian Temperature Swings Matter
If your workspace temperature changes significantly between morning and evening — common across Indian cities — you may find your bed level drifts. Glass beds are more thermally stable than the stock magnetic surface and are a popular upgrade among Indian makers for this reason.
First-Layer Test Print
After levelling, print a single-layer calibration square (many are free on Thingiverse). Watch the nozzle trace the first layer closely. The extruded line should be slightly squished into the surface, not round and bead-like (too far) or scraping the bed (too close).
Loading Filament and First Extrusion
Before loading filament, preheat the hot-end to the correct temperature. For standard PLA, set the nozzle to 200 °C (Control → Temperature → Nozzle). Do not try to push filament through a cold nozzle — you will jam the extruder.
- Cut the filament end at a sharp 45-degree angle using side cutters.
- Pass the filament through the PTFE Bowden tube from the extruder end.
- Push it manually until you feel resistance at the hot-end entrance.
- On the printer’s control panel, go to Prepare → Move Axis → Move E (extruder) and extrude 10 mm at a time until you see filament flowing freely from the nozzle.
- Extrude until the extruding plastic is the correct colour (the sample filament left in the tube from factory testing may be a different colour initially).
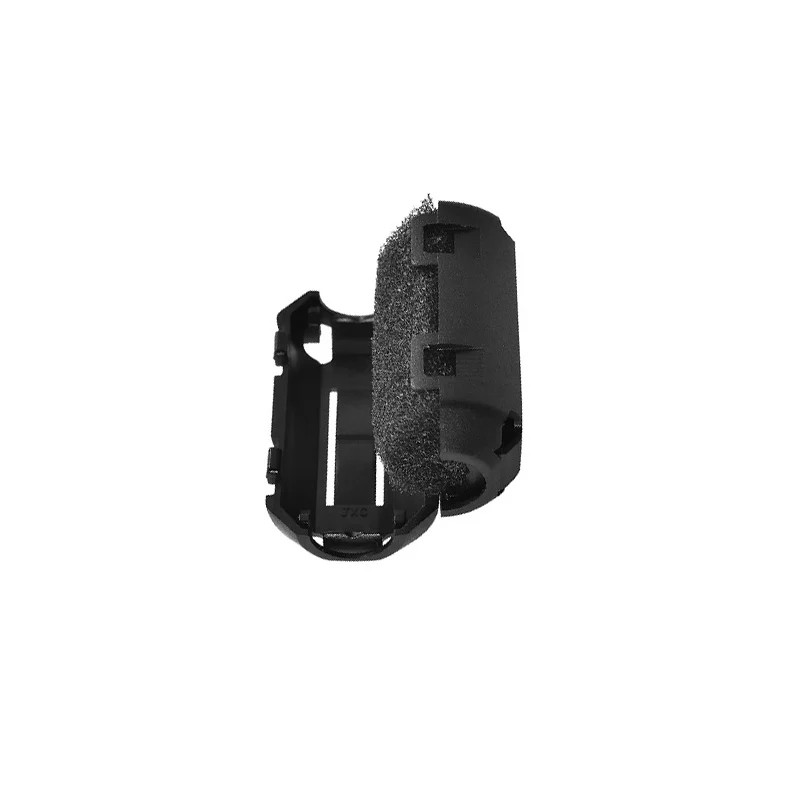
Filament Filter and Dust Cleaner Block for Ender 3
India’s dusty environments clog nozzles fast. This inline filament filter wipes dust off the filament before it enters the extruder, reducing nozzle clogs significantly.
Slicer Settings for Your First Print
A slicer converts a 3D model (STL file) into G-code instructions the printer can follow. Cura is the most popular free option and works perfectly with the Ender 3. Download the latest version from Ultimaker’s website.
Adding the Ender 3 Printer Profile
Open Cura, click Add Printer, and search for Creality Ender 3. The profile fills in most settings automatically. Confirm the build volume is 220×220×250 mm.
Recommended Starter Settings for PLA
- Layer height: 0.2 mm (good balance of speed and quality)
- Wall thickness: 0.8 mm (two perimeter lines)
- Infill density: 20% (gyroid or grid pattern)
- Print temperature: 200 °C (nozzle), 60 °C (bed)
- Print speed: 50 mm/s (first layer: 25 mm/s)
- Fan speed: 100% from layer 2 onwards
- Retraction: 5 mm at 45 mm/s (Bowden setup)
- Supports: off for your first simple print
Start with the test dog or the 20 mm calibration cube included on the MicroSD card. These are small, fast to print, and immediately reveal any calibration issues.
Running Your First Print
Export your sliced file as G-code and copy it to the MicroSD card (the Ender 3 does not support USB drives). Insert the card into the printer with the label facing up — the slot is particular about orientation.
On the printer menu, go to Print from SD. Select your file. Watch the first three layers closely:
- The first layer should be slightly squished and adhere firmly to the bed.
- Lines should be smooth, not bead-like or rough.
- The nozzle should not drag through previously printed lines.
Do not walk away during the first print. If something goes wrong — bad adhesion, spaghetti stringing, or the print lifting off the bed — pause and fix it before wasting an hour of filament.

220×220mm Frosted Heated Bed Sticker Build Plate
Improves first-layer adhesion dramatically compared to bare glass or worn stock surfaces. Easy to replace when scratched.
Common Problems and Fixes for Indian Conditions
Print Not Sticking to Bed
The most common issue. Check: bed level, nozzle height, bed temperature (60 °C for PLA), bed surface cleanliness (wipe with isopropyl alcohol before printing). In high-humidity Indian conditions, PLA absorbs moisture and prints poorly — store filament in sealed bags with silica gel.
Filament Not Extruding
Usually a partial clog. Heat the nozzle to 220 °C and manually push filament through while pulling back slightly (the cold pull technique). If the clog persists, use a cleaning needle to clear the nozzle opening.
Power Cuts Mid-Print
India’s power supply can be unreliable in some areas. The Ender 3 has a basic power-loss recovery feature — enable it in the settings menu. For longer prints, a small UPS gives you 10–15 minutes of buffer to either restore power or safely stop the print.
Layer Shifts
Usually caused by the print head hitting a warped part of the print, or by loose belt tension. Re-tension the X and Y belts by tightening the belt tensioner screws.
Stringing
Long hair-like strands between print features. Increase retraction to 6 mm, reduce print temperature by 5 °C, and enable Cura’s combing mode.
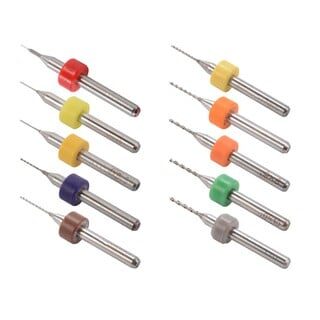
0.1–1.0mm Mixed Nozzle Cleaning Drill Bit Kit (10 Pcs)
Essential toolkit for clearing partial nozzle clogs without disassembly. Covers MK7, MK8, and RepRap-style nozzles including the Ender 3’s stock hotend.
Essential Upgrades to Do Right Away
The Ender 3 is good out of the box, but a few low-cost upgrades make a significant difference, especially for users in India.
- Filament dust filter: India’s dusty environments clog nozzles faster than in cleaner climates. A simple inline filament filter (felt or foam) reduces clogging dramatically.
- Glass bed: A 4mm tempered glass plate sits on top of the stock magnetic surface. It is flatter, more thermally stable, and prints pop off easily once the bed cools.
- Bed levelling springs: Replace the soft stock springs with stiffer yellow springs. Bed level stays consistent for far longer between adjustments.
- Bowden PTFE tube: The stock tube has a slightly larger inner diameter, which contributes to stringing. Capricorn XS PTFE tubing with a 1.9 mm ID is the standard upgrade.
- Spare nozzles: Stock up on 0.4 mm brass nozzles. They wear out, especially with abrasive filaments. Buying a 10-pack is cheaper than running out mid-project.
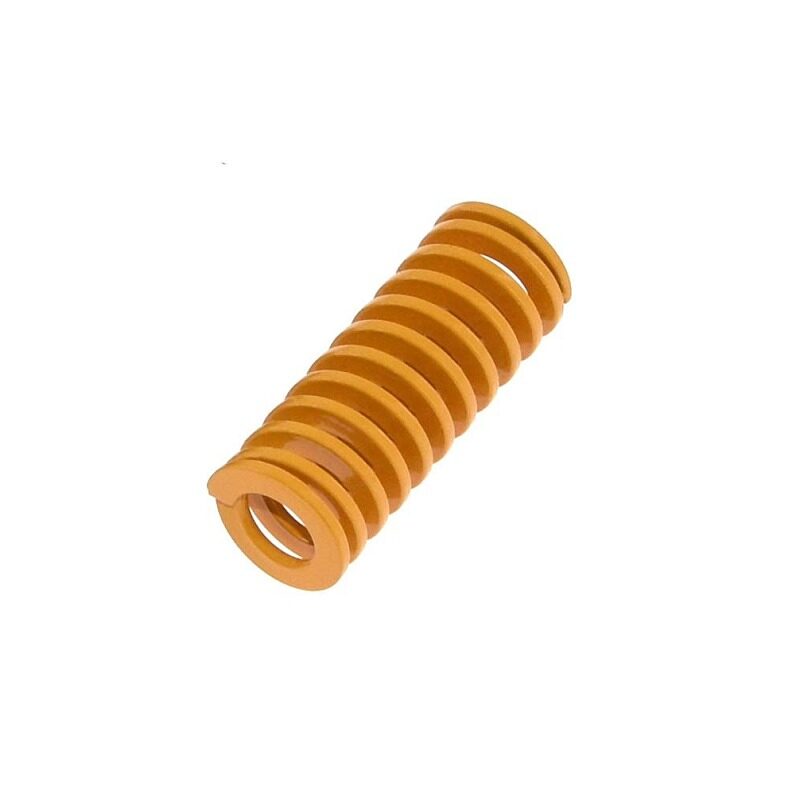
3D Printer Parts Spring for Heated Bed MK3 CR-10 Hotbed
Stiffer bed springs keep your Ender 3 levelled for weeks at a time rather than days. One of the cheapest and most impactful upgrades you can make.
Frequently Asked Questions
Do I need any tools to assemble the Ender 3?
The included hex key set covers all assembly bolts. A pair of side cutters and needle-nose pliers from a basic tool kit are helpful but not strictly required.
Can I use third-party PLA filament with the Ender 3?
Yes. The Ender 3 works with any 1.75 mm filament. Quality varies by brand — premium filaments like Bambu Lab or eSUN have tighter diameter tolerances, which leads to more consistent prints.
How often should I level the bed?
Re-level before any large print, after moving the printer, or whenever you notice adhesion problems. With stiffer springs, many users only level once every 2–3 weeks.
Is PLA safe to use indoors in India?
PLA emits very low levels of VOCs compared to ABS. Good ventilation — a window or fan — is sufficient for home use with PLA. ABS requires dedicated fume extraction.
What filament is best for printing in high-humidity Indian cities?
PLA absorbs moisture quickly and should be stored in sealed bags with silica gel. PETG is more moisture-resistant for daily printing. If printing in a very humid environment, consider a filament dryer or dry box.
Can the Ender 3 print ABS?
Yes, but the Ender 3 lacks an enclosure, making ABS difficult to print without warping. Many Indian users use cardboard or acrylic panels around the printer to create a simple enclosure for ABS.
Ready to start printing? Browse our full range of 3D printing filaments, nozzles, spare parts, and accessories at Zbotic’s 3D Printing store. All products ship across India with fast delivery.


Add comment