
Introduction :
In this project, we are making a clap lamp, which is turn ON/OFF with sound of clap or any other sound by using Sound Detector Sensor. The Sound Detector is a small board that combines a microphone and some processing circuitry. It detects the sounds of door knocks, claps, voice or any other sounds loud enough to picked up by the microphone.
How Does it Work?
We use a sound sensor that generates a high output whenever it detects a sound signal. We have to clap to generate a loud sound so the sensor will detect it. When you clap near the sound sensor the LED will go on when you clap again the LED goes off. There are two given circuits and you can make any one of your choices. One circuit is designed to turn on and off an AC bulb and the other is for an LED.
Please work carefully with the AC load.
Components Required:
- Small breadboard
- Arduino Uno
- Uno Cable
- 1 Channel 5V Relay
- Sound Sensor
- Jumper Wire
- 220V LED bulb
- 5v 2Amp Power Adapter
- 220-ohm resistor

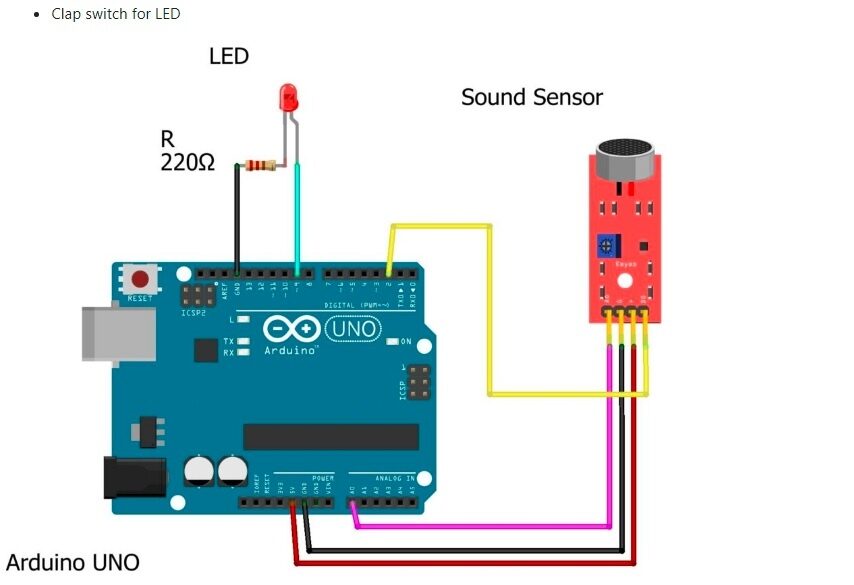
Connections:
Sound Sensor – Arduino Uno
+VCC -> +5V
GND -> GND
D0 -> PIN No.2
LED Connection:
+Ve -> Arduino Pin No.4
-Ve -> GND
Make the same connections for the sound sensor and LED as shown in the above diagram. After completing the circuit make sure to upload the given code.
CODE
- Code for AC bulb clap switch
 //
 int SoundSensor=2; // LM393 Sound Sensor Digital Pin D0 connected to pin 2
 int LED=9;     // LED connected to pin 9
 int RELAY=10;   // RELAY connected to pin 10
 boolean LEDStatus=false;
 void setup()
 {
  pinMode(SoundSensor,INPUT);
  pinMode(LED,OUTPUT);
  pinMode(RELAY,OUTPUT);
  Serial.begin(9600); //initialize serial
  digitalWrite(RELAY,HIGH); // RELAY High means OFF
 }
 void loop()
 {
  int SensorData=digitalRead(SoundSensor);
  Serial.println(SensorData);//print the value
   if(SensorData==1)
   {
   if(LEDStatus==false)
   {
     LEDStatus=true;
     digitalWrite(LED,HIGH);  // LED ON
     digitalWrite(RELAY,LOW); // RELAY OFF
   }
   else if(LEDStatus==true)
   {
     LEDStatus=false;
     digitalWrite(LED,LOW);  // LED ON
     digitalWrite(RELAY,HIGH); // RELAY OFF
   }
   }
   }
- Code for LED clap switch
 //
 int SoundSensor=2;  // LM393 Sound Sensor Digital Pin D0 connected to pin 2
 int LED=9;      // LED connected to pin 9
 boolean LEDStatus=false;
 void setup()
 {
  pinMode(SoundSensor,INPUT);
  pinMode(LED,OUTPUT);
  Serial.begin(9600); //initialize serial
 }
 void loop()
 {
  int SensorData=digitalRead(SoundSensor);
  Serial.println(SensorData);//print the value
   if(SensorData==1)
   {
   if(LEDStatus==false)
   {
     LEDStatus=true;
     digitalWrite(LED,HIGH); // LED ON
   }
   else if(LEDStatus==true)
   {
     LEDStatus=false;
     digitalWrite(LED,LOW); // LED OFF
   }
   }
   }
5. Output
When sound of clapping or any other is detected by sensor, the lamp attached to module will illuminate.
If you have any query please write us at [email protected]
Hope you understand the project well and if you are facing any errors do inform us in the comments section below.


Add comment