
Table of Contents
- Introduction
- How Resistive Soil Sensors Work
- How Capacitive Soil Sensors Work
- Accuracy Comparison
- Durability and Lifespan
- Wiring Both Sensors to Arduino
- Arduino Code Examples
- Which Sensor Should You Choose?
- Real-World Applications
- Frequently Asked Questions
- Conclusion
Introduction
Soil moisture sensing is at the heart of smart irrigation, automated plant watering systems, and precision agriculture IoT projects. When selecting a soil moisture sensor for your Arduino or Raspberry Pi project, you will immediately encounter two dominant technologies: capacitive soil moisture sensors and resistive soil moisture sensors. Both can tell you whether the soil is wet or dry, but they work on fundamentally different physical principles — and those differences translate directly to accuracy, longevity, and cost.
In this detailed guide we compare capacitive vs resistive soil moisture sensors across every dimension that matters: measurement principle, accuracy, response time, corrosion resistance, power consumption, calibration, and price. By the end, you will know exactly which type to buy for your specific project, whether it is a weekend home-garden monitor or a large-scale precision farming deployment.
How Resistive Soil Sensors Work
Resistive soil moisture sensors use two bare metallic probes (electrodes) inserted directly into the soil. They apply a small DC or AC voltage across the probes and measure the electrical resistance of the soil between them. The principle is simple: wet soil conducts electricity better than dry soil, so resistance drops as moisture increases. The sensor outputs an analog voltage that you map to a moisture percentage using a lookup table or calibration curve.
Advantages of Resistive Sensors
- Extremely low cost — typically ₹30–₹80 per module in India
- Simple circuitry — just a voltage divider with a variable resistor (the soil)
- Easy to read — direct analog voltage output proportional to moisture
- Wide compatibility — works with any microcontroller that has an ADC pin
Disadvantages of Resistive Sensors
- Corrosion — DC current through the soil causes electrolysis, which rapidly corrodes the bare metal probes. Many resistive sensors fail within weeks of continuous use in moist soil.
- Electrolyte sensitivity — the sensor actually measures conductivity, not moisture. A dry soil rich in fertilizer salts can read as “wet” because the dissolved ions increase conductivity. This is the single biggest accuracy problem with resistive sensors.
- Drift over time — probe oxidation changes the baseline resistance, causing readings to shift without any actual change in soil moisture.
- High power draw — continuous DC through the soil wastes power, problematic for battery-operated remote nodes.
How Capacitive Soil Sensors Work
Capacitive soil moisture sensors measure the dielectric permittivity of the surrounding material rather than its electrical resistance. The probe is coated with a thin dielectric layer (usually PCB material or an epoxy coat), and an oscillator circuit measures how the capacitance of the probe changes with the surrounding medium. Water has a very high dielectric constant (~80) compared to air (~1) or dry soil (~4–6), so even small changes in water content shift the capacitance measurably.
Critically, the probe electrodes never make direct electrical contact with the soil — the dielectric coating acts as a barrier. This is what gives capacitive sensors their two most important advantages: no corrosion and near-immunity to dissolved salt content.
Advantages of Capacitive Sensors
- No corrosion — probes are electrically isolated from the soil, so there is no electrolysis and no oxidation
- Salt insensitivity — measures dielectric permittivity, not conductivity, so fertilized soils do not produce false readings
- Long lifespan — properly coated capacitive sensors can last years outdoors
- Lower power option — no continuous DC current through the soil; suitable for battery nodes
- Better accuracy — more closely correlated to actual volumetric water content
Disadvantages of Capacitive Sensors
- Higher cost — typically ₹150–₹400 per module
- Temperature sensitivity — the dielectric constant of water changes with temperature; high-end sensors compensate for this, cheap ones do not
- More complex calibration — raw ADC output must be mapped to VWC (volumetric water content) per soil type
- Output can vary by soil type — sandy, loamy, and clay soils have different baseline dielectric constants, requiring separate calibration curves

Capacitive Soil Moisture Sensor
Corrosion-resistant capacitive probe for accurate soil moisture monitoring in garden automation and precision agriculture projects.
Accuracy Comparison
This is the most critical question for anyone building an irrigation controller or agricultural monitoring node. Let us break it down by what each sensor actually measures:
What “Accuracy” Means for Soil Sensors
True accuracy in soil moisture sensing means correctly reporting the volumetric water content (VWC) — the fraction of the total soil volume occupied by water. This is the standard used in agronomy. Neither cheap resistive nor cheap capacitive sensors give you VWC directly out of the box; both require calibration. However, after calibration:
- Resistive sensors in clean, low-salt soil: ±5–10% VWC error (acceptable for basic plant watering)
- Resistive sensors in fertilized or saline soil: errors of 20–40% VWC are common due to ionic interference
- Capacitive sensors in any soil: ±3–5% VWC error after soil-specific calibration
- Capacitive sensors with generic calibration: ±8–12% VWC error (still better than resistive in fertilized soil)
The Salt Problem in Detail
When you dissolve fertilizer (NPK, urea, or any ionic compound) in soil water, the solution becomes conductive. A resistive sensor sees this high conductivity and interprets it as high moisture — even if the soil is actually bone dry. This is not a design flaw but a fundamental limitation of conductivity-based measurement. Capacitive sensors are immune because they measure dielectric properties, and dissolved salts have a negligible effect on the dielectric constant of water at the frequencies used.
Response Time
Both sensor types respond within 1–2 seconds to a step change in moisture. For most applications this is irrelevant. Resistive sensors can show slower recovery after drying because oxidized probes have higher baseline resistance. Capacitive sensors recover cleanly.
Durability and Lifespan
In outdoor, always-on deployments, durability is often more important than raw accuracy. Here is a realistic lifespan comparison:
| Factor | Resistive Sensor | Capacitive Sensor |
|---|---|---|
| Probe material | Bare metal (nickel-plated PCB) | Coated PCB or epoxy-encapsulated |
| Corrosion resistance | Poor — weeks to months | Excellent — 1–3+ years |
| Affected by soil pH | Yes — acidic soil accelerates corrosion | No |
| Ideal for | Short-term / indoor projects | Outdoor / long-term deployments |
| Moisture ingress risk | Low (open probes) | Medium if PCB coating has gaps |
One practical tip for extending resistive sensor life: power the probe only during measurement (use a GPIO pin through a transistor) instead of continuously. This slows electrolysis significantly. Even so, in continuously moist soil with fertilizer, resistive probes typically fail in 4–12 weeks.
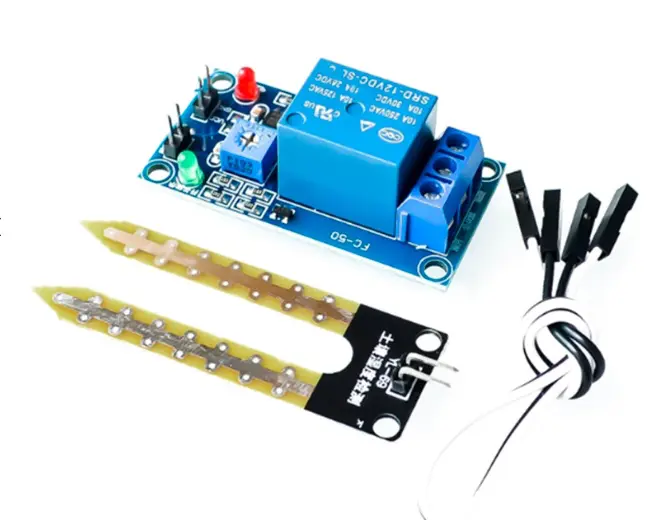
5V/12V Soil Moisture Sensor Relay Control Module
Ready-to-use soil moisture relay module — connects directly to a pump for fully automatic watering without any microcontroller code.
Wiring Both Sensors to Arduino
Resistive Sensor Wiring
Most resistive soil moisture modules include an LM393 comparator and provide both analog (AO) and digital (DO) outputs:
- VCC → Arduino 5V (or 3.3V for 3.3V boards)
- GND → Arduino GND
- AO → Arduino A0 (analog read)
- DO → Arduino D2 (optional digital threshold output)
Capacitive Sensor Wiring
The popular v1.2 capacitive sensor (based on the 555 timer oscillator) outputs a 0–3V analog signal:
- VCC → Arduino 3.3V (important: this sensor runs at 3.3V; feeding 5V may damage it)
- GND → Arduino GND
- AOUT → Arduino A0
For 5V Arduino boards, use the 3.3V output pin or a voltage divider. Alternatively, power it from 5V and use an analog reference adjustment — but 3.3V operation is recommended for best accuracy and longevity.
Arduino Code Examples
Reading a Resistive Sensor
const int SENSOR_PIN = A0;
const int POWER_PIN = 7;  // Optional: power-gate to reduce corrosion

void setup() {
  Serial.begin(9600);
  pinMode(POWER_PIN, OUTPUT);
  digitalWrite(POWER_PIN, LOW);
}

void loop() {
  digitalWrite(POWER_PIN, HIGH);
  delay(10);  // Let sensor stabilise
  int rawValue = analogRead(SENSOR_PIN);
  digitalWrite(POWER_PIN, LOW);

  // Map: 0 (fully dry) to 1023 (fully wet)
  // Invert because resistance drops with moisture
  int moisturePercent = map(rawValue, 1023, 300, 0, 100);
  moisturePercent = constrain(moisturePercent, 0, 100);

  Serial.print("Soil Moisture: ");
  Serial.print(moisturePercent);
  Serial.println("%");

  delay(2000);
}
Reading a Capacitive Sensor (v1.2)
const int SENSOR_PIN = A0;

// Calibrate these values in air (dry) and submerged in water (wet)
const int AIR_VALUE = 620;   // Reading in completely dry air
const int WATER_VALUE = 310; // Reading fully submerged

void setup() {
  Serial.begin(9600);
  analogReference(DEFAULT); // Use 5V reference on Uno
}

void loop() {
  int rawValue = analogRead(SENSOR_PIN);

  // Convert to percentage (0 = dry, 100 = saturated)
  int moisturePercent = map(rawValue, AIR_VALUE, WATER_VALUE, 0, 100);
  moisturePercent = constrain(moisturePercent, 0, 100);

  Serial.print("Capacitive Moisture: ");
  Serial.print(moisturePercent);
  Serial.println("%");

  if (moisturePercent  Water needed!");
  } else if (moisturePercent > 80) {
    Serial.println("-> Soil is saturated");
  } else {
    Serial.println("-> Moisture level OK");
  }

  delay(2000);
}
Calibration tip: Hold the capacitive sensor in open air for 30 seconds and note the stable ADC reading — that is your AIR_VALUE. Then place it in a cup of water (up to the line marked on the PCB) and note the stable reading — that is your WATER_VALUE. These values vary between individual sensors and must be measured for each unit.

DIY Automatic Flower Watering & Irrigation Module
All-in-one soil moisture detection and automatic pump module — perfect for building a self-watering plant system with minimal components.
Which Sensor Should You Choose?
The answer depends on your use case, budget, and expected deployment duration:
Choose a Resistive Sensor When:
- You are on an extremely tight budget (classroom demos, quick prototypes)
- The deployment is short-term (days to weeks) or indoor
- The soil is unfertilized (potting mix or clean garden soil)
- You only need a rough wet/dry threshold, not precise VWC
- You are teaching soil sensor concepts to beginners
Choose a Capacitive Sensor When:
- You need reliable readings for weeks or months
- The soil is fertilized or has high mineral content
- You are building a production-grade irrigation controller
- You want data quality good enough for ML-based crop models
- Power consumption matters (battery or solar-powered field nodes)
- You are deploying outdoors in monsoon or high-humidity conditions
Real-World Applications
Home Garden Automation
A simple Arduino + capacitive sensor + relay + 12V pump setup can water your balcony garden automatically. The capacitive sensor ensures the pump does not trigger when the potting mix is already moist from a recent rain. Build costs are typically under ₹600 for the sensor and relay combination.
Greenhouse Climate Control
Commercial greenhouses use arrays of capacitive sensors at multiple depths (10cm, 30cm, 60cm) to build a soil moisture profile. The data drives drip irrigation zone valves individually, reducing water use by 30–50% compared to timed irrigation.
Smart Agriculture IoT Node
Pair a capacitive sensor with an ESP8266 or ESP32, a solar panel, and an LiPo battery. Deep-sleep the ESP32 between readings to achieve months of battery life. Upload readings to ThingSpeak, Blynk, or a custom MQTT broker. Alert via Telegram when VWC drops below a crop-specific threshold.
Hydroponics Substrate Monitoring
In coco coir or rockwool hydroponic substrates, resistive sensors fail almost immediately due to the high EC (electrical conductivity) of nutrient solutions. Capacitive sensors are the only practical choice here.
Frequently Asked Questions
Q: Can I use a resistive soil sensor with a 3.3V Arduino?
A: Yes, most resistive modules work at both 3.3V and 5V. The analog output range will scale proportionally. Adjust your map() values accordingly and calibrate fresh at the new voltage.
Q: Why does my capacitive sensor read differently in different pots?
A: Different soil types (sandy, loam, clay, peat) have different baseline dielectric constants. You must calibrate the dry and wet reference values in each specific soil type for accurate readings. A single universal calibration does not exist for cheap capacitive modules.
Q: How deep should I insert the soil moisture sensor?
A: For shallow-rooted plants (lettuce, herbs), insert the probe 5–8 cm deep. For medium-rooted plants (tomatoes, peppers), 10–15 cm is ideal. For deep-rooted trees and shrubs, place sensors at 30 cm and 60 cm to capture the full root zone profile.
Q: My capacitive sensor gives erratic readings — what is wrong?
A: Common causes include: (1) power supply noise — add a 100nF decoupling capacitor between VCC and GND close to the sensor; (2) long cable runs — capacitive sensors are sensitive to cable capacitance, keep wires under 50 cm or use a shielded cable; (3) the sensor is touching the pot wall, introducing phantom capacitance.
Q: Is the capacitive sensor really accurate enough for precision farming?
A: Budget capacitive modules (₹150–₹400) achieve ±3–5% VWC after proper calibration — sufficient for irrigation triggers but not for scientific research. Professional-grade capacitive sensors like the Decagon 5TM achieve ±2% VWC but cost ₹8,000–₹15,000 each. For most hobbyist and small-farm applications, budget capacitive sensors are more than adequate.
Q: Can I use multiple soil sensors on one Arduino?
A: Yes. Each analog sensor requires one ADC pin. An Arduino Uno has 6 analog pins (A0–A5), so you can read up to 6 sensors simultaneously. For more sensors, use an MCP3008 SPI ADC expander (8 channels) or switch to an ESP32 which has 18 ADC channels.
Conclusion
The choice between capacitive vs resistive soil moisture sensors is clear once you understand the underlying physics. Resistive sensors are cheap and simple but corrode quickly and give inaccurate readings in fertilized soil. Capacitive sensors cost a bit more but offer superior accuracy, dramatically longer lifespan, and immunity to soil salinity — making them the right choice for any deployment beyond quick desktop prototyping.
For home garden automation, classroom projects, and proof-of-concept builds, start with a resistive sensor to keep costs low. Once you are ready to deploy outdoors or need reliable long-term data, upgrade to a capacitive sensor. The extra ₹100–₹200 investment pays for itself in avoiding sensor replacements and false irrigation triggers within the first growing season.
Ready to start your soil monitoring project? Zbotic stocks both types — browse our full range of soil moisture and environmental sensors to find the right module for your build.


Add comment