
The MG996R servo motor is one of the most popular high-torque servos in the maker and robotics community. With a stall torque of up to 13 kg-cm, metal gears, and a standardised three-wire interface, it bridges the gap between toy-grade servos and industrial actuators. Whether you are building a robotic arm, a pan-tilt camera mount, a hexapod, or an RC vehicle steering system, the MG996R delivers the muscle you need at an accessible price.
This guide covers everything: detailed specifications, wiring diagrams, Arduino control code, torque optimisation tips, common failure modes, and a curated list of high-torque project ideas. By the end you will know exactly when to choose the MG996R, how to wire it safely, and how to squeeze maximum performance out of it.
1. MG996R Specifications at a Glance
Before wiring anything, understanding the datasheet prevents costly mistakes. The MG996R is manufactured by TowerPro and cloned widely, so quality varies, but typical specifications are:
| Parameter | Value |
|---|---|
| Operating Voltage | 4.8 V – 7.2 V |
| Stall Torque (6 V) | 13 kg-cm (127.4 N-cm) |
| No-Load Speed (6 V) | 0.17 sec/60° |
| Gear Type | All Metal (brass/steel) |
| Rotation Range | 180° |
| PWM Frequency | 50 Hz |
| Pulse Width | 1000 µs – 2000 µs |
| Stall Current | ~2.5 A |
| No-Load Current | ~500 mA |
| Weight | 55 g |
| Dimensions | 40.7 × 19.7 × 42.9 mm |
| Connector | JR / Futaba compatible 3-pin |
The stall current of 2.5 A is the figure most beginners overlook. Powering the MG996R from an Arduino 5 V pin will immediately damage the board. Always use a dedicated power supply.
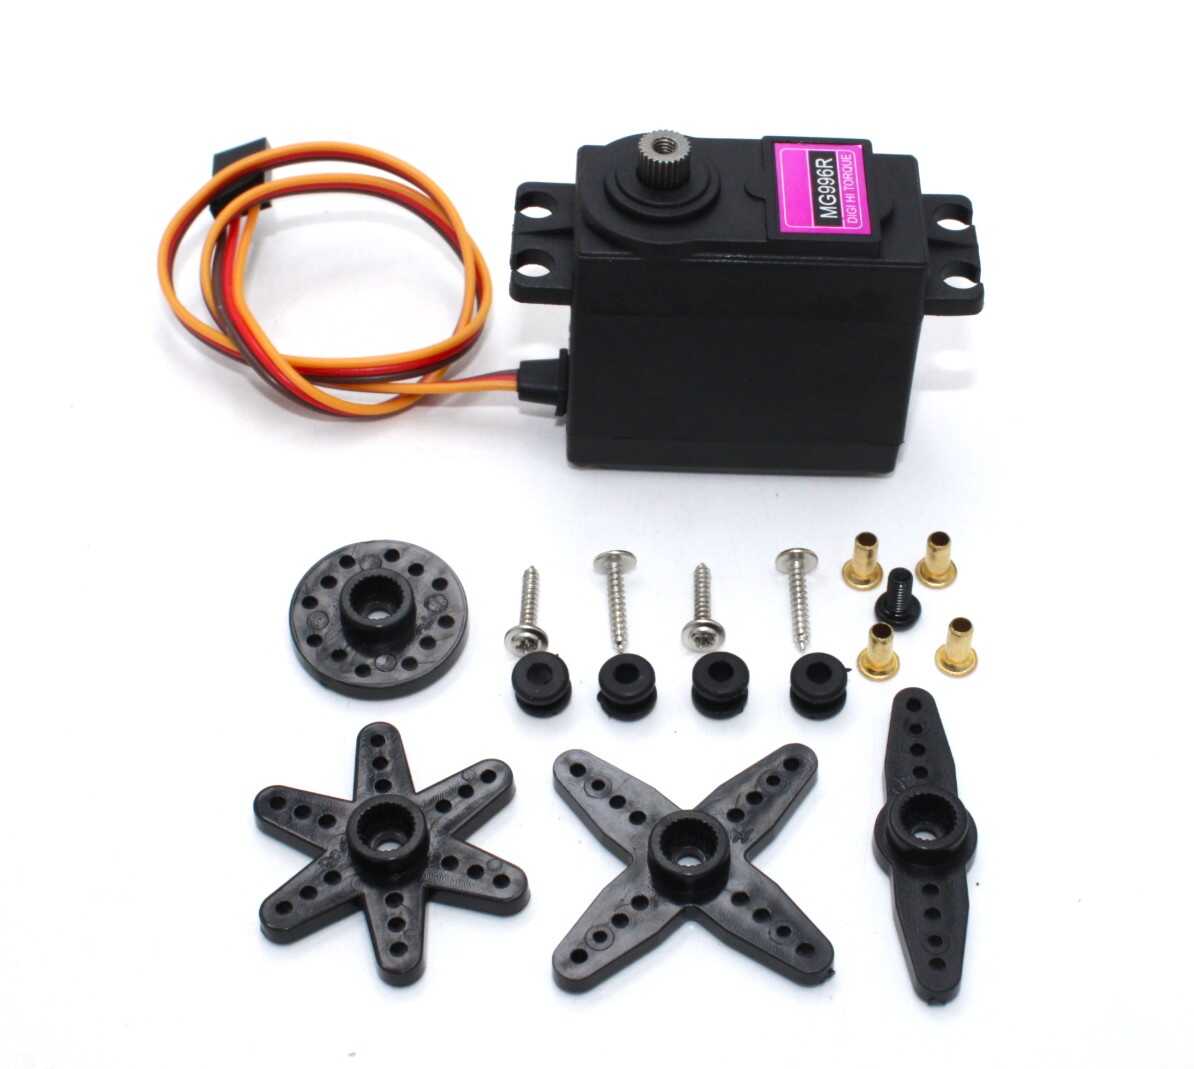
Servo MG996 13KG 180 Degree – High Quality
Metal-gear MG996R with 13 kg-cm torque, double ball bearings, and JR-compatible connector — ideal for robotic arms and RC vehicles.
2. MG996R vs SG90: Why Upgrade?
The SG90 is the classic entry-level servo — 9 g, plastic gears, 1.8 kg-cm torque. The MG996R weighs six times more and delivers seven times the torque. Here is a direct comparison to help you decide:
| Feature | SG90 | MG996R |
|---|---|---|
| Torque | 1.8 kg-cm | 13 kg-cm |
| Gear Material | Plastic | Metal |
| Weight | 9 g | 55 g |
| Bearings | 1 brass bush | 2 ball bearings |
| Stall Current | ~360 mA | ~2500 mA |
| Best For | Light linkages, flags | Arms, heavy steering |
Use the MG996R whenever your load exceeds 2 kg-cm or involves repeated, continuous actuation under load. Metal gears resist stripping far better than plastic.
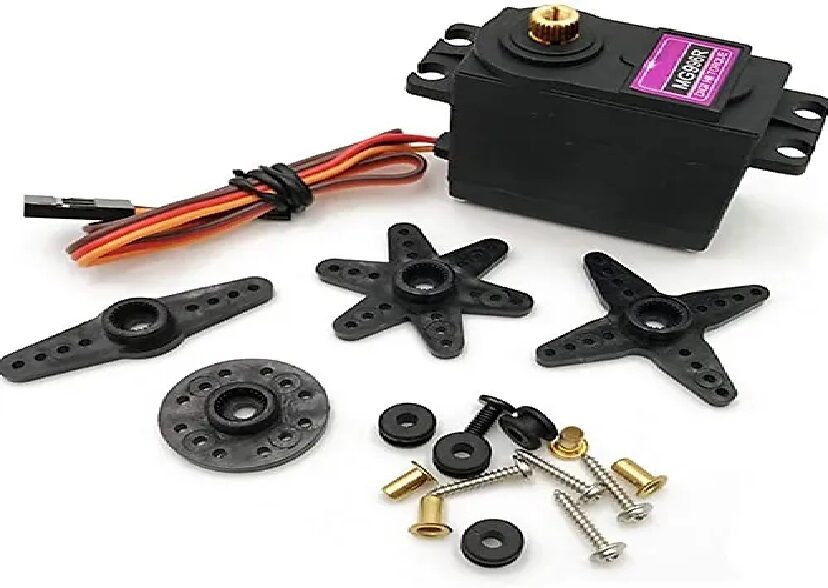
Servo MG996 13KG 180 Degree – Standard
Budget-friendly MG996R variant with 13 kg-cm torque, suitable for prototype builds and beginner robotics projects.
3. Wiring the MG996R to Arduino
The MG996R uses a standard three-wire JR connector:
- Brown wire — GND (common ground for both servo and Arduino)
- Red wire — V+ (4.8 V–7.2 V, from dedicated power supply NOT Arduino 5 V pin)
- Orange wire — Signal (PWM pin from Arduino, typically D9)
Critical wiring rule: Connect the servo power (red + brown) to an external 5 V or 6 V supply rated for at least 3 A. Connect the brown (GND) wire to both the external supply ground AND the Arduino GND pin — this creates a common ground reference essential for reliable signal communication. Never share the Arduino’s 5 V regulator with the servo.
If you run multiple MG996R servos (e.g., a hexapod with six servos), a dedicated BEC (Battery Eliminator Circuit) rated 5 V / 10 A+ is recommended. Alternatively, a LiPo 2S (7.4 V) battery with a step-down regulator to 6 V gives excellent performance.
4. PWM Control Explained
Servos are position-controlled using Pulse Width Modulation at 50 Hz (20 ms period). The position is encoded in the pulse width:
- 1000 µs (1 ms) → 0° (full counter-clockwise)
- 1500 µs (1.5 ms) → 90° (centre)
- 2000 µs (2 ms) → 180° (full clockwise)
The MG996R is tolerant of pulse widths from about 500 µs to 2500 µs in some clones, giving an extended range beyond 180°. However, pushing beyond the rated endpoints risks stripping gears or burning the motor windings. Stick to 1000–2000 µs for safe, repeatable operation.
The Arduino Servo library abstracts all of this, accepting angles in degrees (0–180) and internally generating the correct pulse width using Timer 1. This makes coding extremely straightforward.
5. Arduino Code for MG996R
Below are three progressively useful sketches to get you started.
5.1 Basic Sweep
#include <Servo.h>

Servo myServo;

void setup() {
  myServo.attach(9);  // Signal wire to D9
}

void loop() {
  for (int angle = 0; angle <= 180; angle++) {
    myServo.write(angle);
    delay(15);
  }
  for (int angle = 180; angle >= 0; angle--) {
    myServo.write(angle);
    delay(15);
  }
}
5.2 Serial-Controlled Position
#include <Servo.h>

Servo myServo;
int targetAngle = 90;

void setup() {
  Serial.begin(9600);
  myServo.attach(9);
  myServo.write(90);
  Serial.println("Enter angle (0-180):");
}

void loop() {
  if (Serial.available()) {
    targetAngle = Serial.parseInt();
    targetAngle = constrain(targetAngle, 0, 180);
    myServo.write(targetAngle);
    Serial.print("Moving to: ");
    Serial.println(targetAngle);
  }
}
5.3 Smooth Movement with Easing
#include <Servo.h>

Servo myServo;

void smoothMove(Servo &servo, int fromAngle, int toAngle, int stepDelay) {
  int step = (toAngle > fromAngle) ? 1 : -1;
  for (int a = fromAngle; a != toAngle; a += step) {
    servo.write(a);
    delay(stepDelay);
  }
  servo.write(toAngle);
}

void setup() {
  myServo.attach(9);
  myServo.write(90);
  delay(500);
}

void loop() {
  smoothMove(myServo, 90, 0,   10);
  delay(500);
  smoothMove(myServo, 0,  180, 10);
  delay(500);
  smoothMove(myServo, 180, 90, 10);
  delay(1000);
}
The smooth movement sketch is especially useful for robotic arms and camera gimbals where abrupt motion would cause mechanical shock or blurry footage.
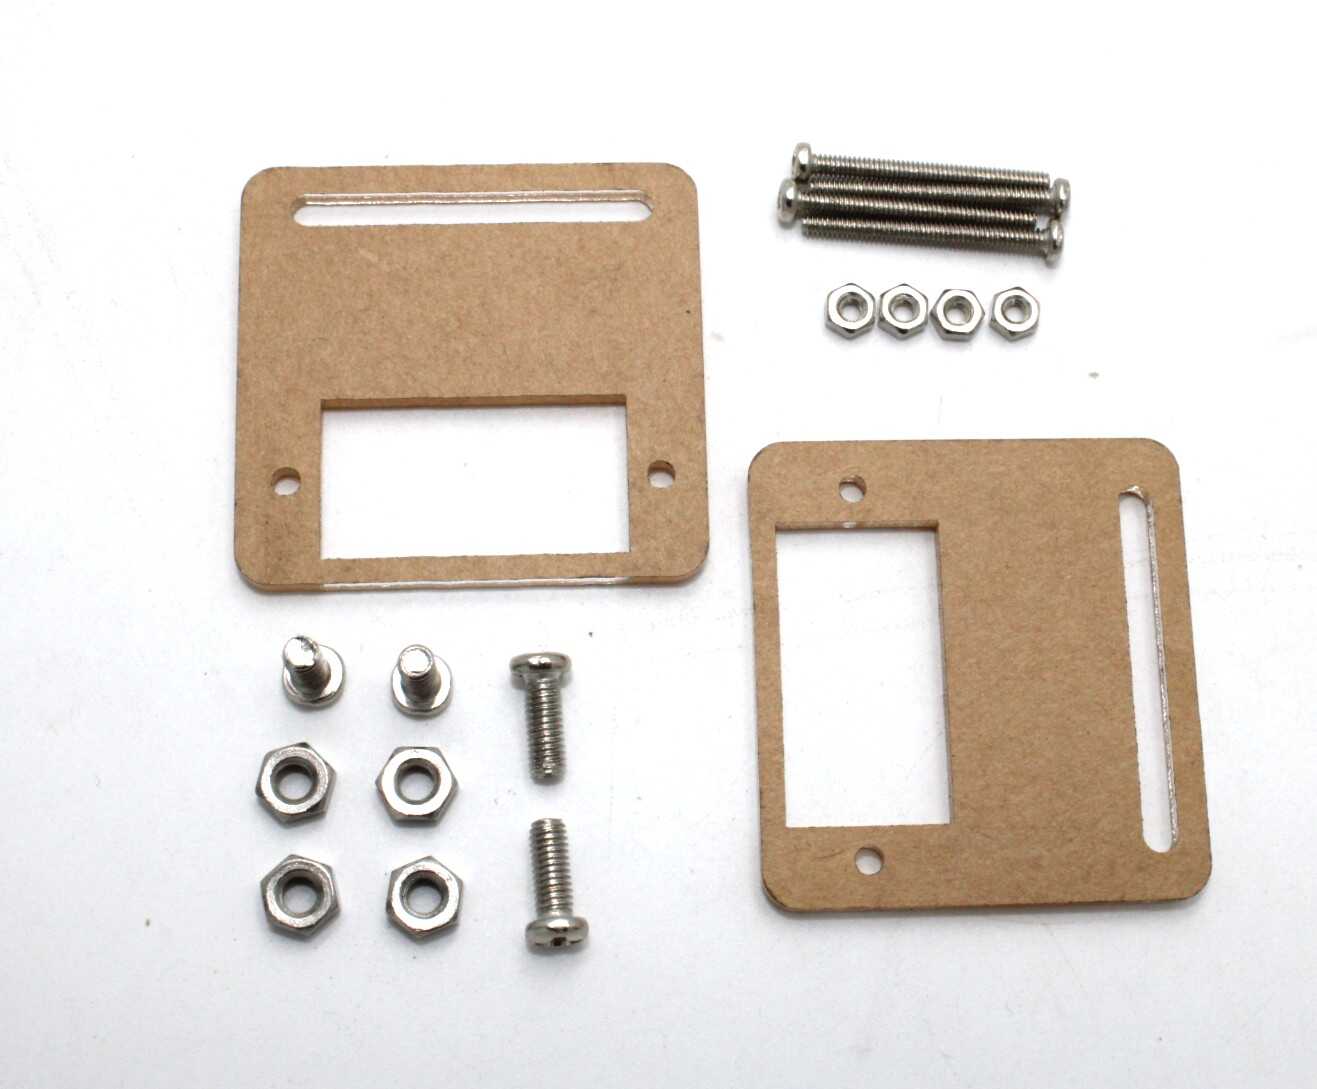
Servo Mount Holder Bracket for SG90/MG90 (Pack of 2)
Sturdy aluminium brackets for mounting MG996R servos in pan-tilt rigs, robotic joints, and gripper assemblies.
6. Power Supply Requirements
Getting the power supply right is the single most important factor in MG996R reliability. Here is a practical guide:
Single Servo
A 5 V / 3 A USB power adapter or a 6 V battery pack (4 × AA NiMH = 4.8 V; 4 × alkaline = 6 V) works well. A 2S LiPo (7.4 V) with a 6 V BEC is ideal for RC applications.
Multiple Servos
Multiply the number of servos by 3 A for peak current headroom. Six MG996R servos need at least 18 A peak capacity. A dedicated servo power distribution board with bulk capacitors (2200 µF–4700 µF across VCC/GND) suppresses voltage spikes from motor back-EMF.
Decoupling Capacitors
Place a 100 µF electrolytic capacitor close to each servo connector. This absorbs inrush current spikes that would otherwise reset the microcontroller or corrupt I2C/SPI communication.
7. High-Torque Project Ideas
7.1 Robotic Arm (4-DOF)
A four-degree-of-freedom desktop arm using four MG996R servos can lift 300–500 g payloads with a 20 cm reach. Assign one servo to the base rotation (supports full arm weight), one to the shoulder, one to the elbow, and one to the wrist. Use aluminium channel extrusions or 3D-printed PLA links for the skeleton.
7.2 Pan-Tilt Camera Gimbal
Two MG996R servos form a robust pan-tilt system for a full-frame DSLR camera or a security camera weighing up to 800 g. Feed pan/tilt angles from an MPU6050 IMU for a self-stabilising gimbal.
7.3 RC Vehicle Steering
In 1:8 or 1:10 scale RC cars, the stock servo is often underpowered. Replacing it with an MG996R gives crisp, reliable steering at high speeds. Connect the signal wire to an RC receiver channel or an Arduino running a remote control sketch over RF modules.
7.4 Hexapod Walking Robot
Eighteen MG996R servos (three per leg × six legs) create a fully articulated hexapod. Each leg needs hip, knee, and ankle joints. Power the entire servo array from a 3S LiPo (11.1 V) through a 6 V / 20 A BEC.
7.5 Automated Door Lock
A single MG996R with a custom horn drives a deadbolt or latch mechanism. Trigger via Bluetooth (HC-05 module + Arduino) or an RFID reader (MFRC522). The 13 kg-cm torque is more than sufficient for standard interior locks.
7.6 Animatronics and Puppet Control
Mouth, eye, and head-turn mechanisms in animatronic props and puppets demand smooth, high-torque actuation. MG996R servos controlled by a PCA9685 16-channel PWM driver over I2C allow synchronised multi-servo choreography from a single Arduino.
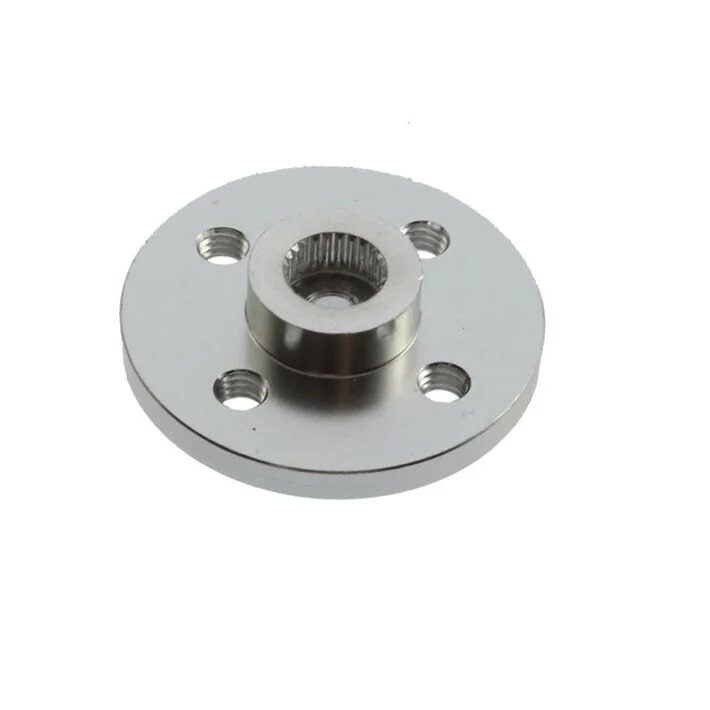
Aluminum Servo Horn/Arm 25T Round Disc – MG995/MG996
25T aluminium servo disc compatible with MG996R spline — stronger than plastic horns, essential for high-torque mechanisms.
8. Mounting and Mechanical Tips
Use the right servo horn: The MG996R output shaft has a 25T (25-tooth) spline. Always pair it with a 25T metal or reinforced nylon horn. Avoid plastic horns on high-load joints — they strip under torque spikes.
Centre before assembly: Power the servo and command 90° before attaching the horn. This ensures your mechanical range is symmetrically aligned with the servo’s electrical range, preventing end-stop collisions.
Isolate vibration: Mount the servo body in rubber grommets when used in applications with motor vibration (RC cars, drones). Vibration fatigues the internal potentiometer and causes drift.
Avoid side loads: MG996R bearings support axial loads well but are vulnerable to radial side loads. Design linkages to apply force along the rotation axis. A secondary support bearing for the horn shaft eliminates side loading entirely in heavy builds.
Lubricate the gearbox: For continuous duty applications, apply a small amount of white lithium grease to the metal gears every few months. This significantly extends gear life.
9. Troubleshooting Common Issues
Servo Jitters or Oscillates at Rest
Cause: noisy PWM signal or power supply ripple. Fix: add a 100 µF capacitor across VCC/GND, ensure PWM signal wire is less than 30 cm, and use shielded cable if near high-current wiring.
Servo Does Not Move
Cause: insufficient supply voltage (below 4.5 V). Fix: check supply voltage under load with a multimeter. Voltage should stay above 4.8 V even when the servo stalls.
Servo Moves to Wrong Position
Cause: pulse width out of range or servo library not calibrated. Fix: use myServo.writeMicroseconds(1500) to command centre directly in microseconds, bypassing library mapping errors.
Servo Gets Very Hot
Cause: mechanical stall — the servo is fighting a load it cannot overcome. Fix: reduce load, increase mechanical advantage, or upgrade to a higher-torque servo. Prolonged stall will burn the motor windings.
Stripped Gears
Cause: exceeding torque limit, physical impact, or shock load. Fix: replace the gear set (metal gear kits for MG996R are widely available) or replace the servo. Always add soft end-stops in software using constrain().
Frequently Asked Questions
Can I power the MG996R from an Arduino Uno’s 5 V pin?
No. The Arduino Uno’s onboard regulator is rated 500 mA maximum. The MG996R draws up to 2.5 A at stall, which will immediately damage the regulator. Always use a separate power supply and share only the ground reference with the Arduino.
What is the difference between MG996R and MG995?
The MG996R is an updated version of the MG995 with a slightly revised gearbox and improved ball bearing arrangement. Both share the 25T spline and similar 13 kg-cm torque rating. MG996R is generally preferred for new designs due to wider availability.
Can the MG996R do continuous 360° rotation?
Not in standard form. It is a positional servo with an internal mechanical stop at 180°. Continuous rotation requires physically removing the end-stop tab and disabling the internal potentiometer feedback loop — this is a common mod but voids reliability guarantees.
How many MG996R servos can one Arduino control?
The Arduino Servo library supports up to 12 servos on most boards (48 on Arduino Mega). However, all 12 share the microcontroller’s timer, and the real limit is power delivery. Use a PCA9685 I2C PWM driver to expand to 16 channels with hardware-generated PWM for best accuracy.
What voltage gives the best MG996R performance?
6 V is the sweet spot — it delivers the rated 13 kg-cm torque and 0.17 sec/60° speed without significantly stressing the motor. At 4.8 V torque drops to about 9.4 kg-cm. Avoid exceeding 7.4 V continuously as it reduces motor lifespan.
Is the MG996R suitable for outdoor use?
The standard MG996R has no IP rating and is not waterproof. For outdoor/RC boat use, coat the internals with conformal coating spray and seal the servo body with silicone grease. Specialist waterproof servo variants exist for demanding environments.
Conclusion
The MG996R servo motor remains an outstanding choice for any maker project demanding reliable, high-torque actuation at a reasonable price. Its metal gears, double ball bearings, and 13 kg-cm torque rating make it capable of powering everything from desktop robotic arms to full hexapod walkers and RC vehicle steering systems. The key to long-term success is proper power supply sizing, correct mechanical integration with the 25T spline, and protecting the servo from mechanical stall in software.
Follow the wiring guide, use the Arduino code samples as a starting point, and apply the mechanical tips to build projects that run reliably for thousands of duty cycles. Explore the MG996R servo and all accessories available at Zbotic to get your high-torque project moving today.


Add comment