
An Automated Guided Vehicle (AGV) is a mobile robot that follows a defined path — a painted line, magnetic strip, or virtual waypoint — to transport materials without human intervention. AGVs are the backbone of modern warehouses, automotive factories, and hospital logistics. In this guide you’ll understand the core AGV concepts and build a working Arduino-based AGV prototype from scratch using components available in India. This is the perfect starting point before scaling to industrial-grade systems.
What Is an AGV? Types & Industrial Use
AGVs were invented in the 1950s and have evolved dramatically. Today they move millions of tonnes of goods daily in facilities like Amazon fulfilment centres, automotive paint shops, and airport baggage handling systems. The core principle has remained constant: a vehicle that knows where to go without a driver.
Common AGV guidance methods:
- Optical/Line Following: Infrared or camera sensors track a painted line or tape on the floor. Cheapest to implement — ideal for prototypes.
- Magnetic Tape/Strip: Hall-effect sensors follow embedded magnetic strips. More reliable in dusty environments.
- Laser Triangulation: Reflective targets placed around the facility; laser rangefinder calculates position by triangulation.
- Natural Feature Navigation: LiDAR or cameras map the environment without any floor markers — the AMR approach.
- RFID/QR Code: Tags embedded in the floor tell the vehicle its exact position at intervals.
Industrial AGV types: tugger AGVs (pull carts), unit load carriers (carry pallets), forklift AGVs, and assembly-line followers. Our prototype falls into the unit-load carrier category, scaled down for a desktop/lab environment.
AGV vs AMR — Key Differences
It’s common to confuse AGVs with AMRs (Autonomous Mobile Robots). Here’s the practical distinction:
| Feature | AGV | AMR |
|---|---|---|
| Navigation | Fixed path (line/magnet) | Free navigation (SLAM) |
| Obstacle handling | Stop & wait | Reroute dynamically |
| Infrastructure | Requires floor markers | Marker-free |
| Cost | Lower | Higher |
| Flexibility | Low (fixed routes) | High (dynamic routes) |
For most warehouse applications with fixed workflows, AGVs are still preferred due to lower cost and higher reliability. AMRs shine in dynamic environments with frequently changing layouts.
Hardware BOM for Arduino AGV Prototype
This build uses widely available, low-cost components. Total cost is approximately ₹2,500–₹4,000 depending on sourcing.
- Microcontroller: Arduino Uno R3 or Mega 2560
- Chassis: 2WD or 4WD robot car chassis kit
- Motors: 2× or 4× TT DC gear motors (included with chassis kits)
- Motor Driver: L298N dual H-bridge module
- Line Sensors: 5-channel IR sensor array (TCRT5000-based)
- Obstacle Sensor: HC-SR04 ultrasonic module
- Power: 7.4V 2S LiPo or 4×AA battery holder
- Indicator LEDs: Red/green LEDs for status display
- Miscellaneous: jumper wires, breadboard, 3D-printed or acrylic mounts
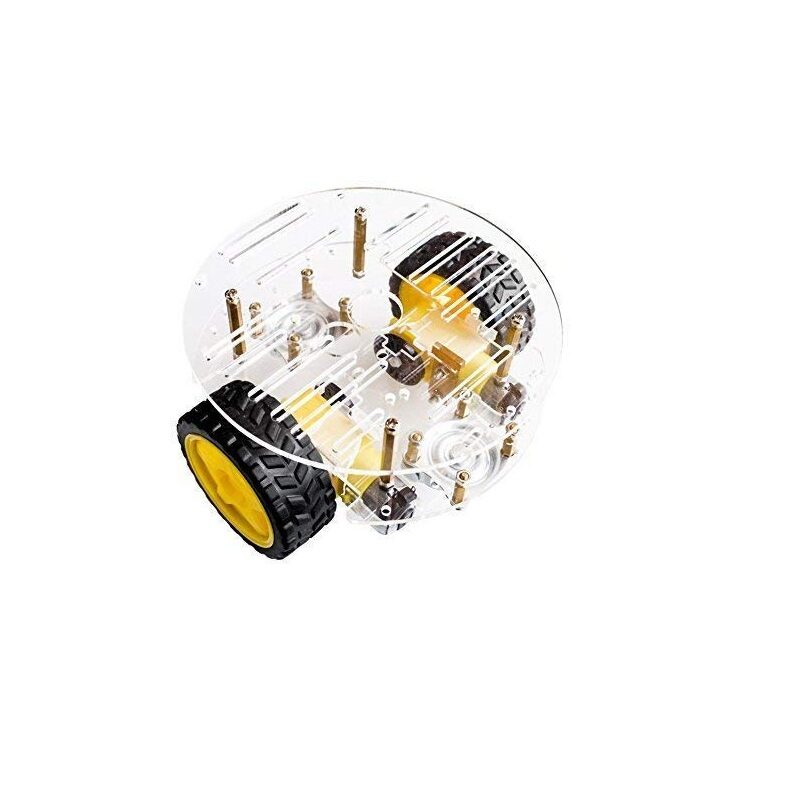
2WD Mini Round Double-Deck Smart Robot Car Chassis DIY Kit
Compact 2WD chassis with dual-deck design — perfect base for your AGV prototype. Includes motors, wheels, and hardware for a complete mechanical foundation.
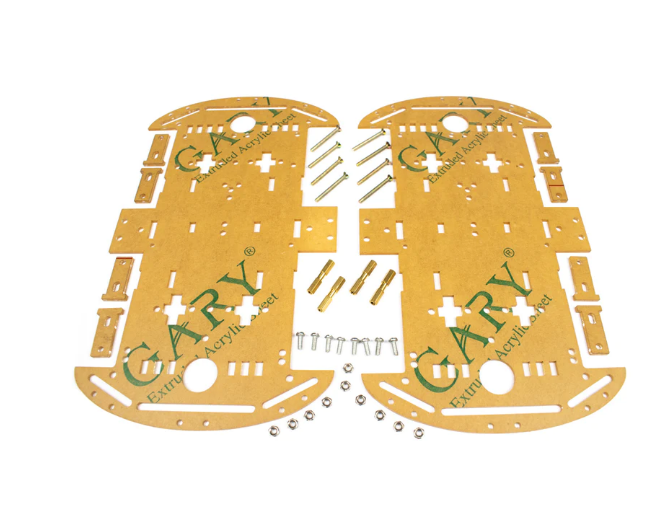
4 Wheels Car Chassis Acrylic Frame
Sturdy 4-wheel acrylic chassis — more stable for heavier payloads and better suited to carry sensors and electronics for your AGV build.
Line-Following Navigation: IR Sensors & PID Control
Line following is the simplest AGV navigation method. A black line (15–20mm wide electrical tape) is laid on a white floor. IR sensor pairs emit infrared light; black tape absorbs it (sensor reads HIGH on most modules), white floor reflects it (sensor reads LOW).
A 5-channel sensor array gives you weighted position feedback. Assign weights [-2, -1, 0, 1, 2] to the five sensors left-to-right. The weighted average of activated sensors gives an error signal:
int weights[] = {-2, -1, 0, 1, 2};
int error = 0;
int sum = 0;
for (int i = 0; i < 5; i++) {
  if (sensorRead(i)) {
    error += weights[i];
    sum++;
  }
}
if (sum > 0) error /= sum;
Feed this error into a PID controller for smooth following:
float Kp = 25, Ki = 0.01, Kd = 15;
float P = error;
I += error;
float D = error - lastError;
float correction = Kp*P + Ki*I + Kd*D;
lastError = error;

int leftSpeed  = BASE_SPEED + correction;
int rightSpeed = BASE_SPEED - correction;
leftSpeed  = constrain(leftSpeed,  0, 255);
rightSpeed = constrain(rightSpeed, 0, 255);
Start with Kp only, then add Kd to dampen oscillation. Ki is rarely needed for line followers.
Obstacle Detection with Ultrasonic Sensors
Safety is non-negotiable in any AGV. The HC-SR04 ultrasonic sensor measures distance using time-of-flight of 40kHz sound pulses. Mount it at the front of the chassis, angled slightly downward to avoid false readings from walls above the floor.
long getDistance() {
  digitalWrite(TRIG, LOW); delayMicroseconds(2);
  digitalWrite(TRIG, HIGH); delayMicroseconds(10);
  digitalWrite(TRIG, LOW);
  long duration = pulseIn(ECHO, HIGH, 30000); // 30ms timeout
  return duration * 0.034 / 2; // cm
}

// In main loop:
if (getDistance() < STOP_THRESHOLD) {
  stopMotors();
  // Wait until clear
  while (getDistance() < STOP_THRESHOLD) delay(100);
  resumeFollowing();
}
Set STOP_THRESHOLD to 20–30 cm for lab environments. In production, AGVs use multiple sensor zones (warning, slow, stop) with laser scanners for 360° coverage.
Motor Driver & Drive System
The L298N dual H-bridge handles two DC motors up to 2A each, powered from 7–35V. Wire it as follows:
- ENA, ENB → Arduino PWM pins (for speed control)
- IN1/IN2 → Left motor direction
- IN3/IN4 → Right motor direction
- 12V → Battery positive
- GND → Battery negative + Arduino GND (shared ground is essential)
- 5V out → Arduino 5V (if jumper installed, max 1A draw)
ACEBOTT ESP32 Tank Robot Car Expansion Pack (QD001–QD004)
ESP32-powered robot expansion pack with integrated motor control — upgrade your AGV prototype to WiFi-enabled remote monitoring and web dashboard control.
Complete Arduino Sketch Overview
The full sketch has three states managed by a simple state machine:
- FOLLOWING: PID line follower active, obstacle sensor polling every 50ms
- STOPPED: Obstacle within threshold — motors off, LED red
- JUNCTION: All sensors read black (junction/crossing) — execute preset turn or continue straight based on junction counter
enum State { FOLLOWING, STOPPED, JUNCTION };
State state = FOLLOWING;

void loop() {
  switch(state) {
    case FOLLOWING:
      followLine();
      if (getDistance() < STOP_DIST) state = STOPPED;
      if (allSensorsBlack()) state = JUNCTION;
      break;
    case STOPPED:
      stopMotors();
      if (getDistance() >= STOP_DIST) state = FOLLOWING;
      break;
    case JUNCTION:
      handleJunction();
      state = FOLLOWING;
      break;
  }
}
For more complex routes, store a route map in EEPROM or receive instructions over Bluetooth/WiFi from a fleet management system.
Scaling Up: From Prototype to Real AGV
Your Arduino prototype validates the concept. Scaling to a real AGV means:
- Higher payload: Replace TT motors with 24V brushless DC motors + planetary gearboxes.
- Better navigation: Magnetic tape + Hall sensor array (or laser triangulation) for sub-millimetre accuracy.
- Safety: Laser scanner safety zones (SICK S300 or similar), E-stop button, safety relay circuit.
- Fleet management: Central server tracks all AGVs, assigns tasks, manages traffic at intersections.
- Communication: Industrial Wi-Fi (802.11ac) or DECT for reliable factory-floor comms.
- Power: Swappable battery packs or automatic inductive charging stations.

ACEBOTT ESP32 Basic Starter Kit (QE201)
Complete ESP32 starter kit with sensors and expansion modules — ideal for adding WiFi-based fleet communication and OTA updates to your AGV prototype.
Frequently Asked Questions
What is the difference between an AGV and a conveyor?
A conveyor is fixed infrastructure that moves items along one path. An AGV is a flexible, mobile unit that can serve multiple pick/drop points and be re-routed by software without physical infrastructure changes.
Can an Arduino AGV handle RFID waypoints?
Yes. An RC522 RFID module connected to Arduino can read tags embedded in the floor at junctions, allowing the AGV to know exactly which junction it is at and make routing decisions accordingly.
What is the maximum speed for an AGV prototype?
For safe indoor lab operation with a line-follower, keep speed below 0.3 m/s. PID tuning becomes critical at higher speeds and the sensors may struggle to read at very high velocities.
Is this project suitable for a college mini-project?
Absolutely. An Arduino AGV prototype is an excellent final-year or mini-project for ECE, EEE, and Mechatronics students. The line-following + obstacle detection combination demonstrates real industrial concepts in a compact build.
Where can I get AGV components in India?
Zbotic.in stocks chassis kits, motor drivers, sensor modules, and ESP32/Arduino boards with fast delivery across India — all the components you need to build your AGV prototype without import hassles.
Build Your AGV Prototype Today
All the components for your Arduino AGV — chassis kits, motor drivers, sensors, and ESP32 boards — are in stock at Zbotic.in. Fast delivery across India, genuine components, and expert support for your robotics project.


Add comment